Jenn-Air Wall Oven Hinges

Jenn-Air Appliance Parts

Popular Jenn-Air Wall Oven Hinges

Your Price
$98.46
  In Stock
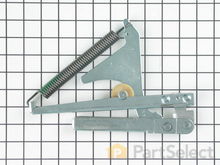
Jenn-Air Wall Oven Door Hinge
★★★★★
★★★★★
21 Reviews
PartSelect Number PS11744215
Manufacturer Part Number WP74008014
The hinges control the rate that the oven door opens and closes, and allows the door to stay open at an angle. This hinge can be used on either the left or right hand side of your oven, and is approximately 20 1/2 inches long. If your oven door will not open or close easily, you may need to replace this part. It may be a good idea to replace both hinges at the same time. If a spring has become loose on one hinge, the other hinge is likely to have the same issue. The repair is simple and only requires a Phillips screwdriver and a small bent nail. For a full step-by-step guide, check out the video below.
Fixes these symptoms
Installation Instructions
William from Statesville, NC
Oven door wouldn't close completely
Parts arrived in three days and it was an easy swap of the hinges but the same problem still existed: the oven door wouldn't close completely, so the oven light stayed on and the convection wouldn't work either unless the door closed all the way. The replacement hinge's springs apparently aren't strong enough to close it and the springs aren't adjustable - which is a design flaw. I did correct the problem though, by using three dollars worth of 1" round magnets, which I placed inside the door: they stay put and are strong enough to pull the door tight. Read more...
Your Price
$89.16
  In Stock
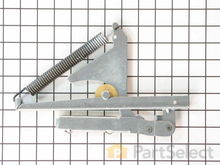
Jenn-Air Wall Oven Door Hinge - Left or Right Side
★★★★★
★★★★★
1 Review
PartSelect Number PS11744384
Manufacturer Part Number WP74010283
As per the manufacturer, when replacing the hinge, they recommend to also replace the hinge receptical also knows as the bracket. See related parts.
Fixes these symptoms
Installation Instructions
MICHELLE from IMPERIAL, MO
Door would not close tight - light would stay on.
Replaced the hinges, the appliance never really shut 100% and after several year it got worse. Now it is perfect and we don't have any problem with heat up time of oven, used to take extra long to get to desired temp. Should have sent it back in the beginning. Read more...
Your Price
$92.41
  In Stock
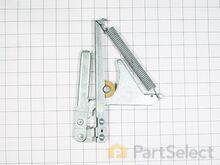
Jenn-Air Wall Oven Door Hinge
★★★★★
★★★★★
8 Reviews
PartSelect Number PS2080677
Manufacturer Part Number 74001984
This door hinge is a genuine OEM replacement part for your wall oven. Replacing this part will require partially removing your oven from the wall, to access the hinge. This part contains one hinge, although it is recommended to replace both at the same time. You will need a Phillips screwdriver to unscrew the hing assembly and install the new one.
Fixes these symptoms
Installation Instructions
Berit from PLANO, TX
Spring broke on door hinge
Turn off power,Lift up and remowe owen door.undo srews that holds owen to cabinet,pull owen out 7 inc.A second person needs to hold owen so it wont tip out.Remove plates on each side so you can see the hinges,romove screws that hold hingesin place,Remove old hinges place new hingesfrom this site .Secure all screws.Put owen door back.done. Read more...
Your Price
$98.03
  In Stock
Jenn-Air Wall Oven Door Hinge - Left or Right Side
★★★★★
★★★★★
6 Reviews
PartSelect Number PS11744424
Manufacturer Part Number WP74011141
This hinge can be used for either the left or the right side of the oven door. Sold individually.
Fixes these symptoms
Installation Instructions
Lar from Cary, NC
Oven Door hinge broke
0. Throw oven circuit breaker 1. Open oven door and slide/lift door off of hinge posts 2. Remove oven drawer 3. Slide oven out from between cabinets and turn so that the back is accessible. 4. remove Phillips screws holding the cover-rear and side panel to the stove. Note which screws have pan heads and which are hex head. 5. remove stove elements and pans 6. Raise stove Top Assembly and release ceramic element sockets from their clips. 7. Push the supports for the Top Assembly fornt and back to release them from their sockets so that the Top Assembly can be lifted to near vertical. 8. Remove the hex head screw holding the Control Panel End Cap to the side panel. (Steps 5-7 might be avoided if you have a small socket wrench that can get to this screw without removing the elements.) 9. Remove the other screws holding the top of the side panel to the "Box Burner" pan that sits under the Top Assembly. 10. Pull side panel slightly away from the oven and lift it to disconnect it from the posts that hold the side panel to the front of the oven. 11. Remove the two screws on the front of the oven that hold the hing mechanism. 12. tilt and remove the hinge. 13. Open the replacement hinge so that it can fit through the hinge opening in the front of the oven. 14. Reassemble. Read more...
Your Price
$74.90
  In Stock
Jenn-Air Wall Oven Door Hinge - Left or Right Side
★★★★★
★★★★★
3 Reviews
PartSelect Number PS11744385
Manufacturer Part Number WP74010284
Fixes these symptoms
Installation Instructions
Daniel from Rochester Hills, MI
Oven door would not close tightly.
DOOR HINGE: Lifted the door out of place and layed it on the floor. Removed the six screws (three on top and three on bottom) from the door to remove the front panel exposing the hinges. Removed three screws from each hinge to remove them. Reversed the process to complete. HINGE BRACKET: Would recommend replacing these with hinges. After removing the screws that hold the oven in I pulled the oven out about four inches. Brackets are now easily removed and replaced, two screws each. Slide the oven back resecure and your done. DOOR GASKET: Just pulled it out and snapped in the new. Read more...
Your Price
$29.48
  In Stock
Jenn-Air Wall Oven Hinge Bracket - Left or Right Side
PartSelect Number PS11744444
Manufacturer Part Number WP74011337
This part is the replacement hinge bracket for your microwave. It is made of metal and is approximately 8 inches long and 1 inch wide. The hinge bracket can also be known as the door hinge receiver or the hinge receptacle. The hinge bracket connects the over door hinge to the oven front frame. If you are unable to close your microwave door properly, or if you notice the bracket is damaged, you may need to replace it. This part is a genuine OEM part and is sourced directly from the manufacturer.
Fixes these symptoms
Installation Instructions
Daniel from Rochester Hills, MI
Oven door would not close tightly.
DOOR HINGE: Lifted the door out of place and layed it on the floor. Removed the six screws (three on top and three on bottom) from the door to remove the front panel exposing the hinges. Removed three screws from each hinge to remove them. Reversed the process to complete. HINGE BRACKET: Would recommend replacing these with hinges. After removing the screws that hold the oven in I pulled the oven out about four inches. Brackets are now easily removed and replaced, two screws each. Slide the oven back resecure and your done. DOOR GASKET: Just pulled it out and snapped in the new. Read more...
Your Price
$104.79
  In Stock
Jenn-Air Wall Oven HINGE
PartSelect Number PS2080598
Manufacturer Part Number 74001856
Installation Instructions
Joseph from New Windsor, NY
Replaced a broken hinge.
The repair was easy. The door pulls off the hinges without any tools. I had to remove four screws ihat held the wall oven in place. I then removed approximately eight trim screws to expose the two screws holding the hinge in place.I then needed to utilize a nut driver to put the screws in the new hinges because the screws cut threads into the hinge as you put them in so they are a little tight and the nut driver makes this step easier. Read more...
Your Price
$57.67
  In Stock
Jenn-Air Wall Oven Bracket
★★★★★
★★★★★
1 Review
PartSelect Number PS11744216
Manufacturer Part Number WP74008015
Installation Instructions
Page from Concord, MA
Display was unreadable and doors didn't close
NOTE: I had a repair person try to fix the door problem and he only replaced the HINGES. You need to replace both the HINGES and the HINGE RECEPTACLES to fix the door problem.

INSTALLING the clock assembly:

First I went to the electrical breaker box and turned off the power to my double oven. Then I removed the screws that hold the oven to the wall and pulled the oven out about 5 inches. I removed the cover for the controls at the top of the oven - the clock assembly is attached to the cover - several connectors need to be unplugged to remove the cover. I put the cover on my counter and unscrewed the four screws (with nutdriver) that hold the clock in place. I unclipped the control cable (flat with embedded wires) and took out the old clock. I reversed these steps to put in the new clock. I then held the cover up to the oven and reconnected the connectors to the rest of the oven, I hooked the cover back in place.

Replacing the hinge receptacles:
I opened the oven doors and removed the hinge covers (just over the hinge itself that keep the door from falling off) and lifted the doors off of the oven. Next went to the side of the oven and removed all the lag screws that attach the hinge receptacles to the oven body (you may need to remove the trim around the oven in the process as they may be too hard to get out otherwise). I put each of the four new hinge receptacles back in place and screwed in all the screws I took out before. I put the oven doors back on and replaced the hinge covers.

The oven works perfectly!! Hurray!
Read more...
Your Price
$9.59
  Special Order
Jenn-Air Wall Oven Hinge Pin
PartSelect Number PS1643212
Manufacturer Part Number 7113P002-60
Sold individually.
Installation Instructions
TONY from ROCKMART, GA
Hinge Was Broken On Rt Side And Pin Missing
Oven door is the removable type, so once removed the problem with the door was revealed. Metal on the bottom of the hinge had broken off where the hinge attaches to the pivot point on the oven door. The oven was pulled out a few inches from the cabinet and a cable attached to the top of the hinge and a spring on the rear of the oven was detached to remove old hinge. New hinge was installed and I was left with the task of attaching the spring cable. With an old piece of electrical wire, I formed a loop and reached back to the area where the spring was located. Then looped the spring with the wire and pulled forward which made it's attachment very easy. Pushed oven back into place and slid door back on hinge. Pretty easy with a little bit of help from an old piece of wire. Read more...

Related Jenn-Air Wall Oven Parts