Your coupon for will be reflected when you check out!
✖
Your coupon for
✖
Hello!
You're visiting the PartSelect site in U.S.
Would you like to shop on the Canadian site?
Stay on this site
Go to Canadian site
✖
Model Number Locations
1Select Category Type
Select Category Type
2Select Product Type
Select Product Type
3Select {MODEL} Type
Select {MODEL} Type
Sample Model Number Tags
Model numbers can be made up of numbers (1005400, for example) or a combination of letters and numbers (LAT1000AAE). The model number will most likely appear on either a paper sticker or a metal plate. Your appliance's model number tag may look similar to the sample model number tags shown here (model number highlighted in yellow):
Model has been saved to My Models. If you're not signed in, your lists are available on this device and will expire within 30 days.
Model has been saved to My Models.
This an authentic OEM 40-Watt replacement light bulb, used in a number of household appliances. It is specially designed to withstand extreme temperatures, which is why these replacement bulbs are mos...
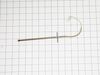
This is a leveling leg for your oven, range, or stove. The leveling legs on your oven allow your appliance to sit perfectly flat. The new one may be longer in length than your original, but will work...
This oven rack is chrome in color and is approximately 24.76 inches wide by 15.78 inches deep. If your old oven rack is damaged, you should consider replacing it. Many of our customers have determined...
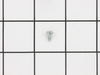
This is a multi-use and multi-appliance screw. It can be used on a microwave, refrigerator, range/oven, air conditioner, dehumidifier, washer, or dryer. The measurements of this screw are 8 x 1/2 inch...
This gas range oven igniter is a flat-style component designed to initiate the heating process by glowing and igniting the gas for the bake burner. Essential for proper oven function, it ensures consi...
This touch-up paint can be used on a wide variety of household appliances. It is most often used on washers, dryer, refrigerators, dishwashers, ranges, freezers, trash compactors, or microwaves. It is...
This is cookware designed for use in your range or oven. It is a two-piece dish that is used to grill or cook food while the broil function is on, meaning it can withstand high temperatures. This set ...
This bottle of non-abrasive cooktop cleaner breaks down and gets rid of the hardest baked-on stains and residue without causing any harm to your appliance. The bottle is 10 oz and does not require a l...
No Longer Available
Questions And Answers for WGG745S0FS02
Ask our experts a question about this model and we'll get back to you as soon as possible!
2 questions answered by our experts.
Sort by:
< Prev
1
Next >
Search filter:
Clear Filter
Your search term must have 3 or more characters.
Keep searches simple. Use keywords, e.g. "leaking", "pump", "broken" or "fit".
Sorry, we couldn't find any existing answers that matched.Try using some different or simpler keywords, or submit your new question by using the "Ask a Question" button above!
Todd
January 7, 2025
I have a whirlpool wgg745sofs02 stove and the upper oven won't work when I try to "Bake". The broiler works but the Bake function does not work. I replaced the ignitor but it still does not Bake. When I turn it on and test for an electric current going to the ignitor I get no reading. So, maybe it's an issue getting power to the ignitor. What should I check next to see if I can get it to work?
For model number WGG745S0FS02
Hi Todd, thank you for reaching out. Inspect the wiring connections between the control board and the ignitor. Look for any loose, damaged, or corroded wires that might be preventing power from reaching the ignitor. If they are fine, the issue could be with the oven control board, part number PS11759748. It is responsible for sending power to the ignitor. You may need to replace it to fix the issue. We hope this sorts out your problem!
I need to order the conversion kit to go from natural to propane gas. Unfortunately it did not come with one. The store we bought it from refused to stand by their sale. What should I do? How do I get one?
For model number WGG745S0FS02
Hi Crystal, thank you for getting in touch. According to our research, the part you are looking for is the liquid propane conversion kit, part number PS11756611. We hope this information is useful!
I numbered every part. ex: 1 L., for first part removed left side. I used a magic marker to circle the holes and wrote the number of screws used on the part, set the srews in a separete place, so that I new where these screws went to. The cleanup was pretty time consuming, but I was able to keep my stove, when every repairman I called to
... Read more fix my stove told me I was better off buying a new stove. ($600.00 stove 2 years old)Please Note: The insulation blanket needed for the entire stove is two pieces, the sides and top are one part # and the bottom and back, are another part #. I did not know this. I just purchased the top and sides. I got lucky, the back and bottom were still in good shape. So I guess I should have read the description of the part more carefully to see what it covers, before I ordered it. It took two people two hours to do the work, it was really nice to have an extra set of eyes, to remember what direction pieces of metal from the stove went. I would do it all over in a heart beat instead of buying a new stove.
First I removed the lower tray and all parts covering the ignitor on the upper oven. 2. Then I removed the screws holding down the ignitor and flame distributor. 3. I then had to pull out the oven from the wall and remove the back panel to expose the wires connecting the ignitor. This required the removal of about six screws but they
... Read morewere fairly easy to get to. 4. I disconnected the ignitor from the back panel then went around to the front of the oven and pulled out the ignitor and all of the attached parts. 5. Here's the tricky part. The screws holding the ignitor in place had fused from the heat and then the threads stripped when I tried to remove them. I had to use a dremel tool and cutting wheel to carefully cut the screws off and then went to buy some replacement screws from the hardware store. 6. I replaced them with a nut and a bolt, to hopefully avoid the same problem for later replacement if necessary. 7. I then replaced everything the same way it came out and all is working like new!
Socket Lite come with clips attached to the outside of the housing. After you unhook the 3 lead wires that are attached to the unit. All you have to do is push in on the clips and release the unit. Then you snap in the new unit. Attach the 3 wire leads, put a oven bulb in the socket end, and the install the light cove
... Read morer


 Diagram and Parts List for Whirlpool Range")


 – Part Number: W11665456")


")


