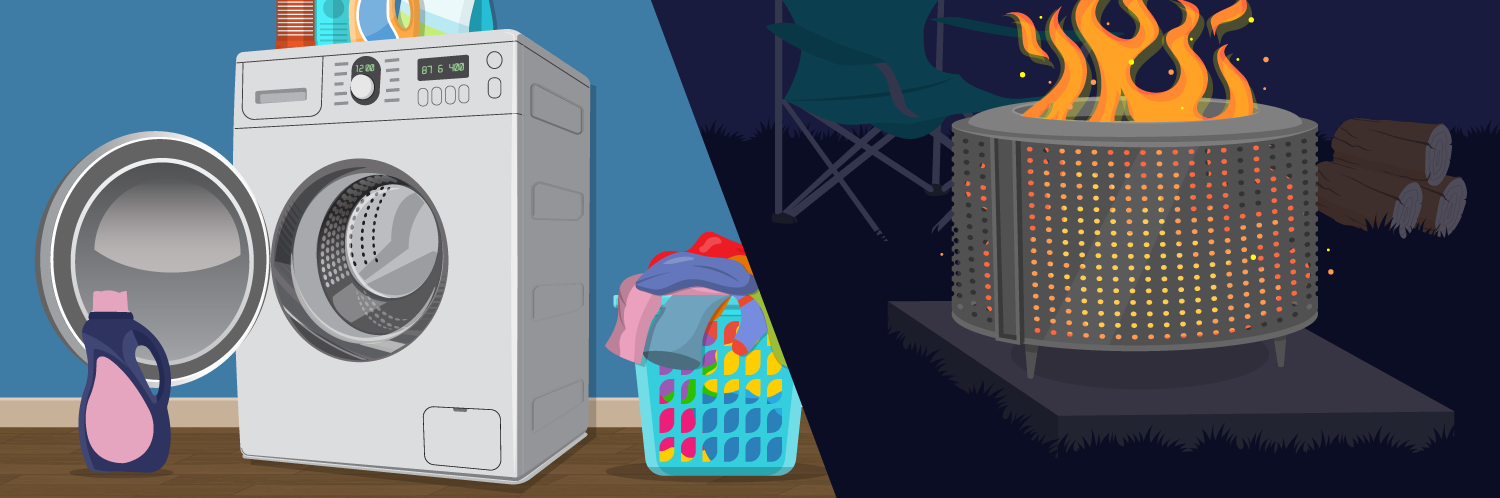
Washer drums are the perfect DIY alternative to expensive store-bought firepits
Post
Pin It
Share
Subscribe
There’s nothing quite like the feeling of sitting by the crackling sparks and ambient heat of your very own backyard firepit. It’s a perfect way, no matter the season, to take a few steps out of your back door and feel more at peace with the world, get close to nature, and meditate and ruminate on life for as long as you have before duties and obligations drag you back inside. Everyone with a bit of space in their backyard should have a firepit.
But, firepits have to be right for you, and your budget There are a range of options that can be bought from department or hardware stores, and these tend to run the spectrum of “crap” to “beautiful”, with prices that match accordingly. Go cheap, and you’ll find yourself with a firepit constructed of thin metal that rusts and deteriorates inside of a season. If you’re looking to spend upwards of $1,000 on your firepit, you can find some pretty amazing hand-made, thick, solid firepit constructions out there, and if you’ve got the money on hand, we say go for it!
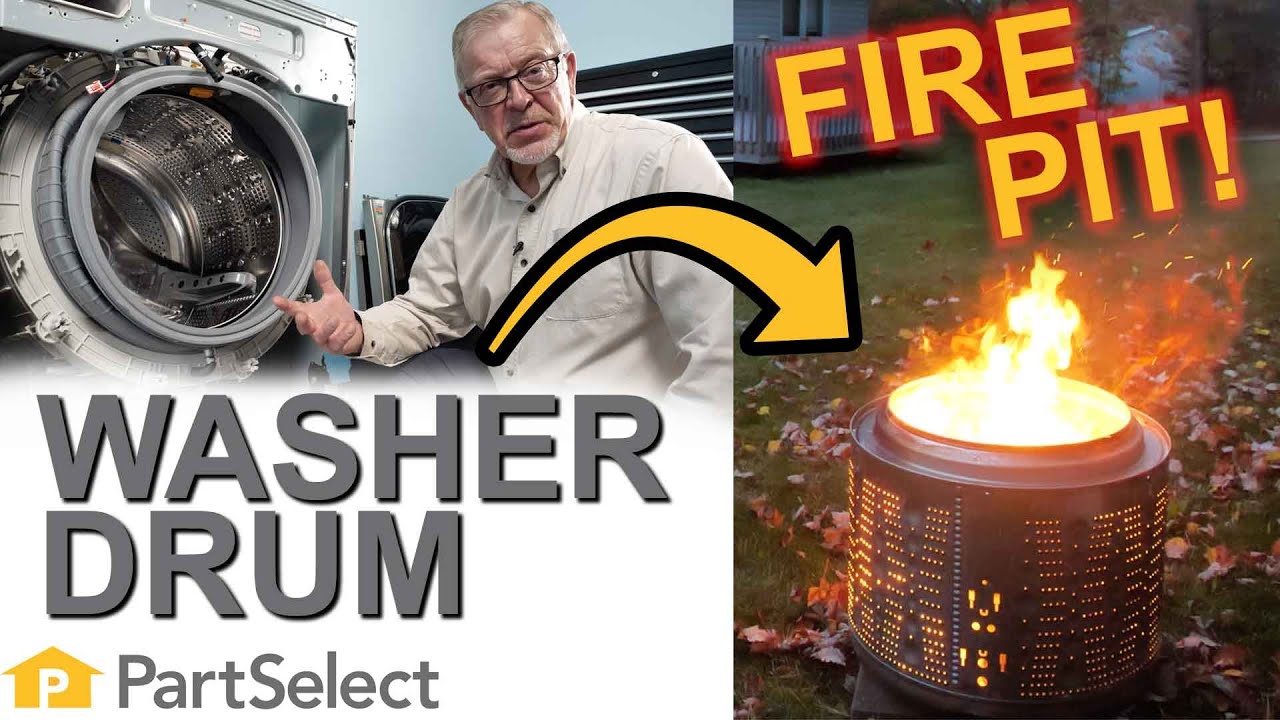
Then there’s the other option, which is to do it yourself! There are endless home-made firepit builds out there, and most of them are simple to construct. Whether you’re making your firepit from brick, stone, or metal, a good starting point is a vessel for your fire to live in, and not many better building blocks for this vessel exist out there than the washer drum from a front-load washing machine! These drums are the perfect size and shape, they’re usually perforated to let out light and allow the fire to breathe, and they’re good-looking and constructed of thick, high-quality metal that will stand up to many seasons of outdoor fires.
Whether you have an old front-load washing machine, or you happen to find one on the side of the road (happens more often than you would think!), or are able to acquire a broken down/used washer for a good price, using a washer drum as the basis for your backyard firepit is smart and thrifty. It’s also incredibly easy! So easy, in fact, that the majority of this article is going to detail the most difficult part of the process, which is accessing and removing the drum from your washer so that it can begin its new life as your backyard firepit.
Watch the following video or read our step-by-step guide below to get your washer drum functioning as a firepit.
Before Getting Started
Regardless of the brand, most front-load washers are constructed in a similar fashion, so the disassembly procedures will be very similar. However, there may be some small differences between the washer we worked on to put together this guide, and your washer, so keep this in mind as you follow the instructions. Use common sense; ultimately, our goal here is to break the washer down enough to access the drum to make our firepit. It’s a little more work than it may seem, but nothing that can’t be handled in less than 30 minutes of work!
Before beginning any appliance repairs or disassemblies, always ensure you have disconnected power to your appliance first.
Washer Disassembly Step-by-Step
You’ll want to begin at the back of the washer, firstly so that you can remove the brackets that secure the top as well as the access panel on the lower portion of the back so that we can access the shaft and motor assembly on this style of washer.
Remove the retaining screws on the top brackets, pull the top back and remove it completely, and set it aside. While you’re at the back of the washer, remove the access panel by removing the retaining screws, and lift the panel up so that the tabs release on the bottom and top. Set the panel aside.
If your washer is a direct drive version, you’ll need to now remove the rotor that is attached to the shaft, using a soft-faced mallet to get it started.
Next, we’ll slide the rotor off the shaft, keeping in mind that the inside is covered with magnets so it will want to stick. Once pulled off, it can also be set aside.
Our next step will be to shift our focus to the front, where we need to remove the console and then the front panel. Start by removing the detergent drawer by sliding it as far forward as it will go, release the locking tab, pull out the drawer, and discard it.
There’s also typically one or two screws that are hidden in behind the detergent drawer, which you will want to remove.
Typically, with this style of front load washer, you’ll have a single retaining screw on the back that goes into the plastic console, which will need to be removed.
We will also need to disconnect the wire harness connectors that feed through from our main harness into our console.
With those removed, we’re going to lift up on the top edge of the control panel to unhook the plastic tabs holding it in place. Once you’ve unhooked these, you should be able to tip the control panel forward, pull the harnesses through, and it will be removed and ready to be discarded or set aside.
With any front load washer you will typically have a door boot or door bellows, so before you can remove the front panel, you will need to disengage these first. There’s normally a wire band that wraps around, with a spring located, typically in the bottom area. You will want to pry that out, pull the band off, and then release the door bellows and push it back inside the washer.
With the bellows released, your next step will be to take out the two screws that secure the door lock assembly to the front panel, then push that back into the washer.
The style of front load washer that you’re working on likely has a little access door at the bottom, which will need to be opened up. This will expose a screw that secures the retainer in place, which will need to be taken out, as well as flipping down the little drain tube so it will fit through the opening. Then you should be able to remove the door and bracket in one piece, exposing a single screw at the bottom that secures the front pane to the support bracket, which should also be removed.
The next step is to remove the retaining screws across the top. Once we’ve done that, you can take the whole front panel assembly aside, which will give you a much better view of the internal construction of the front load washer. As with all front load washers, you should have a rear half of the outer tub, and a front half, joined at a seam and connected by either bolts or push-on clips, depending on your model.
The front half of the outer tub will have the door bellows and typically some counterweights mounted to it. So, what you need to do before separating both halves of those tubs, is to disengage anything that is attached to the front portion, such as hoses, wire harnesses, and bolts that secure the counterweights.
On our model, we had a heater located on the front half of the outer tub, which we needed to disconnect the wire harnesses to.
Our model also had its front and rear outer tub held together by bolts, so our next step was to remove all of those, followed by removing the shocks, which are held together to the base frame and the outer tub with a hinge pin. Compress the locking tabs and pull the pin out. Repeat on the left side and anywhere else pins need to be removed.
You’re almost done! Our particular model had a wire harness attached to the top of the front outer tub, so if yours does too, that will need to be removed.
The only thing that is connecting the front and rear halves of the outer tub at this stage should be a set of suspension springs. You should be able to see where they hook through a hole in both the back and front tabs. You will need to remove the spring by gently prying it off and lowering it down. After doing one spring and before doing the other, we suggest that you separate the two halves of the tub, hook the spring into the back half, and hang it back up again.
On the left-hand side of the cabinet, there will be some other devices in the way. You can choose to remove the screws and lift the whole assembly out of the way, but you may also find that by popping the cover off, you can sneak in with a pair of locking pliers and get it out, without having to remove everything else that’s in the way. Lower the spring and reach in from the front to disconnect it.
Now that the front and rear half of the outer tub have been separated, you can pull the front half out through the front of the washer, and discard it.
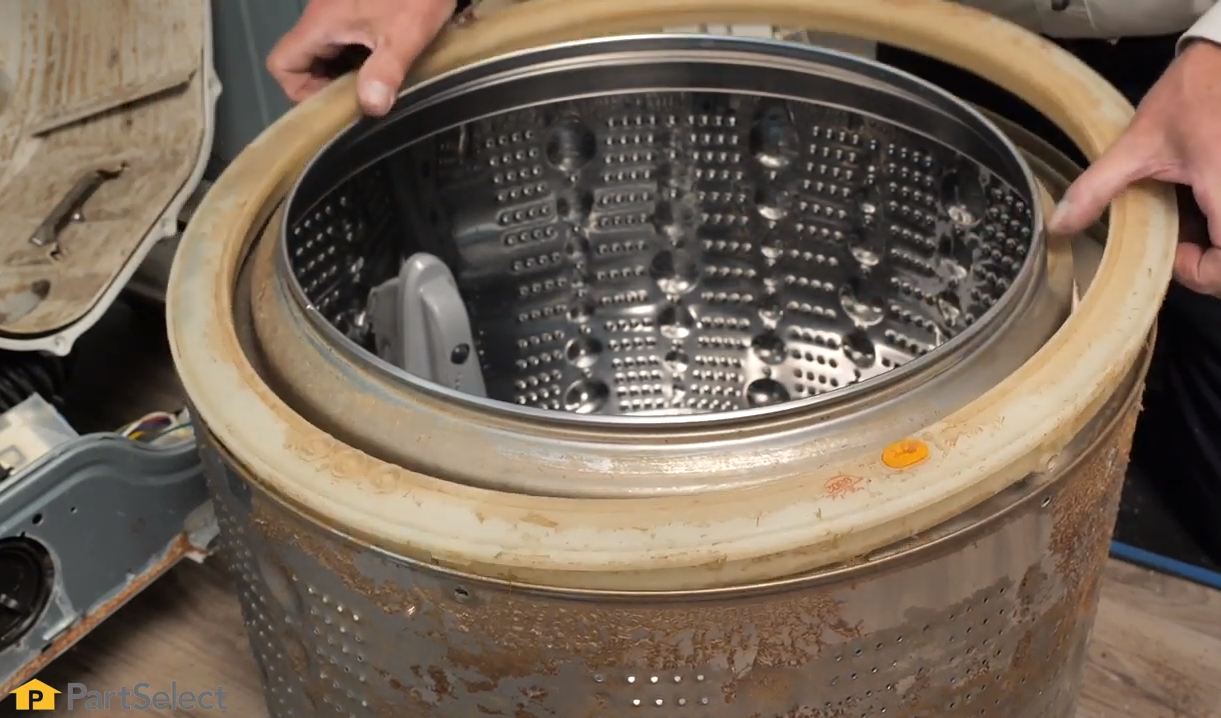
With the front half out of the way, you now have access to your spinner. If the shaft in the spinner is not rusted into the bearings, you should be able to easily slide it out through the front. Get a grasp with both hands, make sure the washer doesn’t move, and pull it forward. Your firepit has been freed!
Next you’ll want to remove the bolts that secure the spinner shaft assembly to the basket. Once those are removed, the spinner shaft assembly should lift right off, and can be discarded.
With the spinner assembly out of the way, you will flip your drum over. Our brand of washer had a plastic balance ring around the perimeter of the wash basket/drum, held in place with some screws. Remove these if present, to get rid of the plastic, which is no good for a fire!
The only thing remaining is the baffles inside of the drum. Our model used a single screw to hold these in place, so we removed that. With the screw removed, slide the baffle up until it lines up with the four keyhole slots, then lift it off and discard.
Get Burning!
Voila! Your firepit awaits. From here, you might want to polish up your washer drum, depending on its condition, but it’s ready to be placed anywhere safe and build a fire in.
You may choose to use this washer drum to form the base of a more complicated and ambitious firepit build; like building a brick wall around it for safety, which is great. The good thing about these washer drums is that they are versatile, and you now have the building blocks for a much more expensive looking firepit.
For us, though, we’re impatient, so we stuck to basics. We scouted a spot that’s safe and away from overhanging trees and structure, put down some patio stones, and we were in business!
Hopefully, this guide helps you quickly and easily liberate the drum from that broken down old washer and get it into the backyard as a firepit you can start making memories around! Have you attempted this build before? Maybe something more ambitious? Share it with us on PartSelect’s Facebook page. We’d love to see what you came up with. And if you find you need any parts for your washer or any other appliance, check out our huge range of OEM repair parts in between s’mores and beers around the fire.
The PartSelect Content Team has a passion for DIY and we pride ourselves on being a resource for quality, expert content to help you accomplish any DIY project. Alongside our expert repair technicians, our team of experienced technical writers works to provide safe and reliable information on all tasks and jobs around your home. We spend time learning about the problems and projects that our customers are working on, and we make it our job to answer key questions and provide resources for every step along the way. Repairs and DIY projects are what we do, and the PartSelect Content Team wants to help you do them, too.
With the Fix app, you can quickly and easily find information on your appliance, along with videos and articles to help you fix it.
"Like magic. I took a picture of the model number on my refrigerator, and the app identified it right away … Very convenient. I'm impressed." - Clever Jeff ★★★★★
You added 1 item to your cart
✖
$
Qty:
Total item(s) in cart:
Order Subtotal
$
*Taxes and shipping will be applied during checkout