Enter the code USA15 at checkout to apply your discount. Discount will be applied at checkout when the code is entered & applies to all parts. Cannot be combined with any other coupon or special offer & cannot be applied to a previously placed order. Not valid toward tax or shipping & handling. Discount has no cash value. Discount expires on July 1 at 11:59pm EST.
You've Got 10% Off Your First Order!Save 10% with code at checkout *click to copy coupon code
Have you ever had a load of laundry finish up in the dryer, only to discover that it’s still damp? We’ve all been there, and it’s not fun. Not only do you need to spend the time running the dryer again, there’s also the cost involved with the electricity or gas being used. Here at PartSelect, we love saving you time and money, so in this article, we’re sharing our best tips to keep your dryer running efficiently. If you want to take things to the next level, we’ve also put together a guide to upgrade your dryer venting.
Tip #1: Sort Your Clothing
You can get better dryer efficiency if you sort your laundry items by size. Keep the smaller items like undergarments separate from the larger ones like towels and sheets. For the optimal settings, you should check your dryer manufacturer’s user guide for instructions for the different kinds of laundry you’re drying.
Tip #2: Clean Your Lint Filter
One of the easiest and most important things you can do is keep your lint filter clean. All the air that goes through your dryer passes through that lint filter. If it has become clogged, it decreases the efficiency of the appliance and causes increased drying time. A plugged filter can also increase the temperature inside the dryer, could damage your clothes and the lint becomes a fire hazard. If your filter has become damaged or is missing entirely (maybe it joined the missing socks?) Then it should be replaced, as it is a vital part of your dryer.
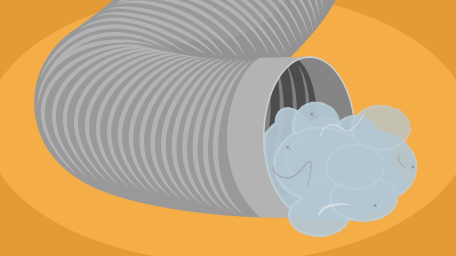
Tip #3: Maintain Your Dryer Vents
Even with a regularly cleaned lint filter, some debris will still find its way into the vents. You should periodically inspect the venting at the back of your dryer and look for any signs of buildup. The type of venting material you have can also make a big difference. Flexible plastic tubing is very common, but it has ridges that can trap lint, eventually leading to a block. The plastic vents can also be quite brittle, and prone to bending and cracking. Kinks in the tubing can cause restricted airflow, which leads to a decrease in your dryer’s efficiency. We'd recommend using material besides plastic for your vents, and further down in this article we’ll share a step-by-step guide to updating your vents.
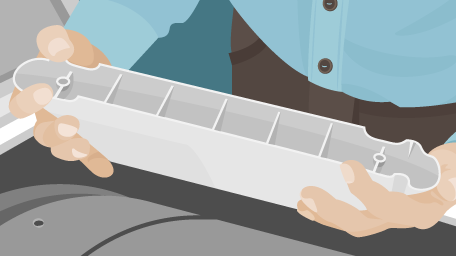
Tip #4: Maintain the Vent Caps
Next, we’re going to head outside and take a look at the vent cap on the exterior of your home. There are typically two different types, either a single flap or a multiple flap, also known as a louvered flap. You want to ensure that the flaps stay closed when there is no airflow, and that they open fully and freely when your dryer is running. If there is any lint buildup, it should be removed so that the vent can work properly. If needed, you can do a thorough cleaning of your entire dryer vent system following our guide. If you have a screen or rodent protector over the vent cap, it can collect lint and debris which restricts airflow.
Tip #5: Inspect the Door Gasket
The gasket on your dryer door provides a tight seal when the door is closed, ensuring the hot air stays inside and the cooler room-temperature air stays out. If the door gasket has any tears or missing pieces, that seal is compromised and should be replaced. Having the hot air escape, or cool air getting sucked in, will impact the efficiency of your dryer and it may need to work longer or harder to dry your clothing.
Tip #6: Heating Element Care
Inside your dryer drum is the inlet duct assembly. The surface can become quite hot, and certain types of fabrics can melt if they come in contact with it. If material has melted onto the duct, it can create a rough surface which can further damage your other clothing. Once the dryer has cooled down, take a look at this part and clean it off if necessary.
If you’ve completed all these tasks, your dryer should be giving you warm, dry, fluffy laundry in an efficient manner. What if we told you it could get even more efficient, AND easier to maintain? Remember that brittle plastic venting you just cleaned wads of lint from? We’re going to show you how to upgrade to a rigid metal duct system, which will help prevent buildup, increase efficiency, and as a bonus it’s more aesthetically pleasing.
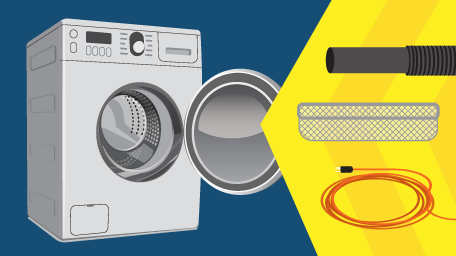
Things You’ll Need
Rigid metal ducting, such as aluminum or galvanized material
Elbow joints (4 pieces per elbow for optimal angle adjustments)
Foil-backed tape
Shears for cutting metal
Measuring tape
Level
Straight edge
Upgrade Your Dryer Vent System
Step 1: Clear Your Work Area
Depending on how your laundry area is set up, you may need to rearrange some things in order to complete this project. If necessary, move the washing machine out of the way, pull the dryer out so you can access the back easily, and remove all the old venting material. You may need to remove some insulation and restraints in order to access the exit port for the vent system. Keep these handy so they can be replaced once the project is finished.
Step 2: Add Extensions
We want our new vent pipe to sit flush against the wall, so we needed to add an extension to the vent cap piece. Measure and cut the appropriate length of material and crimp the end so that it will fit inside the vent cap piece. Dry fit the extension to confirm that everything lines up. Once you’re satisfied, use foil tape to secure the extension in place.
Step 3: Create the 90-Degree Elbows
Once again, depending on your laundry room configuration you will likely need at least two elbows to connect the new duct to the dryer and the vent cap. With our setup, we’ll require a third joint as we have quite a distance to cover. We made the elbow joints with a 4-piece galvanized elbow set that lets you adjust for the precise angle needed. Two of the elbows we created are at 90-degree angles – one will come off the extension we created in step 2, and the other will come out of the back of the dryer. Use the foil-tape to secure your elbow pieces in place. We’ll determine our third elbow angle later, once we have the main ducting in place.
Step 4: Attach the Assembly
For our set-up, we used a full five-foot length of rigid ductwork. Before attaching the duct to the vent cap extension, we sealed up the seam along the back with foil-tape to ensure there are no leaks. Next is to attach the elbow to the crimped end of the duct. With the elbow taped into place, we can now attach the entire assembly to the vent cap extension. Before taping these pieces together, ensure that the long section of ducting is level. For extra security, you can use a piece of plumbing strap to attach the ducting against the wall.
Step 5: Attach Elbow to Dryer
The second 90-degree elbow we created back in step 3 will now get attached to the back of the dryer. You will want to ensure that the crimped end of the elbow is pointing outwards so that it will fit snuggly into the ductwork.
Step 6: Create Additional Elbow
Now that we have the elbow attached to the back of the dryer, and our main duct pipe coming down the wall, we next need to determine what angle is required for the new elbow joint to line up with the dryer. We used a straight edge (in this case a broom handle) to determine that a shallow angle will line up perfectly with the elbow at the back of the dryer. With the angle set, you can tape up the elbow, but don’t attach it to the duct just yet.
Step 7: Measure and Cut the Connecting Pipe
Measure the distance between the new elbow and the one coming out of the dryer to determine the length of pipe you’ll need to cut. You’ll need about 1.5 inches on either side to ensure there’s enough to fit inside both elbows. After marking your measurements, use the shears to cut the appropriate length. Once again, we’re going to tape up the seam running down the back of the pipe.
Step 8: Put it All Together
This is where our whole new vent system comes together! Attach the shallow-angle elbow and the 90-degree angle elbow to your newly cut piece of pipe, and tape everything in place. Connect this new section to the pipe attached to the wall and secure it with tape. Push the dryer back into place, lining up the elbow and ensuring it’s connected to the back of the dryer.
With the whole assembly now connected, taped, and secured it place your upgraded dryer vent system is now complete! Since it is customized to fit your exact laundry space, you will no longer experience bent, crushed, or kinks in the venting. With the smooth interior of the galvanized metal pipe, you won't have to worry about lint getting trapped and building up in the ridges. Laundry day has officially become safer and more efficient. If this project made you discovered that you need replacement parts for your dryer, you can find them by searching for your model number. Be sure to follow our YouTube Channel so you don’t miss any of the action!
The PartSelect Content Team has a passion for DIY and we pride ourselves on being a resource for quality, expert content to help you accomplish any DIY project. Alongside our expert repair technicians, our team of experienced technical writers works to provide safe and reliable information on all tasks and jobs around your home. We spend time learning about the problems and projects that our customers are working on, and we make it our job to answer key questions and provide resources for every step along the way. Repairs and DIY projects are what we do, and the PartSelect Content Team wants to help you do them, too.
With the Fix app, you can quickly and easily find information on your appliance, along with videos and articles to help you fix it.
"Like magic. I took a picture of the model number on my refrigerator, and the app identified it right away … Very convenient. I'm impressed." - Clever Jeff ★★★★★
You added 1 item to your cart
✖
$
Qty:
Total item(s) in cart:
Order Subtotal
$
*Taxes and shipping will be applied during checkout