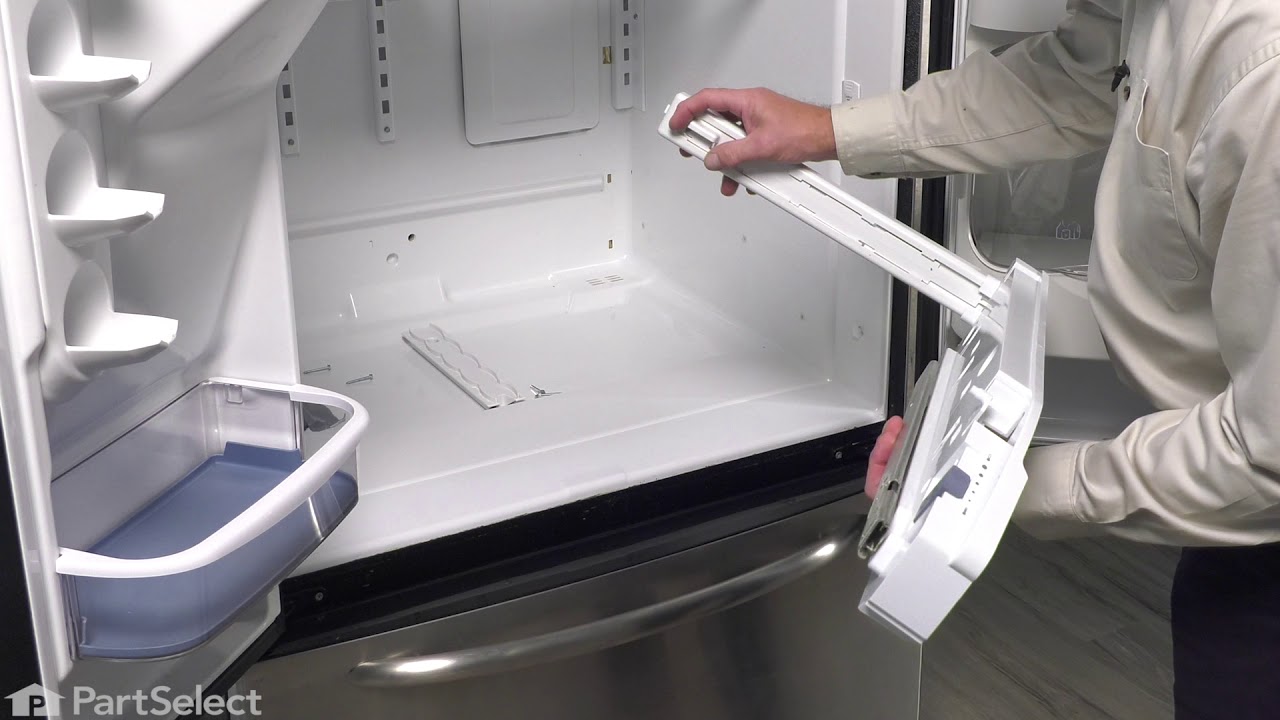
This part is the replacement for the end cap on your refrigerator pantry drawer. Your pantry drawer will have two end caps; one for the right side and one for the left. This is the end cap for the right-hand side, and is sold separately from the left end cap. The part is made of white plastic and is an OEM part sourced directly from the manufacturer. To remove the old pantry drawer end cap, simply remove the pantry drawer and disconnect the end cap. Replace it with a new one, and slide the pantry drawer back into place.
How Buying OEM Parts Can Save You Time and Money
Troubleshooting
This part fixes the following symptoms:
Door won’t open or close
This part works with the following products:
Refrigerator.
This part works with the following products:
KitchenAid, Jenn-Air, Whirlpool, Maytag.
Part# WPW10121977 replaces these:
AP6015354, W10121977
Customer Reviews
Average Rating:
★★★★★
★★★★★
36 Reviews
4.9
Filter By Rating:
5 Stars
32
4 Stars
4
3 Stars
0
2 Stars
0
1 Star
0
Sort by:
< Prev
1
2
3
Next >
Search filter:
Clear Filter
Your search term must have 3 or more characters.
Keep searches simple. Use keywords, e.g. "leaking", "pump", "broken" or "fit".
Sorry, we couldn't find any existing reviews that matched. Try using some different or simpler keywords.
★★★★★
★★★★★
Stan G - October 6, 2023
Verified Purchase
correct part
part was correct and came in a timely manner. I repaired the old piece and won't replace the piece until the repair fails. I was very happy with PartSelect.
★★★★★
★★★★★
Jon T - September 19, 2023
Verified Purchase
Exactly the same
Took longer to clear out fridge for access than replace part
★★★★★
★★★★★
Roza R - April 20, 2023
Verified Purchase
Perfect
Well made and easy to replace the broken one.
★★★★★
★★★★★
Irwin Z - December 5, 2022
Verified Purchase
Good quality. Easy to install.
There are a few how to videos on YouTube which will guide you through the installation process.
★★★★★
★★★★★
Geoffrey B - July 18, 2022
Verified Purchase
No Need To Call The Repairman
This was the exact replacement part. The instructional video was very helpful. Removing drawers and shelves is tedious, but it gives you an opportunity to clean off the accumulated goo. (Admit it: you have mystery substances lurking in the deep recesses of your refrigerator shelves, too.) Removing the broken end cap and installing the new one was easy.
★★★★★
★★★★★
Elaine F - April 21, 2022
Verified Purchase
Easy replacement by handyman.
The part came on time and intact.
★★★★★
★★★★★
Eve G - February 14, 2022
Verified Purchase
Easy to install
The part was well packaged and arrived very quickly. It was a very positive experience dealing with Parts Select! Highly recommend.
★★★★★
★★★★★
John C - January 12, 2022
Verified Purchase
Was easy to install fit perfectly
Part was correct fit and easy to install
★★★★★
★★★★★
Elliott M - January 6, 2022
Verified Purchase
Moderate difficulty for me
There is an excellent review with instructions that made all the difference. There is no YouTube video for this part.
★★★★★
★★★★★
Andrew F - November 19, 2021
Verified Purchase
Great quality and great price
I was happy to get the part. Other than the day of my marriage and the birth of my children this was the happiest day of my life/
< Prev
1
2
3
Next >
Customer Repair Stories
Average Repair Rating: 3.1 / 5.0, 7 reviews.
What's this?
Sort by:
< Prev
1
Next >
Search filter:
Clear Filter
Your search term must have 3 or more characters.
Keep searches simple. Use keywords, e.g. "leaking", "pump", "broken" or "fit".
Sorry, we couldn't find any existing installation instruction that matched.
Pins that hold the cover both broke off
Had to replace both sides- very easy repair no tools needed.
Very simple A) watch video B) Go carefully so you don’t break another plastic part. Took all of about 20 minutes, fit perfectly and works like new.
Scott from NORFOLK, VA
Difficulty Level:
Really Easy
Total Repair Time:
15 - 30 mins
2 of 2 peoplefound this instruction helpful.
Was this instruction helpful to you?
Thank you for voting!
Problem = no accessible screws to remove and replace right end cap for fridge.
So far haven’t done the repair and probably will give up. This issue is discussed in frequent questions area of your web site. Steve’s video needs to be updated to discuss what to do with end caps that are snapped, rather than screwed, in. Before decided to DIY, I looked at video. Video job is easy. Steve showed it was easy, but video end
... Read more cap has screws. I figured mine did too and so ordered the part. When placing order, rep. and/ or web site should point out issue as now that look at item on line can see no screw holes. As your instructions note for my issue, if can pry old unit off, challenge is to recall where everything that drops out goes when replacing. Because I’m stubborn, will probably try one more time, but likely will fail to swap out old for new end cap. Warning: screwless end cap replacement is not easy.
Read less
Peter from EL CERRITO, CA
Difficulty Level:
Very Difficult
Total Repair Time:
More than 2 hours
9 of 9 peoplefound this instruction helpful.
Was this instruction helpful to you?
Thank you for voting!
Snapped the deli drawer lid holders.
Watched numerous U tube videos to prepare ourselves as well as instructions from other posters. Tried to pay attention on how we disassembled thing with limited success. Installing the new end caps proved to be easier that we expected since they weren’t screwed in but just snapped in. We think that’s because it’s a newer model that what w
... Read moree saw on U tube.
Remove the crisper baskets, Hinged lid, Glass shelves, support bars, and to make it easier - the door bins. There are no screws on the end caps for this model of fridge, unlike some YouTube videos you might see. There's a release catch nearly in the middle of the cap. With your index finger, press down on the tab, to release th
... Read moree catch, while lifting the front of the end cap. The end cap should lift up and away from the side wall of your fridge. Be careful to then rotate the entire assembly - in the case of the right side end cap - towards you, so that you can disengage the tab on the crisper drawer temp controller, that fits in the back wall of the fridge. Once you've unhooked the control rods to the crisper temp. control, you'll need to remove the crisper drawer runners. Again - on this model, there are no screws. The runners just slide out from underneath their retaining plastic tabs. Slide them towards what would be the front of the fringe if they were in their natural position, they clear the retaining tabs and become free. The control rods need to be re-attached on the new end cap.. just take your time click it between the various plastic tab. Then insert the end tab of the crisper temp control in the back wall, rotate the entire assembly 90 degrees, so the end cap is aligned with the slide wall, and lower it into position until the retailing clip clicks into position. Congratulations, you've replaced your right side end cap! Then reinstall all the supports, shelves, bins etc. and you're good to go. Good Luck!
Read less
Jon from HOUSTON, TX
Difficulty Level:
Really Easy
Total Repair Time:
30 - 60 mins
9 of 9 peoplefound this instruction helpful.
Was this instruction helpful to you?
Thank you for voting!
Replacing pantry cap with broken “axle” that allows lid to swivel open and shut
Removed pantry drawer and both crispers. Removed glass shelf. Removed both support bars. Using my thumb, pressed into the square openings in pantry cap. That snaps the cap loose from side of the fridge. Removed l-shaped assembly from fridge. Photographed the assembly with my phone camera so I could reconstruct the assembly. It is very co
... Read moremplicated reassembling these parts. Reassembled these parts onto replacement part. Inserted tabs on cap assembly into slots in side and back of appliance. Replaced support bars, glass shelf, crispers, and pantry drawer in that order. Slid pantry lid onto plastic prongs at either end of the drawer. If new prong is too long, slice tiny section off with serrated knife and slide lid back into place. Job well done!
Read less
MARGARET from COUPEVILLE, WA
Difficulty Level:
Difficult
Total Repair Time:
30 - 60 mins
8 of 8 peoplefound this instruction helpful.
Was this instruction helpful to you?
Thank you for voting!
Reassembling the multiple parts
Obviously remove the glass shelf and supports plus all three drawers first. Being as there are no screws or visible means by which the Pantry Drawer End Cap is attached and being as the part entails removal of the vent slider from the back, there presents a problem. The backside of the end cap has hooks that clip into the side of the re
... Read morefrigerator wall. Use caution in raising the end cap up to release the clips. It does help using the screwdriver beneath the end cap and some movement with hands but it will come up along with the backside attachment. That isn’t the problem. The difficulty is in (1) noting and remembering how the assembly came off and apart. (2) Putting the moving parts inside of the end cap like they came out and (3) replacing the back and side at the same time. The back assembly has a clip that inserts to the left. It is important to insert that first. The side portion inserts by placing above the slots and pushing in (to the right) and down at the same time. It all comes together and you will wonder how you did it.
Read less
Robert from LA MESA, CA
Difficulty Level:
A Bit Difficult
Total Repair Time:
30 - 60 mins
Tools:
Screw drivers
16 of 19 peoplefound this instruction helpful.
Was this instruction helpful to you?
Thank you for voting!
< Prev
1
Next >
Questions and Answers
We're sorry, but our Q&A experts are temporarily unavailable.
Please check back later if you still haven't found the answer you need.
5 questions answered by our experts.
Sort by:
< Prev
1
Next >
Search filter:
Clear Filter
Your search term must have 3 or more characters.
Keep searches simple. Use keywords, e.g. "leaking", "pump", "broken" or "fit".
Sorry, we couldn't find any existing answers that matched.Try using some different or simpler keywords, or submit your new question by using the "Ask a Question" button above!
David Watkins
November 18, 2017
When trying to decide left or right, are we talking about the part as we look into the fridge?
Hello David,
Thanks for your question. Yes, the end caps are considered from the point of view as one looks into the fridge. This applies for many major appliances, in fact.
I hope this helps.
22 people found this helpful.
Was this helpful?
Thank you for voting!
Erik
December 4, 2017
Can u help me figure out replacing , can't find screws to remove
For model number ps11748630
Hi Erik,
Thank you for your question. There is a comment on our website listed with the part that a customer has left on how they installed the part, Obviously remove the glass shelf and supports plus all three drawers first. Being as there are no screws or visible means by which the Pantry Drawer End Cap is attached and being as the part entails removal of the vent slider from the back, there presents a problem. The backside of the end cap has hooks that clip into the side of the refrigerator wall. Use caution in raising the end cap up to release the clips. It does help using the screwdriver beneath the end cap and some movement with hands but it will come up along with the backside attachment. That isn’t the problem.
The difficulty is in (1) noting and remembering how the assembly came off and apart. (2) Putting the moving parts inside of the end cap like they came out and (3) replacing the back and side at the same time. The back assembly has a clip that inserts to the left. It is important to insert that first. The side portion inserts by placing above the slots and pushing in (to the right) and down at the same time. It all comes together and you will wonder how you did it." I hope this helps. Thank you and have a great day!
9 people found this helpful.
Was this helpful?
Thank you for voting!
Genevieve
April 22, 2022
I purchsed PS11748630 (pantry enc cap right side) but I noticed that the old part (which has to be replaced) has a bracket that allows the drawer to slide in. Will the old bracket work with the new cap? also can you provide instructions how to remove old part and install new part? thanks
For model number jfc2290vep5
Hello Genevieve, Thank you for your inquiry. The old glides and supports should work with the new part. We have provided a link to our repair video for removing and installing new pantry end caps on a Whirlpool refrigerator. We hope this helps and if you need a part in the future and need help placing an order, customer service is open 7 days a week. Please feel free to give us a call. We look forward to hearing from you!
5 people found this helpful.
Was this helpful?
Thank you for voting!
Scott
March 14, 2019
How do i remove the runner from the old end cap and connect to the new one?
For model number kitchenaid kfcs22evms5 right side pantry drawer
Hi Scott,
Thank you for your question. There is a comment on our website listed with the part that a customer has left on how they installed the part, Obviously remove the glass shelf and supports plus all three drawers first. Being as there are no screws or visible means by which the Pantry Drawer End Cap is attached and being as the part entails removal of the vent slider from the back, there presents a problem. The backside of the end cap has hooks that clip into the side of the refrigerator wall. Use caution in raising the end cap up to release the clips. It does help using the screwdriver beneath the end cap and some movement with hands but it will come up along with the backside attachment. That isn’t the problem. The difficulty is in (1) noting and remembering how the assembly came off and apart. (2) Putting the moving parts inside of the end cap like they came out and (3) replacing the back and side at the same time. The back assembly has a clip that inserts to the left. It is important to insert that first. The side portion inserts by placing above the slots and pushing in (to the right) and down at the same time. It all comes together and you will wonder how you did it." I hope this helps. Thank you and have a great day!
2 people found this helpful.
Was this helpful?
Thank you for voting!
Brian
November 10, 2017
How to replace the pantry end cap on right side
For model number kfco22evbl1
Hi Brian,
Thank you for your question. You will have to remove your pantry lid and then pull out your pantry drawer. Once you do that, there are a few screws on the parts. You would just unscrew those and remove your pantry end caps. I hope this helps. Good luck with your repair.