Enter the code USA15 at checkout to apply your discount. Discount will be applied at checkout when the code is entered & applies to all parts. Cannot be combined with any other coupon or special offer & cannot be applied to a previously placed order. Not valid toward tax or shipping & handling. Discount has no cash value. Discount expires on July 1 at 11:59pm EST.
You've Got 10% Off Your First Order!Save 10% with code at checkout *click to copy coupon code
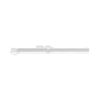
This drawer slide rail is for the right side of your refrigerator. The drawer slide rail attaches horizontally to the refrigerator wall and supports the drawer so it can easily slide in and out. If th...
This is a manufacturer-approved drawer slide rail for your refrigerator. This slide rail is for the left side of the fridge. All you need to complete this repair is a Phillips screwdriver. Remove the ...
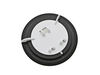
This 10 by 5 inch ice maker (Electromechanical Icemaker Kit, Ice Maker Assembly) produces ice. This particular model will produce seven crescent shaped cubes every cycle. It is constructed of plastic ...
This “Dispenser Door Assembly” (Door Recess Assembly, Ice Door Assembly, Dispenser Door, Refrigerator Dispenser Ice Chute Door Kit, Dispenser Door Flap, Ice Chute Door, Flapper) keeps the room air fro...
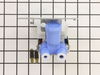
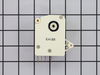
This valve comes with 1/4" compression inlet.
NOTE: This part comes with new quick connections. To install - cut retaining nuts off of existing plastic water lines and gently push them into new valv...
This is the drawer slide rail or slide assembly for your refrigerator. You will find the drawer slide rail at the bottom of your refrigerator, mounted to the right-hand side of the cabinet wall. It is...
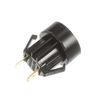
The interior light of your refrigerator is controlled by a switch that is activated when the door is opened and closed. If your refrigerator light will not turn on, there could be an issue with the sw...
This 40-Watt light bulb is sold individually and is a genuine OEM replacement option for your home appliances. It is specially designed to withstand extreme temperatures, so this bulb is compatible wi...
This drawer slide rail is for the left side of the refrigerator, and allows the bottom shelf to slide in and out. If your refrigerator door will not close, or the bottom drawer will not slide properly...
1. Turn off water supply, and electrical ( unplug it) to fridge. 2. Remove water line to valve. Watch for water to pour out of the line. Have a towel handy. 3. Remove the cardboard cover on the bottom of the fridge. 4. Remove the screws that hold the valve in place. 5. Remove the valve, be careful the waterlines ar
... Read moree still attached. 6. Place a towel under valve to catch any water that leaks out from water lines. 7. Remove electrical lines, make sure to mark which went where. One is for the ice, and one is for the water. Make sure the power is off, there is 120 volts present at those connections. - now my waterlines attached using a compression type fitting. The new valve I got used just a push in type of attachment. But, easy enough I just removed the pieces for the compression and the waterlines pushed right in and worked fine. - the mounting harness for the valve was alittle different but the parts I need were in the right location and she fit in fine. 8. Attach water lines. They are different sizes so you can't get those mixed up. 9. Attach electrical lines. - the new valve came with adaptors for my electrical connection. Just snapped them on and kept on going. 10. turn on watersupply for fridge. Plug it back in. 11. Test for leaks, and proper operation. ie. When you push the water does the water valve open? 12. Unplug fridge 13. Now is a good time to clean out any dust or dirt that has accumallated in under around your fridge. 14. reassemble, valve, then cover. move fridge back into place. 15. Plug fridge back in. 16. Take a clean glass. 17. Fill with water from the front. 18. Take full glass of water and go watch tv. You've earned it, and saved yourself probably $100.00 in labor costs. Good Job.
Per the trouble shooting guide on the home page of the website. I suspected the defrost timer was bad because ice had heavily accumulated on the back wall of the freezer compartment and the temperature inside the refrigerator was warm. First, I removed all the freezer racks. Then removed the (4) screws on the back wall in the freezer c
... Read moreompartment. I then removed the ben from the ice maker to allow more room. Once I saw all the ice, I unplugged the refrigerator, and used a hair dryer to defrost ( it took about an hour to get it all). Once the ice was all gone, I then moved into the refrigerator compartment and removed the top shelve. This allowed me more room and access to the defrost timer which was behind the back panel. I used the trouble shooting guide to test the old timer prior to removing the new one from the package, (just in case I needed to send it back). Through this test I determined that the timer was bad, it wasn't the heating element or the t-stat. It was very easy to access, I removed the two knobs and lifted up the panel. I located the defrost timer and removed the screws as directed. I replaced the timer just as I had removed it, plugging in the electrical terminals per the removal process. I then reversed the order and put the panel and top shelve back on. Once all complete, I then moved back into the freezer compartment and replace the back panel and then the ice ben. I plugged it in and haven't had a problem since. This site has saved me a tremendous amount of money, a service contractor quoted us $300, to determine the problem. I ordered the part and it was sitting on our door stoop the next morning.
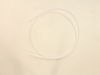
First of all, the larger white plastic tubes in this thing are 5/16" OD, which no plumbing store seems to stock. At the lower left rear end there are 2 tubes, one for water and one for ice, that are doomed to fail being in proximity of a heat source - they essentially get cooked to the point of becoming brittle and cracking. The smaller
... Read more tube and union can be easily found, but do yourself a favor if the larger one cracks and order the plastic tube and water tube union here, and just cut off the brittle part and amend the old tube using the union.