This 40w light bulb is a replacement bulb constructed of glass and metal. It is an easy-to-install electrical part which produces 40w of light. If the bulb won't light up then it may be broken and sho...
This Charcoal Filter traps grease from your oven's exhaust to help prevent it from entering the vent, which could cause damage over time. If the exhaust fan on your microwave is not working, you may n...
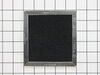
This Grease Filter is constructed of Acrylonitrile Butadiene Styrene and is used to trap grease and help eliminate odors from the exhaust air while cooking. It attaches onto the exhaust and is rated ...
This turntable ring in your microwave makes sure that your glass tray rotates smoothly. Located just above the internal floor, it supports the tray so that your food cooks evenly. A broken turntable r...
This mounting plate is sourced directly from the original manufacturer for use with microwaves. It is a metal plate designed to support a microwave by attaching the microwave to the wall studs. If the...
This three-terminal switch fits your microwave door. This part is mostly black in color and is about 1.5 inches with metal terminals. You might need to replace this part if your microwave is not heati...
This door interlock switch is for microwaves.
Door interlock switch prevents the microwave from starting when the door is open.
Because the microwave shielding and interlock switches must be pro...
This diode, or high voltage diode, is used in microwaves. It is an electrical current control device that ensures power flows in one direction and not the other way. If your microwave produces no heat...
If your microwave is not turning on it could be due to your fuse needing to be replaced. This part protects the microwave by shutting it off if there is an electrical surge. This fuse is just over an ...
The light socket in your microwave houses the light bulb and connects it to the power source. The light bulb will screw into it, so the light bulb will be held in place. Be very careful when installin...
This glass tray drive coupling, also known as a tray support, is a genuine OEM replacement part. It can help solve the issue of your microwave tray not turning properly. This motor couple connects the...
$9.93
In Stock
Questions And Answers for WMH31017AB4
Ask our experts a question about this model and we'll get back to you as soon as possible!
1 question answered by our experts.
Sort by:
< Prev
1
Next >
Search filter:
Clear Filter
Your search term must have 3 or more characters.
Keep searches simple. Use keywords, e.g. "leaking", "pump", "broken" or "fit".
Sorry, we couldn't find any existing answers that matched.Try using some different or simpler keywords, or submit your new question by using the "Ask a Question" button above!
Rob
April 9, 2023
Replaced bad bulb. Now switch not working, will not turn off. Shows full,half and off on display when light button pressed
For model number WMH31017AB4
Hi Rob, thank you for reaching out. The issue is most probably related to the control board, part number PS11722973. A damaged component on the control board can cause this issue. We hope this sorts out your problem!
The nightmare was that this microwave is installed under the cabinet....in order to get to the light bulb I had to pull out my stove then squeeze into the space between the stove and counter....my old microwave light bult was much easier to change.....Shame on Whirlpool for making this so difficult.....must be a better way to cover the li
... Read moreght bulb so that we do not need a screwdriver to remove the door to get to the light bulb
Ordered top & bottom micro-switches and mounting plate parts. Internet reviews could not find specifics if the issue was due to a top/bottom or combination of micro-switch or mounting plate failure. Pulled the plug. Removed the top vent assembly cover held in by 2 Phillips screws inside the vent. Removed the control panel held in by 1 P
... Read morehillip screw at the top vent assembly area. Lifted control panel upward to release the catch and moved it off to the side - didn't disconnect any leads. Used a Torx bit to remove the door switch mounting plates at the front and pulled the plates through the opening from the control panel. Documented the wire color code connections, the top plate uses 2 micro's with one using both the closed & open contact. Installed the respective micros on the mounting plates and worked backwards with the wiring and removal steps. Once completed, the open/close sensing has worked every time.