This chrome drip bowl is designed for use with electric cooktops and ranges. This drip bowl is sold individually. At the widest point this part has a diameter of approximately 10 inches. It sits benea...
The drip bowl catches grease and spills that come from cooking on your stove top. They are located under the heating elements. Drip bowls are often neglected and can become rusted and cracked. If your...
This part connects the wire harness to the surface element and is used for ranges. The kit includes interchangeable mounting brackets, ceramic wire nuts, heat shrink protective tubing, and wires. If y...
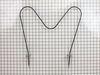
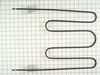
This heating element, used in any range/oven, is an open-style bake element. It is placed at the bottom of the oven and supplies heat. If your baking element does not supply consistent heat or is burn...
If the burner element on your range will not heat up, or is damaged, it may need to be replaced. This part is 8 inches in diameter, and should not be confused with the smaller 6-inch model. The part i...
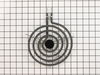
This element is a genuine OEM replacement part, has looped terminal ends, comes with a black medallion center, and fits most electric ranges. All burners are made of a heating wire that produces heat ...
This part is sold individually. This is a part for your stove top. The surface element is what your cookware sits on. The element supplies heat at varying temperatures. This may need to be replaced if...
Terminal block kits are also known as terminal boards, or terminal strips, and they are found in a wide variety of household appliances. Most often in ranges, wall ovens, and dryers. This kit attaches...
This is a burner switch kit, also known as the surface element control switch repair kit, for ranges. This burner switch kit sends voltage to the surface element coil and it controls the stove top sur...
The oven light socket allows you to screw in a light bulb so that you can see the inside of your oven. The light socket is located in the back of your oven, so you will need to remove the back panel t...
This is a clock knob for an electric range, oven, or stove. It allows you to adjust the clock and cooking timer. No tools are required for this repair, the knob simply pops on and off the turn shaft. ...
We're sorry, but our Q&A experts are temporarily unavailable.
Please check back later if you still haven't found the answer you need.
1 question answered by our experts.
Sort by:
< Prev
1
Next >
Search filter:
Clear Filter
Your search term must have 3 or more characters.
Keep searches simple. Use keywords, e.g. "leaking", "pump", "broken" or "fit".
Sorry, we couldn't find any existing answers that matched.Try using some different or simpler keywords, or submit your new question by using the "Ask a Question" button above!
Maikaaloa
July 22, 2021
Hi, i was wondering how to find out when our oven was manufactured. It's a Frigidaire electri clean oven model reg533dl*0 serial 7ocj. Thanks, maika
For model number REG533DL0
Hi Maikaaloa,
Thank you for your question. The information for when your oven was manufactured can be found on the label that you found your model and serial number on. It will show the month and year (MM/YY) and will be either in the upper left or right corner of the label or just under the serial number. We hope this helps! If you have any questions, please let us know.
Used a screw driver with a socket head to remove the two hex head screws holding the old element. Pulled the old element forward until the two wire attachements were visable. The wires were attached with a simple tab connector. Removed the wires from the element. Attached wires to new element slide the element and wires back into wall of
... Read moreoven and replaced screws. Done!
PF alarm appeared on display. Noticed clicking when cord was moved. Had arced for some time and melted original block. New part slightly different. Only has 3 lugs, old one had six. Stack using washers provided. Take note of colors before disassembly. Use caution while working through access opening. The edges are sharp. Only tools neede
... Read mored are phillips screwdriver, deep socket for lug nuts. Nut driver optional. Hope this is helpful.
Removed the two screws that hold the element in place at the rear of the oven.Unplug each prob,you may need pliers as they can be a little tight.Reconnected the new element.Keep the old screws.New element does not come with screws.Always unplug range when doing repairs.