This OEM 40 watt appliance light bulb is used for some ranges, refrigerators, freezers, and microwaves. Simply locate the existing bulb, unscrew it from its socket, and replace with new light bulb. If...
$19.71
In Stock
Order within the next 9 hrs and your part ships today!
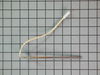
The temperature sensor detects the temperature within the oven cavity. If there is a limited amount of heat, it is not heating evenly, or the oven will not start, this might indicate that your tempera...
$52.99
In Stock
Order within the next 9 hrs and your part ships today!
This part is found inside your oven. This oven rack comes in the color chrome and measures 24 inches in width and 16 inches in length. This is an extremely simple repair that requires no tools. The pa...
$121.56
In Stock
Order within the next 9 hrs and your part ships today!
The Frigidaire light bulb lens covers the interior light bulb in an oven. No tools are necessary to replace this item. After unplugging the appliance, slide off the wire bracket to remove the existing...
$10.89
In Stock
Order within the next 9 hrs and your part ships today!
This tempered glass is supplied by the original manufacturer and measures 20 inches by 13 inches. It is an inner door glass, designed for use in ranges/ovens and has several purposes which include pro...
$84.88
In Stock
Order within the next 9 hrs and your part ships today!
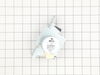
This is a bake igniter manufactured for an oven, stove, or range burner. It ignites the gas to light the oven burner to bake your food items. If your oven will not heat properly, your igniter could be...
$122.00
In Stock
Order within the next 9 hrs and your part ships today!
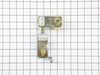
The anti-tip bracket kit comes with one metal bracket and two installation screws, and is sourced directly from the genuine manufacturer. It prevents the freestanding oven, range, or stove from tippin...
$11.24
In Stock
Order within the next 9 hrs and your part ships today!
This is a red indicator light lens for an oven that covers the indicator light for the surface element. The indicator light signifies when the element is on and heated. This part is sold individually....
$11.24
In Stock
Order within the next 9 hrs and your part ships today!
This igniter and orifice assembly is a legitimate OEM replacement part for your gas stove, and includes the igniter, orifice assembly, and gas tube. This part may need replacing if the igniter fails o...
$98.13
In Stock
Order within the next 9 hrs and your part ships today!
The surface burner head is used for ranges and ovens, and is located on the cooktop, where the flames go up. The surface burner spreads the gas through holes to create an even flame throughout the ent...
$27.02
In Stock
Order within the next 9 hrs and your part ships today!
Questions And Answers for PLGFMZ96ECD
We're sorry, but our Q&A experts are temporarily unavailable.
Please check back later if you still haven't found the answer you need.
2 questions answered by our experts.
Sort by:
< Prev
1
Next >
Search filter:
Clear Filter
Your search term must have 3 or more characters.
Keep searches simple. Use keywords, e.g. "leaking", "pump", "broken" or "fit".
Sorry, we couldn't find any existing answers that matched.Try using some different or simpler keywords, or submit your new question by using the "Ask a Question" button above!
Patrick
December 16, 2022
Currently my stove is set up to run propane. Am I able to convert it over to Natural Gas or does it come already as natural gas and was converted to propane?
For model number PLGFMZ96ECD
Hello Patrick, thank you for contacting us. As per our research and owner's manual of your range, model PLGFMZ96ECD, this is a natural gas range and is not designed for conversion to Liquefied Petroleum (L.P.) Gas. It is possible but risky to convert it to propane by changing and adjusting the spud orifice of burners. To convert it to natural gas you will need gas orifices, part number PS439993, part number PS439992, and part number PS439994. Customer service is available 7 days a week if you require assistance placing an order. Thanks again for reaching out!
Hi Mark, thank you for your inquiry. Our research has found some instructions we think will assist you. To Remove the Bake-n-Warm TM Double Oven
Drawer & Replace the Oven Light:
t. Beforedrawerremoval, besureto
turn OFF the Bake-n-Warm TM
Double Oven and let the drawer area
cool completely.
2. Pull the drawer away from the oven.
Using a phillips-head screwdriver
remove the two drawer screws from
the insides of the front oven drawer
compartment.
3. With one hand hold the drawer front
in place. Use your other hand to pull
the glide away from the oven until the glide hook
disengage..
4. Repeat from step 3 above for the
other side of the drawer.
5. With BOTH glide hooks disengaged, Fig. 1
carefully lift the drawer up and away
from the oven. Push both drawer
glides into lower oven cavity.
6. Replace the lower oven light with a
40 Watt Appliance light bulb part number PS2364035.
We hope this was useful.
It was the week before Thanksgiving and we didn't know what to do without an oven. I did some research on Google and of all the websites out there, I found a decent price here at Parts Select and ordered it on Friday. I was shocked when FEDEX pulled up to the door on Saturday afternoon. I went online to youtube and found a step by step
... Read more video specifically for this part. It's posted by the Repair Clinic. http://www.youtube.com/watch?v=cLxKoF16gac. I was able to fix the part and probably saved at least $150.00 for a service call and repair time. The part cost about $90 and I was done in less than 15 minutes. We just got this stove about 2 years ago and I'm thinking maybe we could have saved my old stove since it had the same problem. Great job Parts Select - I got just what I needed and saved a ton of money in the process. Thanks also for their great informative video online. We had a great Thanksgiving and were very thankful for all our hot food fresh from the oven.
Cut off power at fuse panel. pulled stove out from wall went behind stove removed back panels in area of sensor that I could see from the front side, inside oven. Located sensor from rear & unpluged senser from wiring bundle reached inside oven & removed screws from sensor. Pulled sensor out & threaded wire through hole. Took old & new
... Read more sensors to bench in shop. Plug on new not the same as old. Had to change plug Cut and stripped wires. Wire is very small, need to use a good stripper. Twisted wire together & soldered connection, used shrink wrap to insulate wire. Took part inside and reinstalled in reverse order. Used 1/4 inch nutdriver on total job start to finish.
Repair was quite easy, as long as you have the instructions for removing the door. The screws that hold the bottom of the door to the fixed hinge are placed into the side of the hinge assembly after removal; this holds the door at a 45 degree angle for easy removal. After that, just place the door on a flat surface and dismantle the door
... Read morefrom the inside. The inner glass is contained in a metal frame with another piece of glass; this frame comes apart easily using the clips in each side. The door assembles easily after the glass is replaced; just take your time and give yourself enough room to lay out the parts as you go. Good luck!