This dryer drum belt (Whirlpool Dryer Belt, Drive Belt) has four ridges, three grooves and is 1/4" wide, and 92 1/4 inches in length. It comes in black and is made of rubber. The belt transfers the ro...
$17.22
In Stock
Order within the next 9 hrs and your part ships today!
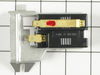
This thermostat (Dryer Operating Thermostat, Dryer Cycling Thermostat, Cycling Thermostat, Dryer Thermostat) is used to maintain a temperature of 155 degrees in the dryer drum. The internal bias heate...
$28.02
In Stock
Order within the next 9 hrs and your part ships today!
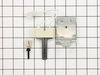
This white OEM dryer door handle is used to open and close the dryer's door. Comprised of plastic and 6-by-2-inches in dimension, the handle is sold individually and attaches to the dryer door. Your d...
$38.66
In Stock
Order within the next 9 hrs and your part ships today!
If your dryer will not heat, takes too long to dry, or does not provide enough heat, you might want to replace your igniter kit. This silicone carbide igniter with ceramic holder kit includes the 3-in...
$40.62
In Stock
Order within the next 9 hrs and your part ships today!
If you notice that your dryer is noisy or will not tumble, you may need to replace the tri ring. This part is triangular, and is less than an inch in size. Tri rings can be found both on the idler pul...
$13.45
In Stock
Order within the next 9 hrs and your part ships today!
If your gas dryer is not heating up or igniting, then replacing the flame sensor, located in the burner assembly, could solve it. This part senses heat from the igniter to monitor if it is hot enough ...
$48.00
In Stock
Order within the next 9 hrs and your part ships today!
If your washer shakes or vibrates loudly when it reaches its max speed, check that the leveling legs are even. To ensure that the washer is firmly on the ground using all four legs, adjust the legs so...
$11.40
In Stock
Order within the next 9 hrs and your part ships today!
This manufacturer-certified dryer lint filter is used to collect lint during the dryer cycle, to prevent damage to the machine and to prevent lint from sticking to clothes. This model comes in white a...
$46.59
In Stock
Order within the next 9 hrs and your part ships today!
This OEM high-limit thermostat kit includes the thermal cut-off fuse and the high-limit thermostat. The purpose of this part is to cut-off power to the dryer when it overheats. Common indications that...
$17.55
In Stock
Order within the next 9 hrs and your part ships today!
Order within the next 9 hrs and your part ships today!
Questions And Answers for NGD4655EW1
We're sorry, but our Q&A experts are temporarily unavailable.
Please check back later if you still haven't found the answer you need.
3 questions answered by our experts.
Sort by:
< Prev
1
Next >
Search filter:
Clear Filter
Your search term must have 3 or more characters.
Keep searches simple. Use keywords, e.g. "leaking", "pump", "broken" or "fit".
Sorry, we couldn't find any existing answers that matched.Try using some different or simpler keywords, or submit your new question by using the "Ask a Question" button above!
Jim
January 25, 2020
Dryer handle broke. Purchased replacement part but it will not snap into place.
For model number NGD4655EW1
Hello and thank you for writing.
The Handle part PS11731583 is in the list of compatible parts for your model and should snap-in. Please let us know if you ordered this compatible handle as all the different handles are very model specific. We hope this helps. Please contact us anytime if you require further assistance.
My Belt broke so put on a old belt that I replaced, and I hooked up the belt and I turned the dryer on and the drum won't turn could it be that I should replace the drum rollers to would that be the problem.
For model number NGD4655EW1
Hello Clayton, thank you for your question. We have researched your model and found that the issue is probably with the Belt, part number PS346995. If that does not take care of the issue, then the problem is most likely to be related to the Drive Motor, part number PS334304. If you require assistance to place an order, please contact customer service. We hope that helps!
Dryer will not heat. Blower vent is clean. Even when the dryer is disconnected from the vent, it does not get hot.
Removed the thermal fuse (https://www.partselect.com/PS11741460-Whirlpool-WP3392519-Dryer-Thermal-Fuse.htm?SourceCode=10) and tested for continuity, and there is none. Tested the cycling thermostat (https://www.partselect.com/PS11741405-Whirlpool-WP3387134-Dryer-Cycling-Thermostat.htm?SourceCode=22&SearchTerm=NGD4655EW1&ModelNum=NGD4655EW1) and it appears to have continuity. Wondering what else could be wrong, that would cause the thermal fuse to fail. Thanks!
For model number NGD4655EW1
Hello Rob, thank you for reaching out. Checking out your dryer gas valve solenoid coil, part number PS11752967, may help you figure out the cause behind the problem that you are facing. Good luck with your repair!
First I shut off the gas supply and disconnected the dryer vent and unpluged the unit so you can access the rear of the dryer. Then I removed the rear cover. This is where you will find your thermostats and fuses. Holding the new part next to the one to be replaced I transfer the wires one at a time so as not to get them mixed up, then un
... Read morescrew the old part and install the new one. Insert a flat blade screwdriver under the top cover in the 2 front corners to unsnap it from it's clips, also at this time you need to remove the 2 screws that hold the upper part of the lint filter tube to the lid, then lift the lid to expose the drum ( I tilted the dryer back as far as the flex gas line would allow me to and rested the top lid against the wall without removing it, to many wires). Behind the front cover in the top right corner is the plug for the door switch,un-plug it and also there are 2 screws one in each corner. After that lift the front cover straight up and pull it away from the cabinet ( it has clips at the bottom to hold it in place). Reaching under the drum on the right side pull down on the belt tensioner and release the belt from the motor then you can remove the drum. Laying the drum down on it's front edge I removed the rear felt seal and took a piece of sand paper to rough up th old glue and clean off some of the felt that was still stuck to the drum. Following the directions from the seal package I put the glue around the edge of the drum and re-installed the new felt. This is a good time to clean out your dryer, while the glue sets up. A shop vac works the best, but be carefull not to suck up the money, it will help pay for the repair ( I found over a dollar in change ). At this time I also changed the coils on the gas valve, remove the 2 screws that hold the clamp and replace them one at a time. Re-install the drum with the belt on it, fold it and push it through the tensioner and put it on the motor pulley. rotate the drum to make sure that the felt is not kinked under itself, re-install the front cover bottom clips first, then the 2 screws and the plug for the door switch, pull down the lid and snap it in place, before installing the rear cover this is a good time to remove the rear cover to the lint chute and clean in there also ( it's easy to see why there are so many dryer fires). Re- install that cover and the rear cover and vent tube, turn your gas back on and check it for leaks ( even if you didn't disconnect it) plug your dryer back in and get busy catching up on the laundry that you haven't had a chance to do because your dryer broke, then smile and think about all the money you saved by doing this simple repair your self. Thanks Parts Select
1. Removed the screws from the lint catcher 2. Removed the bolts from upper rear of dryer 3. Pried off the dryer top from the front (it rests on rear hinges) 4. Disconnected dryer door wiring 5. Removed bolt from inside upper front corners; removed front panel (be careful: the edges are sharp and the tumbler will fall
... Read morewhen it loses support) 6. Removed broken belt and lint from interior parts; removed tensioner (which had fallen out of place). Note: The newer models have a tensioner pulley; my older model had a smooth semicircle that was confusing at first glance 7. Flipped dryer onto its back (for easier reinsertion of new belt and tumbler) 8. Placed new belt on tumbler; reinserted tumbler 9. Inserted new belt through tensioner, inserted tensioner "legs" into grooves on floor. Note: The belt will pull the tensioner upright when it's inserted properly (which isn't obvious at first) 10. Made sure belt and tumbler seal were properly installed 11. Replaced parts in reverse order The process took over an hour because I couldn't figure out how to insert the belt through the tensioner. The trick is to insert the folded belt through the tensioner and onto the motor pulley. If I had to do it again, it would take about 30 minutes (including cleaning lint)
After looking on the website for advice I walked throught the simple steps of disassembling the front, removing the drum, removed the back, disconnected the wire harness. Then removed the blower housing in the back. The blower, mounted on the back side of the motor was very tight. I used a pipe wrench wedged in place and help by my 10
... Read moreyear old Grand-daughter while I used an adjustable wrench to turn the shaft on the front of the motor. Spun the blower off, removed the two clips holding the motor. Then reversed the process when I received the new motor. Care should be taken to avoid damaging the blower fan if a lot of pressure is required.


 Diagram and Parts List for Amana Dryer")