Models > MZC3122FW01

MZC3122FW01 Maytag Freezer - Overview

Sections of the MZC3122FW01

[Viewing 4 of 4]
Keep searches simple, eg. "belt" or "pump".
Touch-Up Paint - White – Part Number: 72017
Touch-Up Paint - White
★★★★★
★★★★★
(2)
PartSelect #: PS385132
Manufacturer #: 72017
This touch-up paint can be used on a wide variety of household appliances. It is most often used on washers, dryer, refrigerators, dishwashers, ranges, freezers, trash compactors, or microwaves. It is...
$8.00
  In Stock
Spray Paint - 12 oz. - White – Part Number: 350930
Spray Paint - 12 oz. - White
★★★★★
★★★★★
(2)
PartSelect #: PS347819
Manufacturer #: 350930
Appliance spray paint is a great way to cover up any chips and scratches that have appeared on your appliances. Instead of replacing the part entirely, this is an easy fix. This is also a great way to...
$22.62
  In Stock
Frame Screw – Part Number: WP7101P126-60
Frame Screw
★★★★★
★★★★★
(1)
PartSelect #: PS11743908
Manufacturer #: WP7101P126-60
Sold Individually.
$7.75
  In Stock
Socket – Part Number: WPW10191429
Socket
PartSelect #: PS11749929
Manufacturer #: WPW10191429
This light socket is a genuine OEM part for your refrigerator. The light socket powers the bulb that lights your fridge. To repair this part, you will need to remove the screws holding the control pan...
$7.95
  In Stock
Capacitor – Part Number: WPW10350564
Capacitor
★★★★★
★★★★★
(1)
PartSelect #: PS11753490
Manufacturer #: WPW10350564
$72.95
  In Stock
Touch-Up Paint - Biscuit – Part Number: 4392899
Touch-Up Paint - Biscuit
PartSelect #: PS373131
Manufacturer #: 4392899
$11.68
  In Stock
Adhesive Cement – Part Number: WP4317852
Adhesive Cement
PartSelect #: PS11742366
Manufacturer #: WP4317852
Also known as Alumilastic Cement.
  No Longer Available
Water Line Installation Kit – Part Number: 8003RP
Water Line Installation Kit
★★★★★
★★★★★
(1)
PartSelect #: PS993036
Manufacturer #: 8003RP
This Refrigerator Ice Maker Installation Kit connects the house water supply, to the refrigerator for ice maker and water dispenser operation. This kit includes 15-ft of copper tubing, (1) saddle valv...
$42.90
  In Stock
START-DEV – Part Number: W10873801
START-DEV
PartSelect #: PS11759689
Manufacturer #: W10873801
$75.88
  In Stock
Spray Paint - Superior Black – Part Number: 285006
Spray Paint - Superior Black
★★★★★
★★★★★
(1)
PartSelect #: PS334404
Manufacturer #: 285006
This is a 12oz (about 355 ml) can of black spray paint that is compatible with a variety of different home appliances and is used to cover and conceal any visible scuffs, scratches or chips. This can ...
$33.37
  In Stock
KEY-DOOR – Part Number: W10838052
KEY-DOOR
PartSelect #: PS11727963
Manufacturer #: W10838052
$39.21
  In Stock
Screw - White – Part Number: WPW10142283
Screw - White
PartSelect #: PS11749007
Manufacturer #: WPW10142283
Sold individually.
$9.31
  In Stock

Questions And Answers for MZC3122FW01

We're sorry, but our Q&A experts are temporarily unavailable.
Please check back later if you still haven't found the answer you need.

Common Symptoms of the MZC3122FW01

[Viewing 5 of 5]
Light not working
Fixed by
these parts
Fixing
Show All
Will Not Start
Fixed by
these parts
Fixing
Show All
Fridge and Freezer are too warm
Fixed by
these parts
Fixing
Show All
Fridge too warm
Fixed by
these parts
Fixing
Show All
Ice maker not making ice
Fixed by
these parts
Fixing
Show All
Keep searches simple. Use keywords, e.g. "leaking", "pump", "broken" or "fit".
Scratches in Surface
This product comes in a bottle with a brush like Liquid Paper. It goes on incredibly easy. A second coat might be needed. I wanted to prevent rust from setting in so I covered the scratches and dings. The paint is a little brighter since my washer is 10 years old but it still looks great.
Parts Used:
Touch-Up Paint - White
  • Michelle from Richardson, TX
  • Difficulty Level:
    Really Easy
  • Total Repair Time:
    Less than 15 mins
65 of 136 people found this instruction helpful.
Was this instruction helpful to you?
Thank you for voting!
Compressor would not run. My daughter was told that compressor was bad and needed to be replaced. Cost would be $550 labor plus parts. I could hear a clicking sound I believe was made by the starter relay. I ordered the parts from part select and had them in three days.
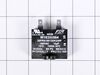
I took the screws out of back panel and slid water line and panel off to the right side while I removed the capacitor and starter relay. Relay was probably the only problem, but I replaced capacitor too while I was doing the repair. Finished removal and replacement in about 20 minutes. While I had panel off I cleaned coils that I could see from behind and then did the same on front side. Cost was $136 for both parts. I could have done it for $71 if I did not replace the capacitor too. Saved my daughter from being taken advantage of.
Parts Used:
START-DEV Capacitor
  • Ken from HOLLAND, MI
  • Difficulty Level:
    Very Easy
  • Total Repair Time:
    15 - 30 mins
  • Tools:
    Nutdriver, Screw drivers
13 of 15 people found this instruction helpful.
Was this instruction helpful to you?
Thank you for voting!
Fridge would not start
Unplug the fridge then wheel the refrigerator out to where you can get to the back - you will probably have to disconnect the ice maker water hose. Using the nut driver remove all the screws from the lower panel on the fridge. You will not have to remove the water hose connection just move the panel around a little. Look on the left side (facing the back of the fridge) you will see the capacitor held onto the compressor with a spring clip. Just pull the clip toward you and that will free the capacitor. Pull up on the capacitor and that will unplug it from the compressor. Be careful not to touch the two poles on the old capacitor. Capacitors store electricity and it could give you a jolt. I used electrical tape to insulate the poles and then threw it away. Plug in the new capacitor- re-hook the clip, reinstall the back panel, plug it in and verify that the fridge is working. Hook your water hose back up and move it back into place and you are done.
Parts Used:
Capacitor
  • Glen from PT CHARLOTTE, FL
  • Difficulty Level:
    Really Easy
  • Total Repair Time:
    15 - 30 mins
  • Tools:
    Nutdriver
7 of 8 people found this instruction helpful.
Was this instruction helpful to you?
Thank you for voting!