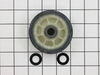
The drum support roller (Dryer Drum Support Roller, Drum Roller and Washer Assembly) holds the drum in the proper position while it spins on the support wheels. This part rotates on the roller shaft w...
This roller shaft is also known as a support roller shaft or a drum roller axle, and is a part for your dryer. The function of this piece is to act as the axle for the drum roller; it provides a place...
This multi rib belt spins the dryer drum during the drying cycle. This belt is 91-5/8 inches in length, 3/8th of an inch wide and has five ridges. It is black in color and made of rubber. You may need...
This part is a retaining ring, sometimes called a retaining clip, that holds the drum support roller onto the shaft of a dryer. It is made entirely of metal and measures less than an inch in diameter....
The idler pulley tightens the drive belt to properly spin the dryer drum. It is attached to an idler bracket. This part comes with the idler pulley and center bearing. To replace this part, you will n...
If you notice that your dryer is noisy or will not tumble, then you may need to replace the drum roller shaft washer. This drum roller shaft washer is just under an inch in diameter and is sold indivi...
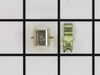
This door catch kit is designed for use in dryers. This is an authentic OEM replacement part. This catch assembly ensures the door of your appliance will close, and remain closed. It allows your appli...
This is a drum felt seal for your dryer. It creates an airtight seal between the dryer rear panel and the back of the drum. It is important that this seal be flexible so it does not interfere with the...
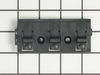
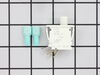
This part replaces two terminal switches in a dryer and prevents the dryer from running when the door is open. This includes two connectors. If your dryer will not shut off, start, or does not tumble,...
$29.92
In Stock
Questions And Answers for MLE23PDHYW
We're sorry, but our Q&A experts are temporarily unavailable.
Please check back later if you still haven't found the answer you need.
removed door, removed screws to lift top panel, removed screws that held old baffles, replaced with new baffles, took off front panel and cleaned out excess lint while I was in there.
FIRST unplug dryer from electrical source, CAUTION, the top of this dryer does not open with clips, do not pry on top to open! On the front of the dryer look under the lower panel, and find two screws, one on the left side, and one on the right, remove these screws, and pull slightly down on panel to remove. Behind this panel find two s
... Read morecrews holding the door panel, one on the left, and one on the right, remove the left, and support the door panel while removing the right side. Gently pull the bottom of door panel outward, and the clips on top of door panel will unhinge from top, carefully rotate left side of door panel to floor, and note the wire connections on switch, and orientation of switch, then unplug wires, and move door panel to a comfortable working positon. Door must be open to remove switch, then depress the two plastic retaining keepers on each side of switch, and push switch through toward door. Replace with new switch, reconnect the wires, and reassymble in reverse order. Remember, door assymbly must be inserted in dryer top at an angle, and then bottom rotated downward, and bottom panel nylon guildes inserted into door panel bottom.
The door had always opened with the wrong swing and it wasn't til I needed to repair this that I noticed you could change the swing. I changed the swing of the door and then noticed that the clip was included on both sides so i did not need to repair the catch. I still have the part so when it breaks again, I can just pop it in.


.gif "SUPPLEMENTAL INFORMATION Diagram and Parts List for Maytag Dryer")

 Diagram and Parts List for Maytag Dryer")