Enter the code USA15 at checkout to apply your discount. Discount will be applied at checkout when the code is entered & applies to all parts. Cannot be combined with any other coupon or special offer & cannot be applied to a previously placed order. Not valid toward tax or shipping & handling. Discount has no cash value. Discount expires on July 1 at 11:59pm EST.
You've Got 10% Off Your First Order!Save 10% with code at checkout *click to copy coupon code
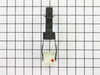
This direct drive motor coupling (Direct Drive Washer Motor Coupling, Motor Coupling, Washer Motor Coupling, Coupling Kit) provides a cushioned connection between the transmission and the motor shaft....
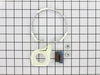
This part replaces your appliances latch (Door Latch Kit, Door Catch, Dryer Door Latch Kit). On your appliance you will find both a strike and a catch. The strike is mounted on the body of the dryer, ...
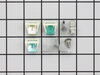
The direct drive drain pump (Whirlpool Direct Drive Washer Pump, Drain Pump, Washer Drain Pump, Water Pump) removes water from the washer during the drain cycle without the use of a belt. The pump is ...
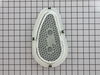
The drum support roller kit allows the dryer to tumble properly by supporting the drum cylinder. The kit includes two drum rollers, four tri-rings, and one palnut (or retaining washer). The kit does n...
The water inlet valve on your washing machine is used to fill the tub with cold, warm, or hot water for the wash and rinse cycles. This part could have either a blue or green-colored valve body. There...
A clutch assembly (Clutch, Washer Clutch) is found in your washing machine and is responsible for spinning the basket during the spin cycle. The clutch lining can wear over time. If the clutch lining ...
This part provides the tension required for a multi-ribbed belt. It also helps the belt rotate the drum and attaches to the idler pulley wheel. If your dryer will not start or tumble, takes too long t...
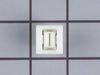
If you notice that your dryer is noisy or will not tumble, you may need to replace the tri ring. This part is triangular, and is less than an inch in size. Tri rings can be found both on the idler pul...
This tub spring is also known as suspension spring, balance spring, or counterweight spring. It is sold individually. The function of the part is to counterbalance the weight of the motor on the front...
This kit is used for electric clothes dryers, and it comes with a yellow wire nut.
$11.08
In Stock
Questions And Answers for LTE5243DQB
We're sorry, but our Q&A experts are temporarily unavailable.
Please check back later if you still haven't found the answer you need.
6 questions answered by our experts.
Sort by:
< Prev
1
2
Next >
Search filter:
Clear Filter
Your search term must have 3 or more characters.
Keep searches simple. Use keywords, e.g. "leaking", "pump", "broken" or "fit".
Sorry, we couldn't find any existing answers that matched.Try using some different or simpler keywords, or submit your new question by using the "Ask a Question" button above!
Enza
August 26, 2021
Does this model come with liquid fabric softener dispenser?
For model number LTE5243DQB
Hello Enza, Thank you for the question. We have researched the model you have provided and have found this model is not equipped with a fabric softener dispenser. We hope this helps!
1 person found this helpful.
Was this helpful?
Thank you for voting!
Anthony
July 5, 2023
Dryer won’t start. Checked door and start switches. Both ok
For model number LTE5243DQB
Hello Anthony, thank you for reaching out. We have researched the model and would suggest checking the thermal fuse, part number PS11746662. It shuts off the heating element or burner or the motor if the dryer overheats. You may test the thermal fuse for continuity using a multimeter. We hope this helps!
Washer fills up does not run replace timer still doesn’t run any ideas
For model number LTE5243DQB
Hi Jeff, thank you for your question. You may need to take a look at your lid lock for being the issue. If that part is not working it will believe that your lid is not closed and so will not continue on to the spin cycle. Good luck with your repair.
Was this helpful?
Thank you for voting!
CHARLES
September 30, 2023
After the end of a wash the tub will refill with water. It will do this on every wash setting. It spins and drains fine, but when it is done it refills the tub with water and won't shut off until it is full. The only way to stop the refilling is to disconnect the power.
For model number LTE5243DQB
Hi Charles, thank you for the question. Based on the description that you have provided, we would recommend you check the washer timer, part number PS11742058, to fix this issue. The washer timer controls the duration of the cycle, the tub filling and emptying and other operations of the washer. We hope this solves your problem!
Hi,
I had a problem with the washer refilling after the end of the washing cycle. I posted a question and Anthony answered saying that I needed to replace the timer. Before the part arrived, we used the washer but just turned off the power at the end of the cycle so it wouldn't refill (as a stopgap). During this however, several washes in, the water would not shut off and the washer overflowed, also smoke started coming from behind the timer control. The part came and I replaced the timer and now (almost) everything works. The water doesn't refill at the end of the cycle and the water stops at the level it is supposed to. It spins and drains normally at the end of a cycle, but now the tub does not fill during any of the rinse cycles. It fills fine at the beginning of the cycle, it drains at the end of that, but when it hits the rinse cycle there is a normal noise from the timer, but the tub won't fill. I'm not sure if the timer is bad or if there was a problem in the connection to the wire harness after the small burning (though nothing looked bad) that caused the smoke, or if there is a different part that might have failed. What might be the problem now that would cause the water to not refill on the rinse cycle?
Best,
For model number LTE5243DQB
Hello Charles, thank you for your inquiry. Based on our understanding of the issue, we would recommend checking the screens at the back of the unit where the hoses come in. Specifically, the cold one and checking the water inlet valve for blockage. If the issue persists, you may need to replace the water level pressure switch, part number PS11750716, to fix the issue. We hope this solves your problem!
The job looked intimidating but turned out to be very easy. First take off the water pump by removing the two clips that hold it in place. Place a shallow pan under the pump to catch the water that is in the pump and hoses. Open the hose clamps with a pair of pliers or channel locks (better) and slide the hoses off of the water pum
... Read morep. The motor comes off next. Unplug the electrical connector from the motor and two wires from the capacitor. Remove the two screws holding the clamps in place and then pop off the two clamps. You will need to hold up the motor with one hand while you remove the clamps or it will fall to the floor once the clamps are removed. One piece of the coupling assemble will be attached to the motor and the other will be attached to the gearcase drive shaft. If you want to clean up the mess created by the shredded rubber center piece of the coupling assembly you will have to take off the motor mounting plate. It is held on by two bolts and removing it makes installing the coupling easier but probably not necessary. Push the back half of the coupling on to the gearcase drive shaft until the shaft is flush with the face of the coupling. Install the new rubber center piece on to the coupling then re-install the motor mounting plate. Install the other half of the coupling on to the motor shaft and lift the motor up to the coupling. You have to rotate the motor shaft by spinning the fan blades until the coupling lines up so you can slide it into the other half of the coupling. Then just reattach the motor, connectors and water pump in the reverse order of disassembly.
Received your parts, Popped them both right into place, Even though only one side needed to be replaced, I wanted them to match up. It was amazing how easy this was. My husband was quite impressed I had ordered these rather then look for either a new or used dryer from some other source.
The hardest part of this job was pulling the machine away from the wall so the hoses could be disconnected and the machine flipped onto it's back. Putting the machine on it's back does two things. It drains the water left in the bottom of the tub so it won't pour out onto the motor when the old pump is removed, and gives the necessary a
... Read moreccess to the pump. Once the machine is on it's back you remove the hose clamps with a pair of pliers and disconnect the hoses. The pump is secured to the motor with a pair of spring steel retaining clips which are easily popped off by hand. Once the clips are removed, the pump is in your hand. Put the new pump in place, replace the retaining clips and hoses, and you're done. This has to have been the easiest repair I've ever done. I wish cleaning gutters was this easy.


 Diagram and Parts List for Whirlpool Washer Dryer Combo")


 – Part Number: WP8572767")