Enter the code USA15 at checkout to apply your discount. Discount will be applied at checkout when the code is entered & applies to all parts. Cannot be combined with any other coupon or special offer & cannot be applied to a previously placed order. Not valid toward tax or shipping & handling. Discount has no cash value. Discount expires on July 1 at 11:59pm EST.
You've Got 10% Off Your First Order!Save 10% with code at checkout *click to copy coupon code
This handle screw, also known as a mounting bolt, is a mounting screw to help secure the door handle to your refrigerator door. If your handle is loose, you may just need to tighten the screw. If your...
This is a single water filter that can be accessible inside the refrigerator. Water filters are designed to provide cleaner and betting tasting water, while also protecting refrigerators and ice machi...
This part is the replacement ice tray for your refrigerator. The tray is made of white plastic and is approximately 9 inches in length, and 3 inches in width. It has the capacity for 8 ice cubes. The ...
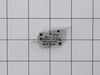
This is a micro switch for various models of LG refrigerators. This switch is responsible for turning the ice dispenser on and off within the freezer compartment of the fridge. If this switch is damag...
Removed ice dispenser and display with small screwdriver from front of the fridge. Pried out the whole piece slowly. This exposed the motor that activates the chute. Plugged in the new motor before any removal to verify the motor was the problem. When it worked, removed old and installed new. 3 screws. Piece of cake.
The replacement gasket does not have as strong a magnet as the original one. I removed the old one carefully so as not to cause more damage in case I have to put it back. Using Tongue suppressor I pushed new gasket into place and put a thin coating of protelem jelly on the gasket. I just have to make sure the door is closed each time to
... Read morebe sure of good seal.
To replace the warped tray, I found the service manual (pg. 124 below) which took some interpreting. Removed the lever. Then removed the assembly by two screws that are forward to the unit and go upwards. The insulation, sensor, and sensor cover are simply pulled down and off and the unit separated to removed the tray, and
... Read morethen insert the new tray. Proceed in reverse. Takes only a few minutes.


 LG Refrigerator")