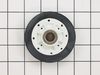
This drum support roller is used for square-ported model clothes dryers. This part is sold individually; however, rollers tend to wear at the same rate, so it is suggested that both should be replaced...
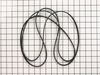
This dryer drum drive belt attaches to the motor pully and works the drum as the motor rotates. The belt has a length of 93- 3/6 inches, and wraps all the way around the dryer drum, around a tension p...
This 1/4 horsepower gas or electric clothes dryer motor carries 120 volts, 60 Hz, and 5.5 amps. It also performs 1725 revolutions per minute. This motor is used for some gas and some electric clothes dryers.
If your dryer is noisy, will not tumble, or is not producing enough heat, you may need to replace the blower wheel. This part is white in color, and is made of plastic. This part is approximately 8 in...
Remove front panel, lint basket, motor mounts,exhaust hood, front drum brackets. Then slip serpentine belt around drum, pressure w/ tension idler pulley and slip around drive motor spindle. Replace all parts in reverse order (a two person job). Vacuumed inside of dryer (full of lint.)
First I turned off the gas supply line. Then unplug the dryer. Remove bottom front cover by removing the 2 screws (1 at each side) at the bottom. Next remove the 2 screws (1 at each side) located at bottom of front door panel. Pull front panel away from dryer and pull down slightly. This will disconnect the entire front panel(with door) f
... Read morerom dryer. Carefull because there is a switch located at the top right corner of the panel on the inside. This will not allow you to remove the door yet. On some scratch paper, sketch the switch and correct color wire positions. Remove wires at connections. Pull the drum toward front dryer carefully. This dislodges it from the back of the dryer. No need to remove it from dryer. This way the belt still remains in place. From inside drum, use a pair of snap ring pliers to remove the snap ring from the support roller shaft located on left side of drum, below where the drum was sitting prior to pulling it forward to dislodge it from inside rear of dryer. Remove old wheel , place some grease on inside of new support roller and some on the shaft. Install new roller and replace snap ring. Slide drum back in place inside the dryer at the rear. Hand rotate the drum to ensure it is properly installed. Reconnect the switch wires to the front panel. Slide panel up into place so that the clips (at top of panel) lock into place(square holes in top cover plate of dryer). Have the door open when doing this because you have to seat the front of the drum into the front cover. Reinstall the 2 screws. Test spin the drum again by hand. If it feels right, it's correctly seated. Reinstall bottom front cover. While everything is apart, you may want to use a vacuum cleaner to clean the inside of your dryer. Perfect time to do this. Plug dryer back in and open gas supply line. Test the dryer. Should be nice and quiet again. This fix is for the left side support roller only. There is a support roller on the right side also. In my case I only needed to fix the left side support roller. The inner diameter of the roller was badly worn and needed to be replaced. You may want to purchase the support roller shaft at the same time. I didn't and will need to do this repair again. I only purchased the support roller and when I removed it, I noticed the shaft is badly worn also. In my case, temporary fix until the shaft is ordered and then I'll do this again.
This was much easier than I expected. I pulled the front covers, released the belt (just move tentioner pulley with fingers to release belt), removed the drum to access the motor. The motor was easy to remove. I loosened then nut in the fan assy using my channel locks (because I did not have a socket that big and then removed the wire har
... Read moreness clip to prepare the motor for removal. The two mounting clips were the tricky part as the fit over a metal ear on each side locked by the spring tension of the clips. It looks like a special tool my be available but I simply used my big straitslot and heavy downward pressure to remove and install. This repair can be completed by anyone with very basic mechanical skills and impress the spouse.