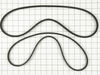
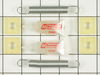
This kit includes both the drive belt and the pump belt which are both V-shaped. If your washer does not toss, spin, or drain water properly, this might be because one of these belts has worn or stret...
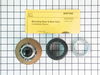
This kit comes with a hub assembly, agitator seal, and spanner nut. If your washer leaks once it is full (with or without clothes in it) or leaks during agitation, then you should replace the seal. Th...
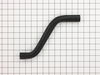
This hose clamp is used in a wide variety of household appliances. Most often it is found in washers, dishwashers, refrigerators, freezers, dehumidifiers, garbage disposals, or air conditioners. This ...
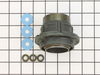
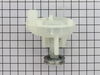
This washing machine drain pump is intended for use with automatic washers that have been manufactured since 1958. The pump itself is made of plastic, though it does come with a metallic belt pulley.
The leveling leg pad or foot pad fits over the leveling leg on your washing machine. The foot pad is designed to protect your floor and keep the washing machine level and in place. This foot pad is ju...
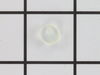
This washing machine lid hinge ball is well under an inch in diameter. These hinge balls are sold separately, though two are required per lid. This lid hinge ball is made of plastic and is used for Ma...
This kit is used on 2-belt washers. It is recommended to change the seal kit at the same time. The tub bearing kit fixes issues with leaking, loud noise, excessive shaking/moving or if your pump is no...
If your washer shakes or vibrates loudly when it reaches its max speed, make sure the 4 levelling legs are even. Adjust the legs so that the machine is level, and tighten the locking nuts on the legs ...
This spring retaining clip is just under 1 inch long. The clip is made entirely of metal and is attached to the back wall of the washer, under the console. If your washer is vibrating and louder than ...
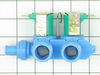
This washing machine water inlet valve has two ports for water to enter. It comes with its own anti syphon and wire guide.
$130.54
In Stock
Questions And Answers for LAT2600AAE
We're sorry, but our Q&A experts are temporarily unavailable.
Please check back later if you still haven't found the answer you need.
6 questions answered by our experts.
Sort by:
< Prev
1
2
Next >
Search filter:
Clear Filter
Your search term must have 3 or more characters.
Keep searches simple. Use keywords, e.g. "leaking", "pump", "broken" or "fit".
Sorry, we couldn't find any existing answers that matched.Try using some different or simpler keywords, or submit your new question by using the "Ask a Question" button above!
David
December 9, 2019
Leaking in front corner of washer
For model number LAT2600AAE
Hello David, thank you for your question. We would recommend checking the following parts. Mounting Stem/Tub Seal Kit Part Number: 6-2095720, Tub Bearing Kit Part Number: 6-2040130 and Drain Pump Part Number: WP6-2022030. These are the most common parts that can leak on this unit. I hope this helps!
1 person found this helpful.
Was this helpful?
Thank you for voting!
Debra
February 11, 2020
Agitator top part came off , what part do i need. Thanks
For model number LAT2600AAE
Hi Debra,
Thank you for your question. If the upper portion of the agitator came off, you will need to replace the agitator auger and base assembly. The part number for it is PS2019803. If you are referring to the fabric softener dispenser, the part number for it is PS11738834. We hope this helps. Thank you and have a great day.
Hi Patsy, thank you for asking. If your beach dispenser is running bleach on the floor, it is most likely damaged and needs to be replaced. The part number for the bleach dispenser cup is PS2019330. If you require assistance to place an order, please contact customer service. We hope that helps!
Have to push down and turn the agitator to get it agitating at times. Do I need to replace the agitator plate?
For model number LAT2600AAE
Hi Kat, thank you for reaching out. You may need to check the agitator base. If it is faulty, then you may need to replace the agitator assembly, part number PS2019803. We hope this information helps!
I used the washer last night with no problem, and it will not turn on today. What could be the problem?
For model number LAT2600AAE
Hello Janna, thank you for your inquiry. According to our research, we would recommend checking the power cord and electrical outlet for any fault. If they are fine, then the issue is most probably with the lid switch assembly, part number PS11739505. You may need to replace it to solve the problem. Glad to be of help!
I removed the 2 phillips screws on the bottom of the front panel. Then checked around to find the belts were actually below the floor panel. I pulled the washing machine away from the wall and tilted it bacwards and found the pump belt was off the pully and the drive belt was badly damaged. I replaced the 2 belts which took no tools
... Read moreand about 3 minutes to accomplish then resecured the front panel, pushed back in place and leveled. Complete repair from diagnosis to back in operation took less than 15 minutes.
My washer is 5 years old and water began to leak on the floor. I took off the front panel and filled the tub. Water did not leak immediately, but after the tub filled with about 3-4 inches of water, the water began to leak from a rubber washer between the fixed tub and the drive shaft. I looked online for exploded diagrams of Maytag wa
... Read moreshers, when I came across your site. By looking at your diagrams, I determined what parts I needed and ordered them. The parts arrived in 2 days, and I installed them. There were no leaks and it cost me under $70 (a repairman would have cost at least $250). The only thing I would recommend to those in similar situations, is to purchase a spanner wrench (your site does not sell, but others do). The stem seal and hub assembly is reverse threaded (clockwise to loosen) and is difficult to remove due to tight quarters in the tub.
1: Disconnected all water and electrical connections. 2: Removed front panel. 3: Disconnected all wires leading from the control panel and removed the top of the washer. 4: Removed the springs that holds the drum down on the damper pads. 5: Flipped washer upside-down so the drum would hang from the bottom of the wash.
... Read more This made it easy to clean the area since it was full of dirt and ground metal dust. 6: Glued new pads (per the instructions) to the cone that protrudes up from the bottom of the washer and allowed to dry. 7: Lubricated the pads with the provided grease and added additional silicon grease to insure smooth operation. 8: Replaced drive belt. 9: Flipped the washer back up-right and installed the drum springs. 10: Reconnected all wires and attached the top of the washer. 11: Reconnected all electrical and water lines and tested operation. 12: Replaced the front panel.
Washer now runs as quite and smooth as it did when it was new.


.gif "SUPPLEMENTAL INFORMATION Diagram and Parts List for Maytag Washer")