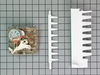
If you have ice building up in your freezer, or if your freezer is getting too warm during the defrost cycle you may need to replace the bi-metal defrost thermostat. The function of the defrost bi-met...
This light bulb is a 120 volt, 25 watt incandescent appliance light bulb with a small base screw-in that fits in a variety of appliances such as microwaves, refrigerators, freezers, cooktops, or stove...
This set of two electronic control boards contains both the emitter and the receiver. These boards tells the icemaker when it's full and that it has to dump the ice, and it also tells the icemaker whe...
This touch-up paint can be used on a wide variety of household appliances. It is most often used on washers, dryer, refrigerators, dishwashers, ranges, freezers, trash compactors, or microwaves. It is...
Metallic screw that is less than an inch long. Does not include the plastic washer.
$7.91
In Stock
Questions And Answers for KSCS23FVSS03
Ask our experts a question about this model and we'll get back to you as soon as possible!
1 question answered by our experts.
Sort by:
< Prev
1
Next >
Search filter:
Clear Filter
Your search term must have 3 or more characters.
Keep searches simple. Use keywords, e.g. "leaking", "pump", "broken" or "fit".
Sorry, we couldn't find any existing answers that matched.Try using some different or simpler keywords, or submit your new question by using the "Ask a Question" button above!
Edward
May 31, 2024
Turned ice maker off using switch in top right side of freezer cabinet. Now it will not return to “on” position.
For model number KSCS23FVSS03
Hi Edward, thank you for reaching out. We would suggest checking the ice level control board, part number PS16875489. It senses ice cube level in the ice bucket and shuts off ice production when the bucket is full. You may need to replace it to fix the issue.
First, I tested the ice maker "switch" that actually just covers the beam that regulates the ice maker. In the "off" position, it still made ice. Then, I removed the three screws on the cover over the transmitter and disconnected the circuit board at the wire connector. It stopped. After ordering and receiving the new transmitter and rece
... Read moreiver boards, I replaced both boards. They are located on either side of the freezer compartment under panels held in place by three screws. Probably saved 150 to 200 bucks.
My Kitchen-Aid ice dispenser had stopped working. I ordered parts and began the repair as soon as the parts arrived. Removed front cover of the ice dispensing station. Two screws at the bottom of the faceplate, under the tray section. Opened the freezer door and removed the ice bucket. Under it I found the connecting drive shaft that link
... Read mores to the auger inside the bucket. Two screws were easily removed and the parts lifted out. The drive shaft was now exposed and could be lifted straight up and out. Back to the front of the door. Now I got to work on the motor itself. It was under a piece of cardstock that protects the area from accidental electrical contact. The motor is held on with 4 screws. The nut driver removed them easily. The new motor was an exact replacement. I substituted the old motor with the new one. At this point I dropped in the new drive shaft from above, inside the door, and made sure it mated properly to the auger motor. Then I re-aligned the holes of the motor bracket, replaced the screws, redressed the wires in the area and put the face plate back on the front of the freezer door. Put the ice bucket back in place, and it worked. Took about 20 minutes. Saved myself a ton of money having a serviceman come out.
WARNING: REPLACING THIS PART REQUIRES CUTTING AND SPLICING ELECTRICAL WIRES. RISK OF ELECTRICAL SHOCK OR FIRE. DO NOT ATTEMPT THIS REPAIR IF YOU ARE NOT EXPERIENCED WITH ELECTRICAL WIRING.
Part Info: The bi-metal strip is clipped onto the evaporator coils and is designed to regulate the defrost coil temperature. If it is n
... Read moreot functioning properly you may notice ice buildup preventing air flow (and preventing proper refrigeration), or more rarely the freezer side may get too warm during the defrost cycle.
1: UNPLUG THE FRIDGE! If there is ice buildup, wait until the ice has melted. A box fan blowing at the ice will help melt it more quickly.
2: Remove the panel covering the evaporator coils. It's located inside the fridge, on the freezer side.
3: Un-clip the bi-metal strip from the evaporator coils.
4: Unplug the wires from the evaporator fan, defrost coil and bi-metal strip, then disconnect the main connector that is plugged into the rear wall.
5: Clip both wires to the old ( bad ) bi-metal strip. Cut close to the casing of the bi-metal strip so there are long wires to splice onto.
6: Strip 1/4 to 1/2 inches of insulation off of the ends of the wires ( depending on the size of the wire-nuts you use). Twist the bare wires slightly to prevent fraying.
7: Do the same for the ends of the wires on the (new) bi-metal strip.
8: Take the ends of the wires belonging to the (new) bi-metal strip and the wires coming from the main plug. Take the like-colored wires, and twist the bare metal ends together.
9: Twist on wire nuts, for both sets of wires. Make sure they are snug, with no bare wire showing.
10: Tape over the wire nuts with electrical tape. Tape over the wires nuts in a spiral fashion, completely covering the nut and both wires that are now spliced together. This will prevent accidental shorting.
11: Plug the main plug back into the rear wall of the fridge. Also re-connect the connectors to the evaporator fan and defrost coil. Make sure the clips on the connectors are snug to ensure a good connection.
12: Clip the new bi-metal strip onto the coils, in the same spot as before. ( Usually just after the small incoming copper tubing that connects to the coils, known as the expansion valve. That is usually the coldest spot on the coils during operation).
13: Replace the panel that covers the coils.
14: Plug the fridge back in... Now you fridge should defrost correctly. If it does not, your defrost coil could be burned out, or the control board could be faulty.


 Diagram and Parts List for KitchenAid Refrigerator")


 – Part Number: WP2260518W")