Enter the code USA15 at checkout to apply your discount. Discount will be applied at checkout when the code is entered & applies to all parts. Cannot be combined with any other coupon or special offer & cannot be applied to a previously placed order. Not valid toward tax or shipping & handling. Discount has no cash value. Discount expires on July 1 at 11:59pm EST.
You've Got 10% Off Your First Order!Save 10% with code at checkout *click to copy coupon code
This light switch may also be known as a refrigerator door switch or a light switch kit, and is compatible with your refrigerator. The function of the refrigerator door switch is to turn on the light ...
$27.70
In Stock
Order within the next 6 hrs and your part ships today!
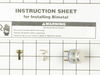
This is a multi-use and multi-appliance screw. It can be used on a microwave, refrigerator, range/oven, air conditioner, dehumidifier, washer, or dryer. The measurements of this screw are 8 x 1/2 inch...
$20.83
In Stock
Order within the next 6 hrs and your part ships today!
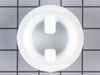
This refrigerator ice maker fill cup dispenses the water into the ice cube mold during the fill cycle. Replacing the water fill cup is a possible solution if you notice that the ice maker is leaking, ...
$40.40
In Stock
Order within the next 6 hrs and your part ships today!
This limit switch is located in the ice/water dispenser section. The switch pictured here is black, though this type of switch is also available in white.
I removed the ice maker from the refrigerator, by removing one screw on the underside bracket and loosening the two screws at the top side, then lifting the ice maker off the loosened screws. I then unplugged the electrical harness that supplies power from the refrigerator to the ice maker. I then disassembled the ice maker by removing
... Read morethe front cover which is snapped in place, then removing two recessed screws at the front. I removed the broken part, I then reassembled the ice maker with the new part. I replaced the two recessed screws at the front and snapped on the cover. Then I reinstalled the ice maker in the refrigator by plugging in the harness, slipping the ice maker over the loosened screws in the refrigerator and replacing the screw that was removed from the underside bracket. Tightening all the screws completed the project.
I replaced the actuator switch and rubber pad with the switch actuator. I had attempted to repair previously without replacing the pad but the problem continued. I put up with the problem for a long time waiting for the opportunity to get to the appliance parts store but their hours are hard to deal with and work myself. I was able
... Read moreto find the part easily with the on-line catalog and parts diagram and ordering was no hassle at all. Shipping was extremely fast. I remove the front panel by removing the drip tray and the 2 screws at the bottom. Then gently lift up on the front cover assembly (careful with the connector to the circuit board at the top) it slides over 2 screw heads at the top. Remove all the screws that secure the dispenser to the fridge, one screw is hidden on the right side (as you face the front. Work the dispenser out and careful of the water tube coming from the top - it stays in place. The wire connector must be unplugged from the left side in order to remove the assembly and not actuate the dispenser while working (a good idea to unplug the fridge). A small phillips screw holds the switch in place and the actuator fits over with the slots fitting over lugs on the assembly. Reinstall as you removed - be careful to be sure all wires go back into the proper location and "tracks" to keep them out of the way and avoid pinching (if the actuator will not go back flush in its location check the wires to the switch). Plug all wires bach in and don't forget the harness to the top of the circuit board on the front panel. Plug back in and check your work. Important to replace the actuator pad - its "elasticity" is the return mechanism for the switch actuator. Probably the issue I had after replacing the switch and still suffering the same problem. Good Luck!
I used a flat-head screwdriver to pop out the old light rocker switch. Then, I unplugged the wires, plugged them into the new light rocker switch, and then popped the new switch into the hole. That's it! Lights began working again.