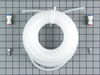
This Defrost Timer works like a clock by switching on the defrost heater circuit after a predetermined amount of compressor run time. This allows the defrost circuit to clear the evaporator of ice or ...
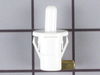
This 8-cube ice maker is used to create ice for your refrigerator. The ice maker receives water from the water inlet valve and will freeze until ice cubes are formed. Once the water has been frozen t...
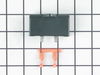
The run capacitor helps the compressor kick on and off while maintaining a constant temperature in your fridge and freezer. You may need to replace your run capacitor if your refrigerator or freezer s...
This replacement icemaker may also be known as the ice maker assembly and is compatible with your refrigerator/freezer. This assembly replaces the heat-release ice maker unit only. The kit comes with ...
This OEM 40 watt appliance light bulb is used for some ranges, refrigerators, freezers, and microwaves. Simply locate the existing bulb, unscrew it from its socket, and replace with new light bulb. If...
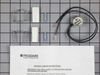
This limiter thermostat cuts out when the temperature inside your refrigerator reaches 55 degrees Fahrenheit and kicks back in when the internal temperature drops to 20 degrees Fahrenheit. If you disc...
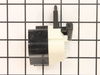
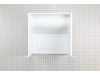
This is the replacement crisper drawer cover support for your refrigerator. The crisper shelf rests on the support, which keeps it level. If your drawer cover or shelf will not stay level, or will not...
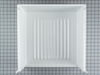
This evaporator fan blade is a genuine OEM part that is sourced directly from the manufacturer. The evaporator fan blade circulates air through the refrigerator to control the amount of cold air goes ...
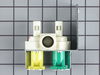
The light socket on your refrigerator houses the light bulb and connects it to the power source. If you notice that your refrigerator light does not come on when you open the door, you may need to rep...
$21.96
In Stock
Questions And Answers for F45WR24CW1
We're sorry, but our Q&A experts are temporarily unavailable.
Please check back later if you still haven't found the answer you need.
Fridge is a side by side. The freezer is pretty narrow for a guy with wide shoulders.
Pulled plug.
Had to remove bottom drawers then used nut driver to remove screws closest to back wall in drawer runners. Once the back screws were removed the runners could be swung up or down out of way so back cover could be re
... Read moremoved.
Once back cover was removed thermostat was located attached to top pipe going into coil using a spring clamp.
Cut the wires just outside the crimp connectors going into thermostat. Released the spring clamp buy squeezing botton together.
Removed old badly corroded thermostat.
I wish I had attached the crimp connectors to the new thermostat wires before mounting it. Reaching way in the back, while turning shoulders verticly and trying to get the wire connectors set from both sides was awkward and uncomfortable...The biggest PIA of the whole task.
Once connected I let the fridge (thermostat) cool for 10 min. Turned the dial defrost timer to get it into defrost mode. Stupidly touched the heating element to see if it was getting warm...it was very hot.
Coils steamed...every looked like it was working. Unplugged, put back cover back on and retattached drawer mounts.
Unplugged faulty ice maker, removed two screws holding it to the refrigerator and took it out. Reversed the operation with the new ice maker and after a few minutes presto, we have ice.
It was pretty straight forward. Remove the two screws that hold the unit to the wall of the freezer. In my case, I had to use a different ice maker than what came with the frig. In order to install the replacement unit they sent a wire adaptor so it would attach to the existing wiring. That too was all fine and dandy. The only p
... Read moreroblem was that the end of the wire adaptor did not fit through the existing hole in the rear of the frig. I used a utility knife to cut through the thin metal lining. That worked just fine. However, I could not cut through the insulation because I could not reach it through the small hole. The excess wire was supposed to be pulled through the hole and out through the back of the unit. So now the excess is between the wall of the freezer and the insulation. The unit is working wonderfully. In fact, it is making more ice than I can use. I am very pleased with the replacement unit. This is the 3rd ice maker that has been in this frig. All the others had a design flaw that had a leak in the rear of the unit. This caused all the ice to form into a big block. The replacement unit has not had this problem so far. Thank you for allowing me to explain my situation so that maybe others may benifit from my experience. Thank you. Jack