Enter the code USA15 at checkout to apply your discount. Discount will be applied at checkout when the code is entered & applies to all parts. Cannot be combined with any other coupon or special offer & cannot be applied to a previously placed order. Not valid toward tax or shipping & handling. Discount has no cash value. Discount expires on July 1 at 11:59pm EST.
You've Got 10% Off Your First Order!Save 10% with code at checkout *click to copy coupon code
The rack track stop on your dishwasher is designed to stop the dish rack at the appropriate place when opening and closing the rack. If your dishwasher is not cleaning your dishes properly, the rack s...
This is a replacement upper dish rack wheel with mount for your dishwasher. The mount supports the dish rack, and the wheel allows the rack to slide out easily. To replace this part, remove the rack s...
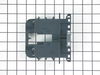
The mounting bracket is sold individually, without screws. This part secures the upper side of the dishwasher to the underside of the counter or cabinet to prevent the dishwasher from moving, shaking,...
This one-piece door gasket provides a water tight seal between the tub and the door, to keep water from leaking out of your dishwasher. If your dishwasher is leaking, tears, or there are gaps in your ...
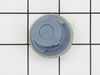
The rinse aid cap (sometimes referred to as the dispenser cap), covers the rinse aid dispenser on the dishwasher door. If your dishwasher will not dispense detergent, or it is leaking detergent, there...
The rubber washer is a part which is specific to dishwashers and should not be substituted by a similar part. It works with the heating element to seal the receptacle opening where the heating element...
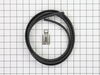
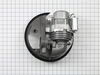
This water inlet valve should be located behind the lower kickplate panel in either the right or left corner. The attaching solenoid on the valve will open and close according to the desired amount of water needed.
$68.34
In Stock
Questions And Answers for DU1050XTPB1
We're sorry, but our Q&A experts are temporarily unavailable.
Please check back later if you still haven't found the answer you need.
Rather than remove the pump assembly - as an earlier post had done - I pulled the entire dishwasher out and laid it down on the floor. This allowed easy, direct access to the motor (that was the hard, messy part). From this point it was easy. Unplug the wiring, remove the retaining bolt, rotate the motor off the mounting brackets and pull
... Read more it out. Then put the new one in. That was the easy part (about 15 minutes). The entire job took 2-and-a-half hours, most of which was taken in disconnecting, cleaning up and reconnecting the dishwasher. It's much quieter now.
1. Remove torx screws around outer edge of inside of door. 2. Separate outer door panel from inner door panel. 3. Locate dispenser, and remove 6 hex nuts and 2 wires for solenoid. 4. Insert new dispenser and re-insert hex nuts. 5. Reinsert torx screws.
I went on the internet and found a pdf file with the Kitchenaid dishwasher repair manual for my model. One of the hardest parts of the job was convincing myself that I could do the job. When you're young, you just go out and buy a new dishwasher and tell yourself, "it's only money, we'll make more." When you're over 50, you tell yourse
... Read morelf, "I can fix this. It will mean I get to retire a week sooner if I don't spend another $700 for a new dishwasher."
In hindsight, I could have done this job (replace the motor) in about 30 minutes. 1) Turn off electrical breaker in basement. 2) slide out dishwasher. 3) disconnect water supply. 4) use old towels to soak up any water still in the tub. 5) turn dishwasher on it's side. 6) unhook the wire harness plug from the motor, squeeze with fingers to unhook. 7) unbolt motor, 1 bolt. 8) turn motor counterclockwise, 1/4 turn. 9) pull motor out from sump, requires some force. 10) install new motor, but use some rinse aid to lubricate the rubber seal on it. Instead I did things the hard way and took the whole darn machine apart!!! See my story below.
I was surprised at how simple the design was and how few parts there really were inside the dishwasher. I found the pdf repair manual very useful, and I also found some repair videos on line. One thing they may or may not tell you - clean the parts well and lubricate the gaskets with some 'rinse aid' liquid when you put the machine back together. Also, it might help you to take a few pictures with a digital camera before you take things apart - that might help you remember how things go back together. Take close up pictures and use a treble light to illuminate the area when you're taking a picture.
The new motor was the ticket to fixing the loud noise. I was worried because the part cost $150. Before I ordered a new motor, I hooked up the old motor to electricity on my work bench and was able to recreate the really loud noise - so I was pretty sure that the new motor would eliminate the problem. It was very easy to install the new motor, only one bolt holds it in place. I did need to disassemble several parts to get to it though. Have no fear. One thing I did was mark the electric leads that went to the small pump with red and black sharpie markers so I could easily see which terminals to plug them back onto.
After reassembling the whole dishwasher with a new motor and testing the dishwasher for leaks by pouring a couple pitchers of water into it - I put the beast back under the counter (hooking it back up to the water supply line, the drain pipe to the garbage disposal and finally the electric supply). Then I ran it and water gushed out the bottom.
This whole job should have been easy, but things never go easy for me. Maybe if I would have lubricated the old sump gasket with rinse aid it would have sealed properly when I reinstalled it. Maybe if I would have cleaned the old sump gasket and the bottom of the tub really thoroughly things would have sealed right. But I didn't - so it leaked. I went ahead and bought a new sump gasket ($30 and had a few more days of waiting and self-doubt and having the dishwasher broken down). One the gasket came, I went through the entire uninstall, disassembly, reassembly and reinstall process AGAIN!!! This time with the new clean sump gasket and thoroughly cleaned surfaces. I also lubricated the gasket with rinse aid before installation. NO LEAKS! Job finished. Lessons learned. Doing it the first time was pretty tough though. Good luck! Get a helper for moral support and picture taking!


 Diagram and Parts List for Whirlpool Dishwasher")