Enter the code USA15 at checkout to apply your discount. Discount will be applied at checkout when the code is entered & applies to all parts. Cannot be combined with any other coupon or special offer & cannot be applied to a previously placed order. Not valid toward tax or shipping & handling. Discount has no cash value. Discount expires on July 1 at 11:59pm EST.
You've Got 10% Off Your First Order!Save 10% with code at checkout *click to copy coupon code
This an authentic OEM 40-Watt replacement light bulb, used in a number of household appliances. It is specially designed to withstand extreme temperatures, which is why these replacement bulbs are mos...
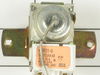
This capacitor (Refrigerator and Freezer Compressor Run Capacitor, Run Capacitor) provides the voltage or energy current required to start the compressor and keep it running. It allows the compressor ...
This is a multi-use and multi-appliance screw. It can be used on a microwave, refrigerator, range/oven, air conditioner, dehumidifier, washer, or dryer. The measurements of this screw are 8 x 1/2 inch...
Sold individually. This bulb is a 7-watt appliance incandescent light bulb. This appliance light bulb is two inches long. It is used for many clothes dryers. You will need a Phillips screwdriver and n...
The compression nut is used as a connection between the water supply line and other components in your refrigerator such as your ice maker and your water dispenser. Tools required for this repair incl...
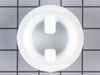
This drive ring is three inches in diameter. It is all white in color and is made of plastic. This ring is used with a refrigeraor's icemaker assembly.
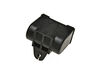
This is an evaporator fan motor for a refrigerator. The fan motor circulates air through the refrigerator to the fresh food compartment for efficient cooling. It is just over three inches long. It is ...
$103.06
In Stock
Questions And Answers for DNT18H9LH
We're sorry, but our Q&A experts are temporarily unavailable.
Please check back later if you still haven't found the answer you need.
I knew the chances of all the freon leaking out was unlikely so I looked at the wiring to the compressor and there was a capacitor and a starter/overload so i figured I would start there. I went on line and found the parts at this site and they were less than the minimum service call charge for a service tech so I figured what the heck le
... Read moret's give her a shot so I did give it a shot. I ordered the parts and they were there in less time than a service tech could come out and i installed the parts and guess what for 90.00 in parts and 15 minutes in time I repaired my refrigerator. Thanks guys, It took less time to order the parts than it did to make the repair so thanks, your website rocks and is very well designed so my hat is off to you guys!
I removed control knobs and a couple of screws and forced the assembly down enough to remove the old thermostat, and insert the new one. Lucky me it was a identical replacement item. Job took about an hour.
First you must unplug the refrigerator, then remove the top hinge and freezer door, then you must remove the middle hinge to remove the refrigerator door, after that there are 4 screws located in the refrigerator compartment that must be removed that are holding the plastic control knob trim in place. When you remove these screws and drop
... Read more the trim piece you can unplug the wiring on it, to completly remove it, next right above the plastic trim previously removed there is a metal trim with 3 screws holding it in place they will be removed now. Now you need to remove all of the shelving in the freezer compartment these pieces will just snap out , at the lower left and right sides of the freezer compartment there are two plastic tips that are attached to the main plastic body of this compartment they will need to be snapped out from behind the metal body of the refrigerator this can be done with a flat head screwdriver. Now pull straight out on the plastic body and it should come out , this will expose an insulating cover over the freezer coil where the defrost heater is located,if this is covered with ice you will need a heat gun which is a overgrown hair dryer basically. To melt the ice you will have to remove a insulating cover that is located behind the previously removed front metal trim it will come out by gently snapping it out of place, use caution during this step so not to break the cover in half. This will expose the front of the freezer coil and you can now use the heat gun to melt the ice, keep a check on the drain pan beneath the refrigerator as it will have to be emptied depending on the amount of ice build up. As the ice melts it should release the top cover of the coil and this will lift out of place also again use caution when removing the cover. With the coil exposed melt the remaining ice, if you look in the coil you will see the defrost heater, if the glass tube on the heater is broken please use extreme caution so you will not get cut by it , now you can unplug each wire from each side of the heater you may need a pair of pliers for this. when the wires are unplugged you can now lift out the bad heater again use caution if the glass is broken. There is a gaurd over the heater that will have to be removed by sliding it off the end wires when you have this off, slide it over the wires on the new element, now gently install the new heater back in the coil reconnect the 2 end wires and make sure they are connected good. you can now assemble all of the covers and parts in the reverse order you removed them, when assenbly is complete plug the refrigerator back in and in about three hours or so you should here the fan and compressor stop and the unit should go into a defrost cycle during this you should here the water running to the drain pan as it melts.