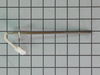
This genuine OEM oven probe is also known as an oven temperature sensor or range probe. This part is manufactured for a range, stove, or oven to detect the temperature within the oven cavity. The prob...
This OEM 40 watt appliance light bulb is used for some ranges, refrigerators, freezers, and microwaves. Simply locate the existing bulb, unscrew it from its socket, and replace with new light bulb. If...
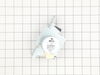
Terminal block kits are also known as terminal boards, or terminal strips, and they are found in a wide variety of household appliances. Most often in ranges, wall ovens, and dryers. This kit attaches...
This part is found inside your oven. This oven rack comes in the color chrome and measures 24 inches in width and 16 inches in length. This is an extremely simple repair that requires no tools. The pa...
The Frigidaire light bulb lens covers the interior light bulb in an oven. No tools are necessary to replace this item. After unplugging the appliance, slide off the wire bracket to remove the existing...
This part is a single oven rack link arm. It is a genuine OEM replacement part for your oven. It connects the oven rack to the door bracket, to allow the rack to extend out when you open the oven door...
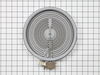
This is a six-inch radiant element with limiter. It works in conjunction with your stove top range. The purpose of this part is to heat up the cooking area that is located on top of the range, also kn...
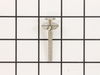
The anti-tip bracket kit comes with one metal bracket and two installation screws, and is sourced directly from the genuine manufacturer. It prevents the freestanding oven, range, or stove from tippin...
This OEM broiler pan and grate insert are cooking accessories used in your oven to broil food. The pan catches drippings and prevents them from falling into the appliance, while the grate insert ensur...
$68.18
In Stock
Questions And Answers for CGEF3057KFD
We're sorry, but our Q&A experts are temporarily unavailable.
Please check back later if you still haven't found the answer you need.
1 question answered by our experts.
Sort by:
< Prev
1
Next >
Search filter:
Clear Filter
Your search term must have 3 or more characters.
Keep searches simple. Use keywords, e.g. "leaking", "pump", "broken" or "fit".
Sorry, we couldn't find any existing answers that matched.Try using some different or simpler keywords, or submit your new question by using the "Ask a Question" button above!
Dorothy
December 17, 2021
Oven heats up to the temperature selected, after the oven door is opened, put in food to cook, the temperature does not adjust back up to the required temperature. It does not record the drop in temperature either. I have to cancel the temperature, re-enter & the temperature needed before the temperature increases/rises back up to the temperature desired.. can you please advise the possible solution to my problem. thank for your time.
For model number CGEF3057KFD
Hi Dorothy,
Thank you for contacting us. If the oven is not heating correctly, the issue may be with the oven sensor. The oven temperature sensor is the part that monitors the oven temperature and signals the electronic control board to turn the elements on and off. Before removing this part from the oven and testing it with a multimeter for continuity, unplug the oven from the electrical outlet. To test the sensor, you will need to reference your owner’s manual to determine what the correct reading should be for your model, as this varies from model to model. To test it for continuity, use a multimeter on the Rx1 setting and touch the terminals with the probes. This test needs to be done with the sensor at room temperature to produce accurate results. If your test results do not meet the manufacturer’s guidelines, you need a replacement temperature sensor. If the sensor is fine, you will need to check the elements, the electronic control board and the wiring between the parts to see which one is causing the issue. We hope this helps! If you have any questions, please let us know.
PF alarm appeared on display. Noticed clicking when cord was moved. Had arced for some time and melted original block. New part slightly different. Only has 3 lugs, old one had six. Stack using washers provided. Take note of colors before disassembly. Use caution while working through access opening. The edges are sharp. Only tools neede
... Read mored are phillips screwdriver, deep socket for lug nuts. Nut driver optional. Hope this is helpful.
First we removed two screws under the rim of the range top to open the lid. Lifted the lid and removed the screws from the bracket that holds the elements, Be careful with the clips that hold the element in, if you break them or bend them there aren't any more! Also note which holes they were in, they are marked according to the differ
... Read moreent sizes of elements. Disconnected the wires, needed needlenose pliers to grip them...connected new element, popped it back in place, replaced bracket, closed top ...Easy peasy!!!
I called a repair place. They charged $54 to diagnose, (said it needed a new latch motor) then wanted $220 to complete the repair. I checked online prices and did it myself for about 15 minutes work and the latch motor itself ($44?).
Was necessary to uplug the range, pull it away from the wall and remove the back panel sheet m
... Read moreetal, then 3 screws that mount the motor. Replace motor, reattach sheet metal. Plug in. Done. Ready to bake cookies.