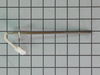
This genuine OEM oven probe is also known as an oven temperature sensor or range probe. This part is manufactured for a range, stove, or oven to detect the temperature within the oven cavity. The prob...
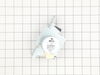
This OEM 40 watt appliance light bulb is used for some ranges, refrigerators, freezers, and microwaves. Simply locate the existing bulb, unscrew it from its socket, and replace with new light bulb. If...
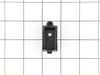
This handle mounting screw works with your oven or range, and bolts the door handle to the door. It is approximately 2 inches in length and is an OEM part sourced directly from the manufacturer. If yo...
This kit is used to convert your appliance to liquid propane. This liquid petroleum gas conversion kit contains seven orifices, each under an inch long.
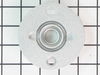
The Frigidaire light bulb lens covers the interior light bulb in an oven. No tools are necessary to replace this item. After unplugging the appliance, slide off the wire bracket to remove the existing...
This tempered glass is supplied by the original manufacturer and measures 20 inches by 13 inches. It is an inner door glass, designed for use in ranges/ovens and has several purposes which include pro...
This is a bake igniter manufactured for an oven, stove, or range burner. It ignites the gas to light the oven burner to bake your food items. If your oven will not heat properly, your igniter could be...
This rear drawer glide, also known as a storage drawer glide, is used in ranges. This helps hold the front side of the storage drawer and allows the drawer to easily slide in and out of the range. If ...
The anti-tip bracket kit comes with one metal bracket and two installation screws, and is sourced directly from the genuine manufacturer. It prevents the freestanding oven, range, or stove from tippin...
We're sorry, but our Q&A experts are temporarily unavailable.
Please check back later if you still haven't found the answer you need.
1 question answered by our experts.
Sort by:
< Prev
1
Next >
Search filter:
Clear Filter
Your search term must have 3 or more characters.
Keep searches simple. Use keywords, e.g. "leaking", "pump", "broken" or "fit".
Sorry, we couldn't find any existing answers that matched.Try using some different or simpler keywords, or submit your new question by using the "Ask a Question" button above!
Martin
November 29, 2019
My left rear burner wouldnt light after having an overflow of a pot spill out. I took the top off and cleaned the gas valve and igniter. Still didn't work even know i can see a spark and can light it with a match. Now a few days later i came back to work on it and that burner works fine now. But the right rear burners doing the exact same thing as described above.
For model number CFGF366FCD
Hello Martin, thank you for writing. This sounds like an issue with the Spark Module, part number PS2350722 for your model. Good luck with your repair!
It was the week before Thanksgiving and we didn't know what to do without an oven. I did some research on Google and of all the websites out there, I found a decent price here at Parts Select and ordered it on Friday. I was shocked when FEDEX pulled up to the door on Saturday afternoon. I went online to youtube and found a step by step
... Read more video specifically for this part. It's posted by the Repair Clinic. http://www.youtube.com/watch?v=cLxKoF16gac. I was able to fix the part and probably saved at least $150.00 for a service call and repair time. The part cost about $90 and I was done in less than 15 minutes. We just got this stove about 2 years ago and I'm thinking maybe we could have saved my old stove since it had the same problem. Great job Parts Select - I got just what I needed and saved a ton of money in the process. Thanks also for their great informative video online. We had a great Thanksgiving and were very thankful for all our hot food fresh from the oven.
I followed the simple instructions that were included in the kit. I started by replacing the 5 orifices on the top burners. The orifices are well labeled with numbers and colors. Next, I tightened the broiler burner orifice and the oven burner orifice with a 1/2 inch wrench. I had to tighten them pretty good to get the flame down where it
... Read more is supposed to be. Then, I checked for leaks and I was then ready to cook.