Enter the code USA15 at checkout to apply your discount. Discount will be applied at checkout when the code is entered & applies to all parts. Cannot be combined with any other coupon or special offer & cannot be applied to a previously placed order. Not valid toward tax or shipping & handling. Discount has no cash value. Discount expires on July 1 at 11:59pm EST.
You've Got 10% Off Your First Order!Save 10% with code at checkout *click to copy coupon code
The surface burner plug-in block kit features a newer-style terminal block. This kit is designed for use with ranges and cooktops. This terminal block is how the coil element on your stove connects to...
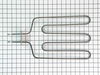
Please note: This is a substitute from the original part. It may physically look different, but will still function the same. This bake element is found on the bottom of the oven.
This is a surface element for the stove top on your range. It supplies heat to the top of the range cooking area. This model is 2100 watts and is eight inches in diameter. It has looped terminal ends,...
This is cookware designed for use in your range or oven. It is a two-piece dish that is used to grill or cook food while the broil function is on, meaning it can withstand high temperatures. This set ...
First I turned off the circuit breaker on the house electricity panel. I removed the two screws that held the element in place in the oven. There were two wires connected to the element by spade plugs that were free floating in a fiberglass pad. I reconnected the spade plugs and put the element back in place and put back in the two sc
... Read morerews. This procedure had I known what I was doing could have been done with the stove in place and would take no more than 5 to 10 minutes. Having no experience at this, I had pulled the stove out into the room and also removed the back cover which turned out to be unnecessary. I put everything back in place and held my breath and turned on the circuit breaker. Voila! It worked!
After trying for many years to buy the "cheap" drip pans in the store, "They never fit right", I decided to order the correct drip bowls. Now my stove top looks brand new, and my coil elements fit the proper way.
I unplugged the stove from the outlet, then removed the two burners I was going to be working on and the drip pans. Then I raised the top part of the stove and removed the screws holding the plug-in blocks to the stove. Then I cut the two wires going to the old plug-in block and stripped the wires back to match the new wire parts. Then I
... Read moreplaced the sleeves over the new wires, then I placed the new wire beside the wire I stripped on the stove and screw on the wire cap making sure it was tight. I repeated this three more times, once I had all four wires connected I then placed the sleeves over the connections and heated them up until they were formed around the connection. Once I had all the connections done I placed one wire at a time into the plug-in block until it locked into place ( I looked at my old plug-in blocks first to make sure I placed the new wires in the correct way ).I then used the metal mounting bracket that matched my old ones and snapped the correct one onto each plug-in block. Before mounting them onto the stove I compared them to my old ones to make sure they were correct. Then I used the new screws to mount them to the stove. I took a second look at everything I had done before closing the top cover of my stove. After lowering the cover back into place I put both the drip covers in place and then installed the burners.I then plugged the stove back into the outlet and tried the burners. This was very simple and the video on the web site shows this very well which made my job very simple.