Enter the code USA15 at checkout to apply your discount. Discount will be applied at checkout when the code is entered & applies to all parts. Cannot be combined with any other coupon or special offer & cannot be applied to a previously placed order. Not valid toward tax or shipping & handling. Discount has no cash value. Discount expires on July 4 at 11:59pm EST.
You've Got 10% Off Your First Order!Save 10% with code at checkout *click to copy coupon code
It is an authentic manufacturer-sourced replacement part that i supplied for Craftsman trimmers. The function of a carburetor is to mix the air and the gas into a highly combustible mix before it goes...
This genuine OEM glide cap, is also referred to as a fixed line head. It protects the cutting line of your string trimmer and prevents it from coming into contact with sidewalks or curbs. Housing the ...
The pawl assembly is a complete OEM kit that includes the two plastic pawls, the two springs, and the metal housing. Installation is rated "Medium" difficulty and requires a screwdriver and socket set...
Fuel tanks are responsible for storing and supplying fuel, like gasoline, for an engine. This fuel tank assembly is designed for and compatible with various models of trimmers and includes the plastic...
This fuel tank cap fits on top of the fuel tank in your lawn equipment. It prevents gasoline from spilling out and keeps moisture and dirt from entering the tank. If the cap is damaged, it will be vis...
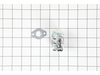
This clutch assembly is a genuine OEM replacement kit for outdoor lawn equipment. The kit includes the clutch drum, clutch, clutch washer, and screw. The clutch assembly transfers power from the engin...
This Switch is a black, plastic on/off switch for a trimmer. Installation of this manufacturer-certified switch is rated as "Easy" and requires a screwdriver, wrench set and socket set. Refer to your ...
emptied fuel from tank. pulled off the 2 fuel lines from the carburetor.opened the air cleaner door. removed the 2 torque screws that hold on the carburetor. removed the carburetor and air cleaner gasket. installed new carburetor and gasket and put back and tightened the 2 torque screws. closed air cleaner door and pushed the fuel lines o
... Read morento the new carburetor.put some fuel in the tank. started the trimmer. runs great.
Removed 2 screws securing the air cleaner and carburetor to the engine using a T25 Torx driver. then removed the throttle cable from the carb.Then removed the o ring gasket from the engine and replaced with a new one and replaced the carb etc. Primed it and fired it up.Runs just like new.
The replacement of the carburetor, O-ring, and gasket was simple. I removed 2 screws that held the air cleaner and carburetor in place, swapped them out, and replaced the screws. What took longest was finding a piece of fuel line after breaking one of them. It was brittle after hanging in my garage for several years. I found some in my
... Read more garage and replaced it. It took a few pulls to get it started, but ran very smooth.
Additional information: rather than mixing my fuel, I purchased 40:1 pre-mix fuel to prevent gunking up the carburetor in the future. I use it in my other trimmer and have not had any issues.


(2015) Cub Cadet Trimmer")