Enter the code USA15 at checkout to apply your discount. Discount will be applied at checkout when the code is entered & applies to all parts. Cannot be combined with any other coupon or special offer & cannot be applied to a previously placed order. Not valid toward tax or shipping & handling. Discount has no cash value. Discount expires on July 4 at 11:59pm EST.
You've Got 10% Off Your First Order!Save 10% with code at checkout *click to copy coupon code
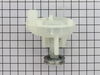
This washing machine drain pump is intended for use with automatic washers that have been manufactured since 1958. The pump itself is made of plastic, though it does come with a metallic belt pulley.
The leveling leg pad or foot pad fits over the leveling leg on your washing machine. The foot pad is designed to protect your floor and keep the washing machine level and in place. This foot pad is ju...
If your washer shakes or vibrates loudly when it reaches its max speed, make sure the 4 levelling legs are even. Adjust the legs so that the machine is level, and tighten the locking nuts on the legs ...
The hose clamp is used to hold the water hose in place which will prevent the hose from leaking water. Sometimes the clamp may lose its ability to latch on, causing a leaking washer. For the installat...
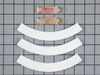
This damper pad kit is used for base support. It comes with three six inch damper pads, two little tubes of lubricant. NOTE: This part will need adhesive to stick it in place.
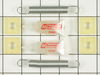
This glide and spring kit contains two three inch springs, four one inch square glides, and two tubes springs. This kit replaces older style round roller glides.
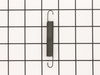
This timer knob spring is almost an inch and a half long, and is not quite an inch in diameter. It is made of metal and is used with the timer knobs of both washers and dryers.
Firstly, remove ac power from washer! After removing the front panel of the washer (two philips screws), I loosened and removed the plastic motor cover and removed three hex head screws holding the motor. Have someone help you tilt the washer so you can remove the belts by "rolling" them off of the pullies (pump pully and motor pully
... Read more). What I did was use a chemical degreaser to clean the motor base metal channel where the nylon sliders reside. After doing that and letting it dry, I removed the two old springs. I ended up reinstalling the old springs because they were not stretched and I installed a new spring (total three) on the right side of the mount. A stiff metal rod with a hook on the end will help you install the springs. Squirt some of the included silicone lubricant on both sides of the motor mount channel and exercise the lube. Reinstall the motor and plastic cover over top of motor. Clean hands and clean belts while you have them out, reinstall belts and front cover and you're finished. My wife said it never ran better!
I loosened three screws to relieve the belt tension and removed the belt from the pump drive pulley. After removing the water from the wash tub I removed the intake and output hoses from the pump. I next removed the mounting screws and removed the pump. I attached the new pump loosely and re-attached the belt. I moved the pump to tighten
... Read morethe belt tension and tightened the mounting screws. I re-attached the hoses, filled with water, checked for leaks and replaced the front panel.
I took out the two screws in the bottom front panel of the washer, and rotated the front panel from the bottom away from the machine until the top or the panel was released from the machine frame. I then tilted the washer back to get access to the bottom of the machine. The pump pulley had split in half, and the bottom half fell off the d
... Read morerive motor shaft. The only problem I had was breaking free the set screw that holds the pulley to the drive motor shaft. I used a long arm Allen wrench and an adjustable "Cresent" wrench to apply enough force to break the set screw loose. Iclamped the upper transmission belts tightly to keep the motor shaft from turning while I loosened the set screw.