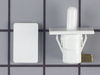
This door shelf end cap set contains two white end caps. Each end cap can be used as either the right or the left side. These end caps also come with adhesive strips and an instructions sheet.
$18.25
In Stock
Order within the next 11 hrs and your part ships today!
This is a multi-use and multi-appliance screw. It can be used on a microwave, refrigerator, range/oven, air conditioner, dehumidifier, washer, or dryer. The measurements of this screw are 8 x 1/2 inch...
$20.77
In Stock
Order within the next 11 hrs and your part ships today!
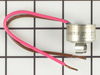
This is a bimetal defrost thermostat for your refrigerator. It stops the fridge from overheating during the defrost cycle by protecting the evaporator. This clip-on thermostat will sense the temperatu...
$42.45
In Stock
Order within the next 11 hrs and your part ships today!
This touch-up paint can be used on a wide variety of household appliances. It is most often used on washers, dryer, refrigerators, dishwashers, ranges, freezers, trash compactors, or microwaves. It is...
$8.00
In Stock
Order within the next 11 hrs and your part ships today!
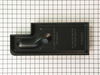
This hinge bracket, also known as a door stop, is attached to the bottom of the door and is used to limit how far the door swings out to protect the refrigerator itself, and any surrounding cabinets f...
$10.72
In Stock
Order within the next 11 hrs and your part ships today!
The purpose of the light switch in your refrigerator is to automatically turn on the light when the door is opened. If the light does not come on automatically when you open the door, the contacts ins...
$30.31
In Stock
Order within the next 11 hrs and your part ships today!
The light socket in your refrigerator houses the light bulb and connects it to the power source. If your refrigerator light is not coming on when you open the door, you may need to replace the light s...
$70.65
In Stock
Order within the next 11 hrs and your part ships today!
first I diagnosed the problem with the whirlpool do-it-yourself repair manual, which was very easy to understand. as per the repair manual, "this part located on the evaporator or the back of the liner is used during the defrost cycle. This bimetal senses the temperature from the evaporator. When the temperature reaches 50-70 degrees (F)
... Read more the defrost bimetal turnd the defrost heater off. " then I emptied the freezer. removed the the back panel to expose the evaporator. I looked for the bimetal defrost thermostat clipped on the evaporator. tested the bi-metal defrost thermostat, as per the manual, " the ohmmeter should show ZERO resistance (continuity). if not, the bimetal is bad and needs replacing." NOTE: the bimetal must be cold. it is also tested with the bimetal warm/hot, by running it under hot water. i used a styrofoam cup with hot water & dipped the bimetal in. as per the manual, " the ohmmeter should show an open circuit. if not, the bimetal is bad and needs replacing. then got online found partselect.com. ordered the part, recieved it in less than 2 days. within minutes after recieving the part, I removed the bimetal defrost thermostat and spliced in the new one. thanks to partselect.com my fridge is back up and running properly again. prior to installing the new bimetal, i tested it, as descibed above, you can hear & feel the bimetal open/close when it gets hot/cold.
First I removed the old lightbulb from the socket and replaced it with a new one to confirm that the bulb was not the problem. I then pryed the socket out with a flat-head screwdriver. I could tell that the socket was anchored in its hole with clips so it was relatively easy to pry it out. Once the socket was out, I disconnected the le
... Read moread wires and ordered a replacement socket kit from Partselect. When the new one arrived, I reconnected the lead wires to it, snapped it back into its hole, screwed in a new lightbulb, and presto!! The light was back on with no further problem. Thank you, Partselect!! A $15.00 part saved me what probably would have been at least a $100. service call and heaven knows what the technician would have told me I needed!!!
Took all the screws out of the plastic shroud that encloses the switch .There only four that I needed to remove, were the two in front where the switches that go,they go in horizontally and two in the back with large washers on them that hold the back to the top of the box that go in vertically.The switch was a snap ( make that two snaps
... Read more ) the wiring is almost self explanatory. then it gos back to the way you took it off. OH! and don't forget to turn the light bulb all the way back in to the socket , so the light will work after you take the time to install it yourself.I had the water supply line from under the box to the water dispenser in the door and the total bill on that was one hundred thirty seven and a hand full of change.Don't be afraid to do it yourself the savings is enough on one one item to make several months payments on a new one Randy the "Handy Man'