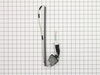
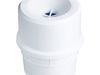
This Idler Pulley includes the tri-ring and gasket and everything included here is manufacturer-certified. This part maintains correct tension on the drive belt in order to spin the drum properly. If ...
The Drive Belt is a 93 1/2" belt which wraps around the dryer drum to allow tension and movement. If broken the dryer will not turn properly, or there may be loud noises. The part is rated as "medium"...
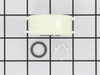
If you notice that your dryer is noisy or will not tumble, you may need to replace the tri ring. This part is triangular, and is less than an inch in size. Tri rings can be found both on the idler pul...
This is an inner cap seal, but may also be known as an O-ring, and it is a part for your washing machine. Some symptoms replacing this part will fix include: leaking from your appliance, uncontrollabl...
This hose clamp is used in a wide variety of household appliances. Most often it is found in washers, dishwashers, refrigerators, freezers, dehumidifiers, garbage disposals, or air conditioners. This ...
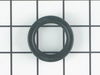
This part may also be referred to as a main outer tub seal. This part prevents leaking from the bottom of the tub. The gasket is approximately 2 inches in diameter to the outer edge, black in color, a...
The front facing foot is sold individually. It is used on your washing machine and can also be known as an adjustable leveling leg. This specific front facing leveling leg has a rubber foot. It is imp...
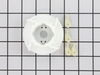
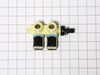
This agitator cam kit contains an almost three inch white retainer and four agitator dog ears. This kit is used to move the upper agitator and it connects the base of the agitator with the agitator top (mover).
This touch-up paint can be used on a wide variety of household appliances. It is most often used on washers, dryer, refrigerators, dishwashers, ranges, freezers, trash compactors, or microwaves. It is...
$8.00
In Stock
Questions And Answers for 11087842700
We're sorry, but our Q&A experts are temporarily unavailable.
Please check back later if you still haven't found the answer you need.
First I removed the fabric softener container and set it aside. Below that, there is a plastic cover with a rubber gasket that distributes the fabric softener. I also just pulled that out and set it aside. Below that was an 11mm bolt that attached the upper and lower agitator to the drive mechanisim. The lower agitator is attached dir
... Read moreectly to the shaft and that was working properly so I knew it was't a motor or drive issue. Until it broke, the top half of the agitator sat still for a second, then it turned clockwise with the lower agitator. This helped push the clothes down to the lower part to be circulated throughout the wash cycle. Well, now the upper agitator just sat there, like it wasn't attached to anything at all. Below the aforementioned plastic cover with the rubber gasket, I found a part that had 4 plastic "teeth" that moved in and out, releasing and grabbing the inside of the upper agitator, respectively. Over time, these teeth wore down and stopped "grabbing" the ridges on the inner part of the upper agitator, causing it to stop turning with the lower agitator. I removed the 11mm bolt and tried to seperate the upper agitator from the lower agitator to replace the teeth. This part was kind of tough to get out because the plastic clips that held it in were deformed. I just had to pull hard and eventually it came apart. In the process, I broke two of the clips. I wasn't really concerned because the 11mm bolt holds everything in place anyway. After that I just swapped out the worn teeth with the new ones. I put it back together in the opposide order I took it apart and viola....good as new. And it only cost me $15 bucks.
First I removed back and top of dryer, then the support braces holding the drum, after that I took the drum out and the blower covers and cleaned the whole dryer of lint and other debris. Installed the new belt and then reassembled the dryer.
1) Disconnected power cord from wall. 2) Disconnected vent hose from back of dryer. 3)Removed dryer rear panel. 4)Disengaged tension spring on idle wheel arm. 5) Removed worn idle wheel. 6)Installed new Idler wheel assembly. 7) Vacuumed dust from rear of dryer (optional, recommended). 8) Reinstalled rear cover, vent hose and power cord. E
... Read moreasy repair 15-30