Enter the code USA15 at checkout to apply your discount. Discount will be applied at checkout when the code is entered & applies to all parts. Cannot be combined with any other coupon or special offer & cannot be applied to a previously placed order. Not valid toward tax or shipping & handling. Discount has no cash value. Discount expires on July 4 at 11:59pm EST.
You've Got 10% Off Your First Order!Save 10% with code at checkout *click to copy coupon code
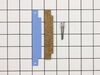
The front glide is located at the front of the dryer, the drum rides along it. If you hear a metal-on-metal noise when your dryer is running, your front glide may be worn out and require replacing. Th...
This was pretty much as easy as most other folks had described on this site. 1. Removed the two screws at the front bottom that are holding on the fromt panel, and then lift up and remove the panel. 2. Disconnect the door-open-safety-switch, remembering which color of wire goes on which connection. 3. Remove the four s
... Read morecrews (two on each side) on the front bracket that supports the drum and tthat contains the front glides. 4. Remove support bracket and lint trap, letting the drum rest gently on the stuff underneath. 5. Remove the screws holding the lint trap to the support bracket. (My model had five screws.) Remove lint trap from support bracket. 6. Drill out the two pop rivets on each of the two glides, noting the orientation of the teflon pad and mounting strip. 7. Secure - and here is where I had a little problem - new glides in place with pop rivets. (I hadn't use a rivet gun in a while, so I messed up the first pop rivet and had to go to the hardware store to get a replacement. I didn't hold the pop rivet in all the way while I was accuating the gun!) 8. Reverse the process for assembly, and you are all done.
I set the dryer on its back to make alignment of the front drum guide cover easy to reinstall in the seal after completion. I removed the 2 screws at the bottom front then removed the white and yellow wires to the interlock switch and set the front cover aside. I then removed the 4 nut screws holding the front drum cover and removed. On
... Read more the back side there are two teflon and cork "bearings". I had ordered two even though only one was worn down to metal. On each one I then removed the two rivets by drilling them out. Then I placed the corks into the bearing slots with a little glue then inserted the teflon into the slots and riveted them into place with the rivets that came with the kit. I replaced the drum cover, connected the switch and screwed the dryer front cover back on. I set the dryer back up. Connected the vent hose and turned the dryer on. Beautiful sweet smooth and quiet operation. I had replaced the front and back drum seals a few months ago and saw the teflon was missing but did not have the kits at that time. With a complete job I would recommend replacing the front and rear drum seals and the two teflon/cork bearing kits at the same time.
Remove two sheet metal screws at bottom front. Tip up and remove front panel. Tip up top panel. Hold it up to allow access to rear of drum. Use soft piece of wire to loop around top of spring. Pull 4 springs up and off drum. Rotate the springs to release them from the base plate. Starting at the rear of the drum slip new spring end into
... Read morewasher base. Slip wire loop on the top of the new spring. Pull and stretch new spring onto drum. Repeat 3 more times. Replace front cover....you're done!