


Appliance Parts
- Accessories
- Dishwasher
- Dryer
- Stove / Oven
- Microwave
- Refrigerator
- Washer
- See more... See less...
Lawn Equipment Parts
- Lawn Mower
- Chainsaw
- Blower
- Generator
- Air Compressor
- Lawn Tractor
- Pressure Washer
- See more... See less...
Shop With Confidence


How To Fix A Gas Range or Stove Igniter That Won't Light

Click a Part Below to Start Your Repair:
Hot Surface Igniter Oven Safety Valve Electronic Control Temperature SensorAbout this repair:
- Rated as EASY
- 358 repair stories
- 1 step by step video
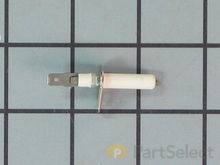
Hot Surface Igniter
The hot surface igniter is used in modern gas oven burners to open the gas valve and to ignite the gas. As the igniter draws electric current it will heat to a high temperature and glow, as well as cause the bi metal in the oven safety valve to warp and open the valve releasing the gas to be ignited. This sequence normally takes about a minute.
How to inspect an oven burner igniter:
- Before beginning, disconnect the appliance from the gas supply. You should first determine if your issue is being caused by the igniter or by the gas lines. If your stove top burners function normally, then it is most likely an issue with the igniter. Otherwise, rule out the gas lines as the cause prior to suspecting the igniter.
- Clean any debris or dirt off your hot surface igniter using a toothbrush, blowing it gently after you are done. While the location varies between models, the hot surface igniter is usually found near the oven burners, you may need to remove the bottom panel in order to access it.
- Using a small needle, clean the pilot hole where the gas passes through. Remove any dirt, debris, or gunk that may be blocking the gas flow.
- Visually inspect your igniter to see if it sparks properly. After verifying that you have disconnected the gas supply, press the ignition button on your stove while looking for sparks coming off the igniter.
- If you are unable to see sparks, you will need a replacement oven burner igniter.


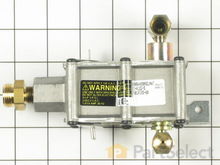
Oven Safety Valve
The oven safety valve (also called the gas valve) is the part that ensures that gas is not released until the igniter has reached the correct temperature needed to ignite the gas. While this part can fail, it is uncommon.
How to test the safety valve in your oven with a multimeter:
- Disconnect your appliance from the power source and ensure the oven has completely cooled before starting.
- Remove the safety valve in order to test it. Your safety valve will likely be near the burners and/or igniters. In order to access it you will likely need to remove the back panel of your oven, and possibly heat shields covering the burners/igniters.
- Using a multimeter on the Rx1 setting, touch the terminals on the valve with the probes. This should produce a reading of 0-50 ohms of resistance. Some models will have two sets of terminals: one for broil and one for bake, if your model has two sets of terminals, simply test each set individually.
- If your test produces a reading outside this range, you will need a replacement safety valve.


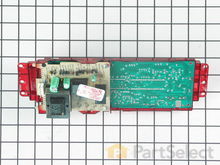
Electronic Control
Most modern ovens use an electronic control board to control the oven functions. These models will use the control board to operate the oven safety valve.
How to inspect the electronic control board in an oven or range:
- Disconnect the power source from your range or oven before beginning this inspection.
- Locate your electronic control board. You likely will need to remove all or part of your top panel in order to access it. Once you have access to it, remove the electronic control board in order to closely inspect it.
- After removing it, begin by inspecting the terminals on the board for signs of burning or shorted terminals. You should then visually inspect the entire board for signs of wear, damage, or cracking.
- If the control board in your appliance shows any of the symptoms above, you may need a replacement electronic control board.


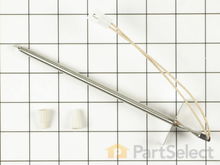
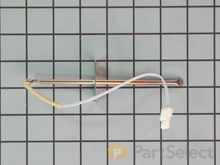
Temperature Sensor
On modern electronic control ranges, the oven temperature sensor is the part that regulates the oven temperature. If it is not working properly it could be the reason why the oven is not lighting. Most modern ovens will display a fault code if the oven sensor is at fault.
How to test an oven’s temperature sensor with a multimeter:
- Before starting, verify that you have disconnected your appliance from the power source.
- Remove the temperature sensor in order to test it. It is often found inside the oven, on the rear wall near the top.
- With a multimeter set to the Rx1 setting, touch the sensor’s terminals with the probes to test for continuity. The reading you should receive varies between models, refer to your owner’s manual to determine how much resistance a functional temperature sensor should have for your model. Ensure this test is done with the sensor at room temperature.
- If the reading you receive indicates your sensor is not functioning properly, you need a replacement temperature sensor.

More Repair Parts
Still not sure which part is broken? We can offer you custom troubleshooting help if you search with your model number.
