


Appliance Parts
- Accessories
- Dishwasher
- Dryer
- Stove / Oven
- Microwave
- Refrigerator
- Washer
- See more... See less...
Lawn Equipment Parts
- Lawn Mower
- Chainsaw
- Blower
- Generator
- Air Compressor
- Lawn Tractor
- Pressure Washer
- See more... See less...
Shop With Confidence


How to Fix A Washer That's Timer Won't Advance

Click a Part Below to Start Your Repair:
Lid Switch Timer & Timer Motor Water Level Control Timer Knob & Dial & Skirt Drain Pump Water Inlet ValveAbout this repair:
- Rated as EASY
- 2530 repair stories
- 17 step by step videos
Lid Switch
The lid switch is a safety feature found on most top loading washing machines. The lid switch is normally located beneath the main top with a projection on the lid or a pin attached to the lid that will actuate the switch when the lid is closed. The lid switch supplies power to the timer and motor circuits.
How to test the lid switch in a washing machine with a multi-meter:
- Unplug your washing machine.
- Remove the cabinet or top panel and locate the lid switch.
- After finding the switch, begin by ensuring that no levers or actuators are damaged or sticking and that the switch is being activated mechanically when the lid is closed.
- If no issues are found when performing the above checks, remove the switch and set your multi-meter to the Rx1 setting. While pressing and holding the switch button, place the probes on the switch’s terminals, you should receive a reading of zero.
- If you receive a different reading, you will need a replacement lid switch.


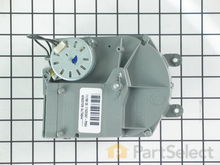
Timer & Timer Motor
The timer is used to control all the functions of the washer. The timer will have a series of electrical contacts that are operated by a cam assembly which is advanced by a timer motor. Some of the contacts in the timer are used to control the timer motor. If the timer on your washer will not advance, the timer or timer motor may be at fault.
How to test the timer & timer motor in a washing machine with a multi-meter:
- Disconnect your washing machine from the power source.
- Locate and remove the timer from your appliance. You will need to remove the control panel and the rear panel in order to access it.
- Set your multi-meter to Rx1 and touch the probes to the terminals that control the motor (refer to your wiring diagram). You are testing for continuity and should receive a reading of zero or nearly zero.
- If your test produces different results, you will need a replacement timer.

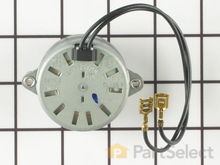
Water Level Control
The water level control on washing machines is used to turn the water valve on and off at the selected levels, as well as to supply power to the timer motor when the correct water level is reached. If your washer fills but the timer does not advance you may have a defective water level switch.
How to inspect the water level control in a washing machine:
- Before beginning, unplug your washing machine as you will be handling electrical components.
- Prior to suspecting the switch, you should eliminate the air dome hose as the source of the problem. Remove the cabinet to locate and remove the air dome hose. Submerge the hose in water, seal one end while blowing air into the other, looking for bubbles throughout. Additionally, you should check the hose for signs of cracks, wearing, or obstructions.
- If no issues are found above, you may need a replacement water level switch.


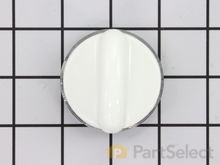
Timer Knob & Dial & Skirt
The timer knob or dial is attached to the timer shaft and will turn as the timer advances through a cycle. The timer knob may also be used to start the cycle by pulling out on the knob which activates a switch inside the timer. The timer knob is normally made of plastic, strengthened with a keyed metal insert where it attaches to the timer shaft. Normal use can cause the knob to crack or wear and no longer turn with the timer shaft. This will make it difficult to turn the timer to the desired cycle and will also cause the dial to not turn with the timer shaft as the cycle advances.
How to inspect the timer knob in a washing machine:
- Disconnect your washer from the power source.
- Locate the timer knob, you will need to remove the rear panel or cabinet to access the back of the timer.
- Inspect the knob to ensure that the timer engages when the knob is pulled out and pushed in.
- If it does not engage, you will need replacement knobs.


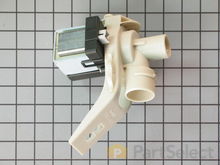
Drain Pump
The drain pump removes water from the washing machine tub at the end of the wash and rinse portions of the cycle. If the drain pump fails, then the washer will not sense that the tub is empty and may not advance into the next portion of the cycle. If your washer stalls at the end of the wash or rinse portions of the cycle, you should check to see if the drain pump is functioning properly. Some electronically controlled models may display a fault code if this condition occurs. If your machine is flashing a fault code, you can refer to our list of common appliance fault codes to determine the source.
How to inspect drain pump the in a washing machine:
- Unplug your washing machine.
- Locate your drain pump. You will have to remove the front panel or cabinet of your appliance to access the pump.
- Once you have found the pump, inspect all the hoses and connections coming off the pump for leaks or damage.
- If the leak is coming from the pump, you will need a replacement pump.


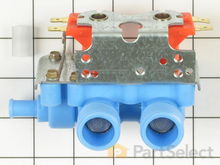
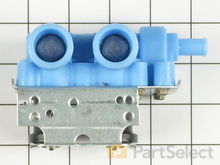
Water Inlet Valve
The water inlet valve is used to supply both hot and cold water to the washer during the fill portions of the cycle. The valve will have at least two electric solenoids that open the valve when required. If your washer does not advance through the cycle or stalls at a wash or rinse fill portion, then the water inlet valve may be at fault. You should first verify that the inlet hoses do not have any kinks or restrictions and that the inlet screens are clean. If these are ok, then you can check the continuity of the solenoids with a multi-meter.
How to test the water inlet valve in a washing machine with a multi-meter:
- Ensure that you have unplugged the washing machine before starting.
- Locate and remove the water inlet valve. It will likely be found directly behind the hose connections; you will need to remove all or part of the cabinet to access it.
- Inspect the screens inside the valve for debris or buildups, do this carefully as the screens cannot be replaced and if they are damaged you will need a new valve.
- Visually inspect your pump for any signs of wear or damage, if none are found, set your multi-meter to Rx1 and place the probes on to the terminals. Refer to your owner’s manual to see what reading this test should produce, as it varies from model to model.
- If your reading is outside the recommended range, if you receive a reading of infinity, or if your valve is visibly damaged, you will need a replacement water inlet valve.

More Repair Parts
Still not sure which part is broken? We can offer you custom troubleshooting help if you search with your model number.
