


Appliance Parts
- Accessories
- Dishwasher
- Dryer
- Stove / Oven
- Microwave
- Refrigerator
- Washer
- See more... See less...
Lawn Equipment Parts
- Lawn Mower
- Chainsaw
- Blower
- Generator
- Air Compressor
- Lawn Tractor
- Pressure Washer
- See more... See less...
Shop With Confidence


How to Fix A Washer That Won't Fill With Water

Click a Part Below to Start Your Repair:
Inlet Hoses & Screens Water Inlet Valve Lid Switch Selector Switch & Water Temperature Switch Water Level Pressure Switch Timer & Electronic ControlAbout this repair:
- Rated as EASY
- 1417 repair stories
- 7 step by step videos
Inlet Hoses & Screens
Washing machines are connected to the household water supply by fill hoses. These hoses are typically 4-5 feet in length and often will have a plastic or wire mesh screen inserted into the end of the hose that attaches to the faucet. The screen prevents sediment from entering the water inlet valve, which is located on the back of your appliance.
How to inspect the hoses & screens on your washing machine:
- Before suspecting the hoses & screens, ensure that the faucets are turned on and that the inlet hoses are not kinked.
- Next, you should turn off the faucets and remove the fill hoses from the inlet valve. Inspect the screens that are part of the inlet valve, remove any debris that you find.
- Place the hose ends into the tub or a bucket and turn on the faucet to verify that you have adequate pressure. If not, then remove the hose from the faucet and inspect the screens for dirt accumulation or damage.
- If you find any issues when performing the checks above, you will need replacement hoses & screens.


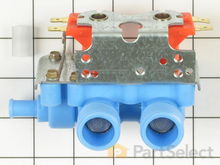
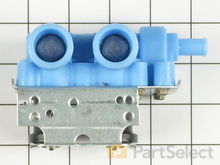
Water Inlet Valve
The Water Inlet Valve on your washing machine supplies hot and cold water for the wash and rinse. The valve will have two solenoids that operate inlets for both the hot and cold water supply. The timer or electronic control, water temperature cycle selector and the water level pressure switch control the valve. The valve is controlled by the timer or electronic control, the water temperature/cycle selector switch and the water level/pressure switch.
How to test the water inlet valve in a washing machine with a multi-meter:
- Before beginning, ensure that you have unplugged your washing machine.
- The water inlet valve will most likely be found directly behind the hose connections. You will need to remove the rear panel in order to access it. Once you have located it, remove the valve in order to test it.
- Before testing it, inspect the screens inside the pump and the pump itself for any debris or damage. Be very careful when doing this as screens cannot be replaced, and if they become damaged the entire valve will need replacing.
- Set your multi-meter to Rx1 and touch the probes to the terminals. The reading of a functional valve varies from model to model, refer to your owner’s manual to determine what your reading should be.
- If you do not receive the recommended reading, you will need a replacement water inlet valve.

Lid Switch
The lid switch on a top load washing machine is a safety device designed to prevent the motor circuit from operating when the lid is open. On some models, the water inlet valve circuit is also controlled. If the lid switch fails on these models, power cannot be supplied to the water inlet valve.
How to inspect the lid switch in a washing machine:
- Before starting this repair, verify that you have disconnected your appliance from the power source.
- You should begin by verifying that the switch is being activated mechanically. To do this, you will need to remove the top panel or cabinet to see the back of the switch. You should also inspect the levers or actuators to verify that they are not damaged or sticking.
- If everything appears functional, remove the switch in order to test it for continuity. Using a multi-meter set to Rx1, touch the probes to the terminals while pressing in on the switch button. This test should produce a reading of zero.
- If you do not receive a reading of zero, you will need a replacement lid switch.


Selector Switch & Water Temperature Switch
The selector switch or water temperature switch selects the water temperature for the wash and/or rinse portions of the cycle. The switch provides a circuit to supply power to the correct solenoids on the water inlet valve.
How to test the selector switch in a washing machine with a multi-meter:
- Disconnect your appliance from the power source before starting.
- Open your washer’s cabinet in order to locate and remove the selector switch. It is usually secured to the frame of the appliance.
- With your multi-meter set to Rx1, touch the probes to the terminals of one button, you will be testing one button at a time. Press in on the first button, your reading should change from infinity to zero. Then you should press in on another button, this should change the reading back to zero.
- If your tests do not replicate the results above, you will need a replacement selector switch.


Water Level Pressure Switch
The water level switch is a pressure activated switch that is part of the water inlet valve circuit. This part is normally located behind the control panel and will have a hose or air dome tube that connects it to the tub. On washers that use an electronic control, this switch may be located at the sump area below the tub. If the switch is defective, it may not supply power to the water inlet valve.
How to test the water level switch in a washing machine:
- Unplug your washing machine. Before suspecting the switch as the issue, inspect the air dome hose by submerging it in water, sealing one end and blowing in the other, no bubbles should come out of the hose during this test. Additionally, you should inspect it for any signs of wear or damage. You will need to remove your appliance’s cabinet to access the air dome hose.
- Remove the water level switch to. It is usually found below the control panel but may also be found below the sump area below the tubs.
- Inspect the switch for any signs of wear, burning, cracking, or damage.
- If the air dome hose is not damaged or if your switch shows any the symptoms above, you may need a replacement water level switch.


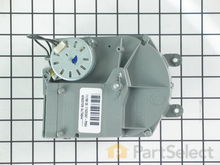
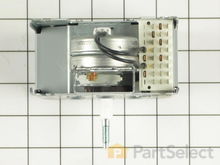
Timer & Electronic Control
The timer or electronic control is used to determine when the water inlet valve receives power. The mechanical timer will have a series of electrical contacts that are operated by a small motor and cams. During the wash, fill and rinse fill portions of the cycle these contacts will supply power to the water inlet valve circuit.
How to test the timer control in a washing machine with a multi-meter:
- Before beginning, ensure that you have disconnected your appliance from the power source.
- Locate and remove the timer. You will need to remove all or part of your washer’s cabinet. When removing the switch, disconnect the wires by grasping the metal connectors and not the wires themselves.
- With a multi-meter set to the Rx1 setting, touch your probes to the timer’s terminals that control the motor (refer to your wiring diagram). This test should produce a reading of zero or nearly zero as you are testing for continuity.
- If your test does not produce this result, you will need a replacement timer.

More Repair Parts
Still not sure which part is broken? We can offer you custom troubleshooting help if you search with your model number.
