


Appliance Parts
- Accessories
- Dishwasher
- Dryer
- Stove / Oven
- Microwave
- Refrigerator
- Washer
- See more... See less...
Lawn Equipment Parts
- Lawn Mower
- Chainsaw
- Blower
- Generator
- Air Compressor
- Lawn Tractor
- Pressure Washer
- See more... See less...
Shop With Confidence


How to Fix A Noisy Washer

Click a Part Below to Start Your Repair:
Pump & Pump Motor Drive Belt Direct Drive Motor Coupling Shock Absorbers Tub Dampening Strap Drive motor Drive Motor Pulley &Transmission Pulley & Pump Pulley Pump Belt Tub Bearing Agitator Directional Cogs & Dogs Clutch AssemblyAbout this repair:
- Rated as EASY
- 2763 repair stories
- 12 step by step videos
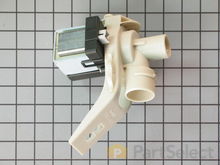
Pump & Pump Motor
The drain pump on a washing machine is used to pump the water from the wash tub before and during the spin cycle. The pump may be belt driven, motor driven or have its own electric motor. A noise coming from the washing machine during or after the spin cycle can indicate that the drain pump has a restriction or has become defective.
How to inspect the pump & pump motor on a washing machine:
- Unplug your washing machine and remove the front panel or cabinet to locate the pump. Plug your washer back in and run a cycle to verify that the pump is the source of the noise. Use caution as you are now exposed to moving parts and electrical circuits.
- If you can confirm that the noise is emanating from the pump, remove the inlet hose to the pump.
- Inspect the pump impeller for signs of foreign objects that may be causing the noise or for damage to the impeller. You should also attempt to turn the impeller manually to verify that it is not seized or worn. Remove any foreign objects you may find around the pump.
- If you find any signs of wear or damage, or if the impeller is seized, you need a replacement pump motor. Front load washers often use a self-contained electric drain pump and the motor may be worn or damaged and require a complete replacement pump.


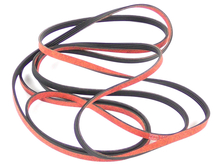
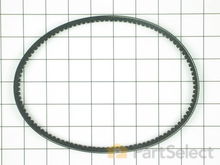
Drive Belt
The drive belt is used to connect the drive motor to the transmission in some top load washers, or the drive motor to the wash basket in most front load washers. The drive belt is used to connect the drive motor to the transmission in some top load washers, or the drive motor to the wash basket in most front load washers. The drive belt may be either a single V-shaped belt or a multi-rib belt and is normally made of rubber but may have a fabric covering. On front load washers the drive belt is normally a multi-ribbed belt and is designed to be installed for a tight fit. On belt driven top load washers, the drive belt is normally a V belt with a fabric covering to allow for some slippage or it may be a rubber covered belt with an idler pulley or another tensioning device to reduce the amount of friction created when the motor starts up.
How to tell if a washing machine drive belt needs replacing:
- Disconnect your washer from the power source, and then remove the access panel or cabinet.
- Locate your drive belt, it will be connected to the drive motor on one end. Once you have located it, remove the clamps that hold the belt in place and remove the belt in order to inspect it.
- Inspect the drive belt for any signs of burning, fraying, wear, or any other damage.
- If you find any of the above, you need a replacement drive belt.
Direct Drive Motor Coupling
Some top load washers use a direct drive motor coupling to transfer power from the motor to the transmission. The drive coupling connects the motor to the transmission and consists of two plastic drive forks with a rubber coupling between them. One of the drive forks is attached to the drive motor shaft and the other is attached to the transmission input shaft. As the motor shaft rotates, the rubber coupling between the drive forks absorbs the torque to prevent the forks from breaking. Normal use will create wear on the coupling and eventually the drive forks may slip and cause a vibrating noise. If the transmission seizes or if the spin basket cannot turn freely, then the coupling may fail and again you may experience a vibrating noise.
How to inspect a washing machine’s direct drive motor coupling:
- Unplug your washing machine.
- Open your washer’s cabinet in order to locate and remove the direct drive motor coupling. You may need to remove the drain pump and/or motor to access the motor coupling, depending on your model.
- Inspect the motor coupling for any signs of cracking, wear, or damage. If you find any of these, you will need a replacement direct drive motor coupling.


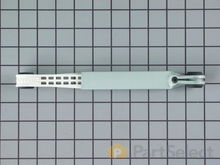
Shock Absorbers
All front-load washing machines have shock absorbers that are used to dampen the tub movement in the spin cycle. The shock absorbers or struts are attached to the base frame and to the outer tub and you will need to remove the front panel or the rear panel to access them. When shock absorbers weaken or become damaged, the machine will often make a loud banging sound during the spin cycle and if the symptom is not corrected, can lead to damage of other components.
How to inspect the shock absorbers on a washing machine:
- Disconnect your appliance from the power source.
- Remove the front or rear panel, depending on your model, in order to locate the shock absorbers.
- Inspect the shocks for signs of broken attachments, leaked fluids, or a weakened dampening action.
- If either shock shows any of the signs above, you will need replacement shock absorbers. You should replace both shocks at the same time, even if only one shows the signs above as they wear at approximately the same rate.
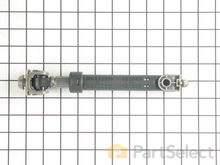

Tub Dampening Strap
Some models of top-load washers use tub dampening straps to cushion the movement of the tub during the spin cycle. There are four straps attached to the top of the tub and to each corner of the cabinet. These straps are made of rubber and can fail with normal use. When the straps become stretched or damaged, the tub may contact the cabinet during the spin cycle and create a loud banging sound. Continuous large loads and excessive use will create more strain and cause premature failure of the straps.
How to inspect the tub dampening strap on your washing machine:
- After disconnecting your appliance from the power source, open the cabinet of your washer.
- Locate your tub dampening straps, there will be four of them, each one attached to the wash tub and a corner of the cabinet.
- Inspect the straps for any signs of wear, fraying, or damage.
- If any of the straps show the signs above, you will need four replacement tub dampening straps. It is recommended that you replace all four straps at the same time as they wear at approximately the same rate.


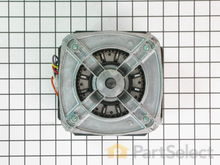
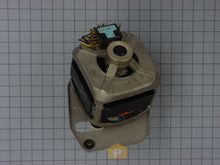
Drive motor
The main drive motor on a top load washer is used to operate the transmission, spin the wash basket and on some washers, to operate the pump as well. On front load washers, the drive motor operates a belt that drives the wash basket pulley. A common symptom associated with a failing drive motor is a humming or buzzing noise when the motor starts, sometimes accompanied by a slight burning smell. The drive motor has a thermal overload that will remove power from the windings when it senses this overcurrent condition, and the motor will shut down. This could be caused by a driven component of the motor that has seized or by a defect in the motor itself.
How to test a washing machine drive motor with a multi-meter:
- Ensure you unplug your appliance before starting; you will be handling electrical components.
- Remove the cabinet of your washer and locate the drive motor. Once you have located it, carefully disconnect the wires attached to it and remove it from the washer in order to test it.
- With your multi-meter set to Rx1, test for continuity by placing the probes on one terminal each. You should receive a reading of zero or close to zero.
- To test for ground connection, with one probe still touching a terminal touch the other probe to the bare metal housing of the motor. You should not receive any reading from this test.
- If your test results differ from those described above, you need a replacement drive motor.

Drive Motor Pulley &Transmission Pulley & Pump Pulley
On belt driven washing machines, the motor pulley supports the drive belt and in some cases the pump belt. There will also be corresponding pulleys on the transmission and the pump. These pulleys can accumulate a buildup of grease, rubber compound or dirt that can cause a squealing or thumping sound when the motor is running. If your washer is making this type of sound when agitating, draining or spinning, then you should inspect the pulleys for signs of dirt accumulation or damage.
How to check the pulleys on your washing machine:
- Before beginning, disconnect your appliance from the power source.
- Remove the cabinet and locate the pulley in question. Remove the belt from the pulley in order to closely inspect the pulley.
- Look for signs of burning, wear, or damage. You should also look for buildups of grease, dirt, or other materials, cleaning anything you find off the pulley and the surrounding area.
- If you find any signs of damage, you will need a replacement pulley.


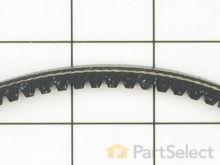
Pump Belt
On belt driven top load washers, the pump belt is what drives the pulley on the drain pump. Regular use and age can cause the pump belt to become cracked or frayed, which can create a squealing or thumping noise during the drain or spin cycle. This may be accompanied by a burning rubber smell or an incomplete drain as well.
How to tell if the pump belt in a washing machine needs replacing:
- After unplugging your appliance, open the washer’s cabinet in order to locate the pump belt. It will be connected to the drive motor pulley one on end.
- Remove the clamps that hold the belt in place in order to closely inspect it. You are looking for signs of damage, wear, fraying, and burning.
- If you find any of the above, you will need a replacement pump belt.

Tub Bearing
Both top and front-load washing machines have tub bearings that allow the wash basket or inner tub to rotate freely. Top load washers normally have a bearing at the bottom or input of the transmission and another where the shaft attaches to the inner tub. Front load washers typically use two bearings to support the wash basket shaft and are located at the rear of the outer tub. The bearings are protected from the wash water by a tub seal. Regular use, prolonged exposure to harsh detergents and overload conditions can cause the bearing seal to break down, allowing water to reach the bearings and eventually causing them to fail.
How to inspect the tub bearing in a washing machine:
- Disconnect your washer from the power source.
- Remove the washer’s cabinet and locate the tub bearing. Depending on the style and model of washer you have, you may need to remove the inner tub, wash basket, and/or transmission to access the tub bearing.
- Inspect the tub bearing for any signs of cracking, rust, wear, water damage, or other sign that the bearings have failed.
- If you find any of the symptoms above, you will need a replacement tub bearing. It is recommended that you replace your tub seal at the same time, especially if your bearing shows signs of rust or water damage.


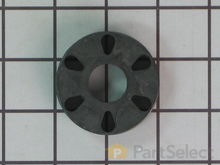
Agitator Directional Cogs & Dogs
Agitator directional cogs, sometimes referred to as agitator dogs, are often used to operate the upper portion of dual action agitators. These cam shaped dogs engage the cogs on the inner surface of the agitator as it turns in one direction, and then release when the agitator reverses direction. This allows the upper portion of the agitator to “ratchet" in one direction while the bottom half will agitate in both directions. The directional cogs are made of hard plastic and will wear with normal use. When they become too smooth to properly engage the cogs on the agitator, they will start slipping and will make a grinding or crunching noise. You will also notice that the top portion of the agitator does not move smoothly or doesn't move at all.
How to inspect the agitator cogs in a washing machine:
- As with any other inspection, disconnect your washer from the power source before beginning.
- Open the lid of your washing machine, if your machine has a fabric softener dispenser, remove it to access the cogs. If your model does not have a fabric softener dispenser, remove the agitator cap to access the cogs. You may also need to remove the agitator top and/or base in order to access the cogs, depending on your model.
- Inspect the cogs for any signs of damage, wear, discoloration, and to see if there are any missing cogs.
- If you find any of the above, you will need a set of replacement directional cogs.


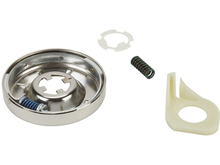
Clutch Assembly
Some top load washers use a clutch assembly to lock the transmission input shaft to the wash basket drive during the spin cycle. Over time, the repeated friction of the clutch pads rubbing against the housing can cause the clutch to wear and create a scraping sound. A worn clutch can prevent your washing machine from spinning or may cause a slower spin speed which will leave your clothes wet after a cycle. Additional symptoms that the clutch may be causing your problems are brake dust or shavings found underneath the washing machine, a slight burning smell or a loud noise during the spin cycle.
How to inspect the clutch assembly in a washing machine:
- Unplug your appliance before beginning as you will be handling electrical components.
- Locate and remove your clutch assembly for close inspection. The clutch assembly is typically located below the outer tub and attached to the basket drive assembly. You will need to remove the cabinet, the drive motor, and transmission assembly to gain access to the clutch.
- Visually inspect the clutch assembly for any signs of wear, damage, or burning.
- If you find any of the above, you will need a replacement clutch assembly.


More Repair Parts
Still not sure which part is broken? We can offer you custom troubleshooting help if you search with your model number.
