Enter the code DIYDAD10 at checkout to apply your discount. Discount will be applied at checkout when the code is entered & applies to all parts. Cannot be combined with any other coupon or special offer & cannot be applied to a previously placed order. Not valid toward tax or shipping & handling. Discount has no cash value. Discount expires on June 17 at 11:59pm EST.
You've Got 10% Off Your First Order!Save 10% with code at checkout *click to copy coupon code
This touch-up paint can be used on a wide variety of household appliances. It is most often used on washers, dryer, refrigerators, dishwashers, ranges, freezers, trash compactors, or microwaves. It is...
$8.02
In Stock
Order within the next 7 hrs and your part ships today!
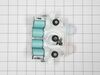
This is an inlet valve for your washing machine. The inlet valve is an electrically controlled valve with a solenoid that opens and closes as needed, during the water filling cycle of the washing mach...
$88.26
In Stock
Order within the next 7 hrs and your part ships today!
The hose clamp is used to hold the water hose in place which will prevent the hose from leaking water. Sometimes the clamp may lose its ability to latch on, causing a leaking washer. For the installat...
$11.12
In Stock
Order within the next 7 hrs and your part ships today!
Appliance spray paint is a great way to cover up any chips and scratches that have appeared on your appliances. Instead of replacing the part entirely, this is an easy fix. This is also a great way to...
$22.68
In Stock
Order within the next 7 hrs and your part ships today!
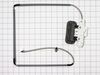
This lid hinge is a genuine OEM replacement part for your washing machine. This hinge is for the left side of your lid, although it is a good idea to replace btoh hinges at once. The hinge holds up th...
$25.37
In Stock
Order within the next 7 hrs and your part ships today!
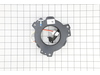
This drain pump is specially designed to fit in top load washing machines. It is responsible for removing water from the washer tub during the drain cycle and directing it to the household plumbing sy...
$168.46
In Stock
Order within the next 7 hrs and your part ships today!
Questions And Answers for WTW7500GW2
We're sorry, but our Q&A experts are temporarily unavailable.
Please check back later if you still haven't found the answer you need.
11 questions answered by our experts.
Sort by:
< Prev
1
2
3
Next >
Search filter:
Clear Filter
Your search term must have 3 or more characters.
Keep searches simple. Use keywords, e.g. "leaking", "pump", "broken" or "fit".
Sorry, we couldn't find any existing answers that matched.Try using some different or simpler keywords, or submit your new question by using the "Ask a Question" button above!
Jeannie
September 6, 2021
My washer has power to it when I push the power button. When I push the start button, it will only beep. I am not able to change any of the settings on the control panel either, they just beep as well. I used it yesterday but today it will not work.
For model number WTW7500GW2
Hello Jeannie, Thank you for the question. If the appliance has Power but is not starting the cycle, you may have a defective Lid Latch Switch, PartSelect Number PS11731620. The Switch tells the controls when the Lid is closed and it is safe to start the cycle. We hope this helps!
Hello Richard, thank you for your question. Try rocking the appliance from side to side or back and forth. If it's rocking a lot, your flooring or appliance's feet may be uneven. You can adjust the washer feet or place the washer on a piece of plywood. If your washer is level, we suggest replacing the suspension. Part number PS12347544. We hope this helps.
Trips gfci when start is pressed but not if plugged into a standard outlet.
For model number WTW7500GW2
Hi William, thank you for your interesting question. If plugging your washer is tripping GFCI often, it is possible that you are plugging your washer into an overloaded circuit. To prevent this from happening, make sure that your washer has a dedicated circuit. You can do it by plugging your washer into an alternative power outlet and seeing if it still trips. Check your washer's wiring for any visible damages. We would also recommend checking the power cord of your washer. It can get damaged, which can cause a short circuit. Please contact us anytime if you require further assistance.
Was this helpful?
Thank you for voting!
Sameerah
October 12, 2022
Lid lock then unlock and won’t start
For model number WTW7500GW2
Hi Sameerah, thank you for reaching out. According to our research on the model, the lid lock latch appears to be faulty and you may need to replace it with part number PS11731620. If you need help placing an order, customer service is available 7 days a week. Glad to be of help!
can the drain line clog to slow down drainage, if so how do you unclog, clean, etc?
For model number WTW7500GW2
Hi Steve, thank you for your question! Yes, the drain line clogs slow down the drainage. Lint and related fragments occasionally find their way into the drain and muck up the pipes, leading to a clogged drain. Remember, all of the dirt and grime on your clothes doesn’t just disappear. It goes down the drain. So any grease, oils, and general debris on clothing can lead to clogs over time. Hot water and baking soda make for a simple, powerful, and low-cost solution here. This combination is one of the best homemade solutions for unclogging a drain. Start by unplugging the washing machine and gently moving it away from the drain. Do this slowly so as not to disturb the hoses on the back. Boil at least 1 gallon of water and have it ready to go. Between the hoses where the machine hooks up to the water supply, you will find the washing machine drain hose. Remove it from the drainpipe, and you will be able to see directly down the pipe. Slowly and carefully pour the hot water down the pipe. You can use a funnel with a narrow-mouthed pitcher to avoid spills. Add the baking soda and pour it down the drain. Pour approximately 1 cup for every gallon of boiling water. Make sure to do this after pouring the water, not with the water. For an added boost, make a 1:1 mixture of vinegar and water and pour this down the drain last. Repeat as necessary. You can also use standard drain cleaner, which is a fairly reliable option here, though these cleaners are on the abrasive side, so do not go overboard and choose a non-corrosive product. Wear latex gloves and protective eyewear when dealing with heavy-duty drain cleaners. We hope this information helps!
This product comes in a bottle with a brush like Liquid Paper. It goes on incredibly easy. A second coat might be needed. I wanted to prevent rust from setting in so I covered the scratches and dings. The paint is a little brighter since my washer is 10 years old but it still looks great.
1.) disconnect power to your washer. Turn off water supply and disconnect from the washer.
open the washer top and remove plastic cap from the wash plate
2.) using 7/16 socket, remove bolt from the wash plate. If you can't remove it with a socket , I recommend using impact wrench.
3.) remove wash plate
... Read more( you might need to spray penetrating oil or wd40 inside the bolt hole to loosen it. Check to make sure the wash plate gear grooves are not worn down, if they are, replace it.
4.) using your Maytag specific spaner nut wrench, remove the spaner nut from the shaft of the gear case. This should be right underneath where the wash plate was. If you can't turn it by hand , use a rubber mallet or hammer to encourage it.
5.) some people remove the wash basket at this point. I don't think it is necessary.
6.) close your washing machine. Tape the top closed to keep it from flying open. Tilt your washer back and prop it up where you have access to the underside of the washing machine.
7) remove motor rotor bolt and pull rotor off of the motor.
8.) disconnect the two wire connectors that supply power to motor. using a socket, remove bolts that are keeping motor attached to the gear case.
9.) Now that the gear case is all the is remaining on the underside, you can remove the 4 bolts that are holding the gear case to the washer. Now try to pull gear case out.
10.) if gearcase will not pull out, lower washer back to upright position. Spray penetrating oil or wd40 around the shaft of the gearcase and allow it to sit for 5-10 minutes. Using a hammer, lightly tap on the shaft of the gearcase and it should now fall out. ( you might have to apply penetrating oil again, or apply more force with the hammer.
11.) reinstall motor to new gearcase. Insert new gear case to the washer. Reinstall bolts and reconnect power supply wires.
12. ReInstall spaner nut inside the washer, reinstall wash plate.
As women, myself and my daughter completed this fairly simple repair. The replacement washer plate was top quality and included the washplate replacement screw. Additionally, we purchased a tube of lock tight to further secure bolt placement. The most difficult part of the repair is to disengage old screw and securely replace with new one
... Read more. Very pleased with fast delivery Excellent customer service and top quality part. Thanks


 Diagram and Parts List for Whirlpool Washer")