


Models
>
VED6505GW0
VED6505GW0 Dryer - Overview
Models starting with VED6505GW0
Click on the best match to narrow your results.
Keep searches simple, eg. "belt" or "pump".

Heating Element - 240V 5400W
PartSelect #: PS334313
Manufacturer #: 279838
The heating element (Flat Can Heating Element 5400W, Heating Element, Whirlpool Dryer Heating Element, Dryer Heating Element) provides heat to the dryer. It is metal and measures 10.5 inches long, 7.5...
$64.90
In Stock

Dryer Cycling Thermostat
PartSelect #: PS11741405
Manufacturer #: WP3387134
This thermostat (Dryer Operating Thermostat, Dryer Cycling Thermostat, Cycling Thermostat, Dryer Thermostat) is used to maintain a temperature of 155 degrees in the dryer drum. The internal bias heate...
$27.97
In Stock

Maintenance Kit
PartSelect #: PS373087
Manufacturer #: 4392065
The drum support roller kit (Dryer Repair Kit) allows the dryer to tumble properly by supporting the drum cylinder. The idler pulley provides the tension required for a multi-ribbed belt. The belt att...
$37.48
In Stock

Dryer High Limit Thermostat
PartSelect #: PS11742185
Manufacturer #: WP3977767
A dryer high-limit thermostat (High Limit Thermostat, Hi-Limit Thermostat, Dryer High-Limit Thermostat) is a switch that is actuated by temperature change. This high limit thermostat acts as a safety ...
$23.52
In Stock

Dryer Door Handle - White
PartSelect #: PS11731583
Manufacturer #: W10861225
This white OEM dryer door handle is used to open and close the dryer's door. Comprised of plastic and 6-by-2-inches in dimension, the handle is sold individually and attaches to the dryer door. Your d...
$38.59
In Stock

Roller Support Tri-Ring
PartSelect #: PS11755850
Manufacturer #: WPW10512946
If you notice that your dryer is noisy or will not tumble, you may need to replace the tri ring. This part is triangular, and is less than an inch in size. Tri rings can be found both on the idler pul...
$13.42
In Stock

Leveling Foot
PartSelect #: PS1609293
Manufacturer #: 49621
If your washer shakes or vibrates loudly when it reaches its max speed, check that the leveling legs are even. To ensure that the washer is firmly on the ground using all four legs, adjust the legs so...
$11.40
In Stock

Dryer Lint Screen Filter
PartSelect #: PS11757278
Manufacturer #: WPW10717210
This manufacturer-certified dryer lint filter is used to collect lint during the dryer cycle, to prevent damage to the machine and to prevent lint from sticking to clothes. This model comes in white a...
$46.50
In Stock

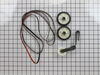
Heating Element Connection Wire Kit
PartSelect #: PS334206
Manufacturer #: 279457
This kit is used for electric clothes dryers, and it comes with a yellow wire nut.
$11.06
In Stock

Drive Motor with Pulley
PartSelect #: PS334304
Manufacturer #: 279827
This motor fits most Whirlpool incorporated dryer brands before 1996. NOTE: Pulley is NOT available separately.
$124.64
In Stock

Rear Drum Felt Seal
PartSelect #: PS8691753
Manufacturer #: W10612022
This seals Includes adhesive. This part helps seal the drum to prevent hot air from escaping.
$64.69
In Stock

Screw, 8/18 x 3/8
PartSelect #: PS11746840
Manufacturer #: WP90767
This screw is sold individually.
$5.42
In Stock
Common Symptoms of models starting with VED6505GW0
[Viewing 11 of 11]Noisy
Fixed by
these parts
these parts


Show All
Too hot
Fixed by
these parts
these parts


Show All
Not Heating
Fixed by
these parts
these parts
Show All
Marks left on clothes
Fixed by
these parts
these parts


Show All
Door won’t close
Fixed by
these parts
these parts


Show All
Drum Not Spinning
Fixed by
these parts
these parts


Show All
Heat stays on after drum has stopped
Fixed by
these parts
these parts
Show All
Won’t Start
Fixed by
these parts
these parts

Show All
Touchpad does not respond
Fixed by
these parts
these parts
Show All
Will Not Start
Fixed by
these parts
these parts
Show All
Timer Not Working
Fixed by
these parts
these parts

Show All


Keep searches simple. Use keywords, e.g. "leaking", "pump", "broken" or "fit".
Dryer motor runs, but no heat
To reach the heating element you only need to open the back cover of the dryer (about 8 nut-head screws). Remember to disconnect the power.
To remove the heating element there are two small nut-head screws. Remove the two electric wires. Then you can pull the heating element away.
You can check the heating element wi ... Read more th an ohm-meter or visually inspect it to see if the heating element spiral wire is broken.
Don't hurry to dispose the old element. My model includes a small electric safety part. You'll need to transfer it to the new heating element (that comes without it)..
Good luck.
Read less
Parts Used:

-
Gadi from Irvine, CA
-
Difficulty Level:Really Easy
-
Total Repair Time:30 - 60 mins
-
Tools:Nutdriver
2256 of 2437 people
found this instruction helpful.
Was this instruction helpful to you?
Thank you for voting!
Dryer would run with no heat.
The repair was easy. the most time consuming part was vacuuming the dust from the back of the Dryer, The repair required removing screw from the back panel of the dryer. Then removing screws from the heating element and unplugging the wires. The only moderately diffculy part was swapping the sensor form the old element.
Parts Used:
-
Remie from Mahopac, NY
-
Difficulty Level:Really Easy
-
Total Repair Time:15 - 30 mins
-
Tools:Nutdriver
694 of 724 people
found this instruction helpful.
Was this instruction helpful to you?
Thank you for voting!
No heat for dryer
Moved dryer from wall,disconnected power. Unscrewed the 12+ sheet metal screws holding on the back cover. Located heating element, remover it's two sheet metal screws and pulled down on the element to remove. Disconnected the two electrical leads from element and went to the top of Dryer. Do not remiember if told to remove the temptur
... Read more
e kill button was easy to see that it was needed on new element. Moved high tempeture senson to new element. Reversed steps to install new element. Replaced back cover, pluged in and powered up. Works like a champ. Thanks for the price on the part and the video which started me on the right track. I'll be back !!
Read less
Parts Used:
-
Leslie from Dallas, TX
-
Difficulty Level:Really Easy
-
Total Repair Time:30 - 60 mins
-
Tools:Nutdriver, Pliers
496 of 519 people
found this instruction helpful.
Was this instruction helpful to you?
Thank you for voting!