This genuine OEM washer has a 3/4 inch outside diameter. This thrust washer can be used on most makes and models of dryers. A complete list of compatible dryers is available below. The washer is found...
$7.95
In Stock
Order within the next 48 mins and your part ships today!
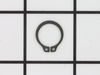
The metal retaining ring, which is under an inch long, holds the rear wheels on the axels of the dryer. The main reason why it would need to replaced is if the retaining ring has sprung out of place o...
$13.58
In Stock
Order within the next 48 mins and your part ships today!
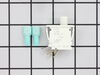
This part replaces two terminal switches in a dryer and prevents the dryer from running when the door is open. This includes two connectors. If your dryer will not shut off, start, or does not tumble,...
$29.94
In Stock
Order within the next 48 mins and your part ships today!
This hose clamp is used in a wide variety of household appliances. Most often it is found in washers, dishwashers, refrigerators, freezers, dehumidifiers, garbage disposals, or air conditioners. This ...
$11.80
In Stock
Order within the next 48 mins and your part ships today!
If your washer shakes or vibrates loudly when it reaches its max speed, make sure the 4 levelling legs are even. Adjust the legs so that the machine is level, and tighten the locking nuts on the legs ...
$18.47
In Stock
Order within the next 48 mins and your part ships today!
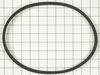
The hose clamp is used to hold the water hose in place which will prevent the hose from leaking water. Sometimes the clamp may lose its ability to latch on, causing a leaking washer. For the installat...
$11.10
In Stock
Order within the next 48 mins and your part ships today!
This inlet hose washer, also known as a high pressure inlet hose washer, is used in washing machines, refrigerators, freezers, and dishwashers. The function of this part is to create a watertight seal...
$8.00
In Stock
Order within the next 48 mins and your part ships today!
Order within the next 48 mins and your part ships today!
Questions And Answers for SWTT21WN
Ask our experts a question about this model and we'll get back to you as soon as possible!
1 question answered by our experts.
Sort by:
< Prev
1
Next >
Search filter:
Clear Filter
Your search term must have 3 or more characters.
Keep searches simple. Use keywords, e.g. "leaking", "pump", "broken" or "fit".
Sorry, we couldn't find any existing answers that matched.Try using some different or simpler keywords, or submit your new question by using the "Ask a Question" button above!
JOYCE
March 5, 2020
What can be causing a squealing sound?
For model number SWTT21WN
Hi Joyce,
Thank you for your question. If your washer is making a squealing noise when in use, the washer may have an unbalanced load and you will need to shut it off and redistribute the clothes in the tub. If you are overfilling the washer, this can cause strain on the parts that cause the washer to agitate. If you are overfilling the washer, try washing smaller loads of clothes to see if this helps. If there is a squealing noise coming from the washer, you may have a damaged drum. Overtime, through use and from loose items such as coins and zippers, the drum will wear out. It can be dented and banged up or the bearing o the bottom of the drum can become damaged or worn. If it is the drum that is causing the noise, it will need to be replaced. If the belt on your washer is damaged, frayed or not correctly adjusted, this may cause the squealing noise and you will either have to adjust the belt or replace it. We hope this helps. Thank you and have a great day.
FIRST unplug dryer from electrical source, CAUTION, the top of this dryer does not open with clips, do not pry on top to open! On the front of the dryer look under the lower panel, and find two screws, one on the left side, and one on the right, remove these screws, and pull slightly down on panel to remove. Behind this panel find two s
... Read morecrews holding the door panel, one on the left, and one on the right, remove the left, and support the door panel while removing the right side. Gently pull the bottom of door panel outward, and the clips on top of door panel will unhinge from top, carefully rotate left side of door panel to floor, and note the wire connections on switch, and orientation of switch, then unplug wires, and move door panel to a comfortable working positon. Door must be open to remove switch, then depress the two plastic retaining keepers on each side of switch, and push switch through toward door. Replace with new switch, reconnect the wires, and reassymble in reverse order. Remember, door assymbly must be inserted in dryer top at an angle, and then bottom rotated downward, and bottom panel nylon guildes inserted into door panel bottom.
Switch can be removed from outside of dryer and your video described the repair as having to work from inside dryer. But since wires were still attached to old switch, it could be popped out and wires switched. Since there were three wires on new switch to allow it to turn on and off a circuit, it was useful to check the resistance of the
... Read more switch compressed or released to be certain I was attaching the two wires to the right two poles of the new switch. But that all required only a couple of minutes. Thank you.
remove bottom section under door 2 screws remove door 2 screws remove switch by squeezing tabs install 2 new female ends on wires supplied with switch . put switch back in plug in wires .