


Models
>
SWT220WA
SWT220WA Speed Queen Washer - Overview
Sections of the SWT220WA
[Viewing 21 of 21]


Keep searches simple, eg. "belt" or "pump".

Thrust Washer
PartSelect #: PS11740482
Manufacturer #: WP233520
This genuine OEM washer has a 3/4 inch outside diameter. This thrust washer can be used on most makes and models of dryers. A complete list of compatible dryers is available below. The washer is found...
$7.95
In Stock

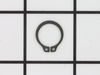
Retaining Ring
PartSelect #: PS11740487
Manufacturer #: WP23748
The metal retaining ring, which is under an inch long, holds the rear wheels on the axels of the dryer. The main reason why it would need to replaced is if the retaining ring has sprung out of place o...
$13.58
In Stock

Screw, 8/18 x 3/8
PartSelect #: PS11746840
Manufacturer #: WP90767
This screw is sold individually.
$5.42
In Stock

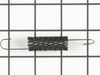
Spin Belt
PartSelect #: PS11740578
Manufacturer #: WP27001007
This v-shaped spin belt helps transfer power from the motor to the transmission to help pump the water in and out of the washer. It also helps runs the spin cycle in the washer.
$84.20
In Stock

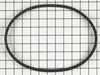
Hose Clamp
PartSelect #: PS11743008
Manufacturer #: WP596669
This hose clamp is used in a wide variety of household appliances. Most often it is found in washers, dishwashers, refrigerators, freezers, dehumidifiers, garbage disposals, or air conditioners. This ...
$11.80
In Stock

Adjustable Leveling Leg
PartSelect #: PS2021026
Manufacturer #: 22003428
If your washer shakes or vibrates loudly when it reaches its max speed, make sure the 4 levelling legs are even. Adjust the legs so that the machine is level, and tighten the locking nuts on the legs ...
$18.47
In Stock

Hose Clamp
PartSelect #: PS11740613
Manufacturer #: WP285655
The hose clamp is used to hold the water hose in place which will prevent the hose from leaking water. Sometimes the clamp may lose its ability to latch on, causing a leaking washer. For the installat...
$11.10
In Stock

Lid Hinge Mounting Screw
PartSelect #: PS11748588
Manufacturer #: WPW10119828
Sold individually. NOTE: The color on the screw may not be the same as the image, but will still function the same.
$11.80
In Stock

Complete Hub and Seal Kit
PartSelect #: PS2174602
Manufacturer #: R9900552
This kit comes with hub, seal head, gasket, seal shroud, seal seat, screw, spline insert, drive bell and seal.
No Longer Available


Inlet Hose Washer
PartSelect #: PS11757437
Manufacturer #: WPY013783
This inlet hose washer, also known as a high pressure inlet hose washer, is used in washing machines, refrigerators, freezers, and dishwashers. The function of this part is to create a watertight seal...
$8.00
In Stock

Screw, 8-18 x 1/2
PartSelect #: PS11741443
Manufacturer #: WP3390631
This screw is sold individually.
$7.84
In Stock
Questions And Answers for SWT220WA
We're sorry, but our Q&A experts are temporarily unavailable.
Please check back later if you still haven't found the answer you need.
Common Symptoms of the SWT220WA
[Viewing 6 of 6]Noisy
Fixed by
these parts
these parts


Show All
Leaking
Fixed by
these parts
these parts


Show All
Burning smell
Fixed by
these parts
these parts
Show All
Will not agitate
Fixed by
these parts
these parts
Show All
Spins slowly
Fixed by
these parts
these parts
Show All
Will not drain
Fixed by
these parts
these parts
Show All


Keep searches simple. Use keywords, e.g. "leaking", "pump", "broken" or "fit".
Noisy during spin cycle
This was the second time for the repair. The original bearing lasted 5 years then became noisy. Replaced it, and the unit worked great 5 more years and the noise came back. So I knew exactly what needed fixing what to order, parts wise. This is not a project for the faint of heart, you will completely disassemble your washer to change
... Read more
out the main bearing. Roughly here are the steps: 1, pull out the agitator with a good firm jerk up. 2, remove the rubber plug in the center of the drive hub, 3 remove the bolt you have just exposed. 4, pry up on the hub, use a puller if you have to to remove it. 5, pry off the cone shaped rubber seal and remove the large main nut from the drive shaft. 6, remove the 4 bolts holding tub, 7 remove the front panel and unscrew the front of the top panel, tip the top up. 8, lift out the tub, 9, remove the 6 large springs holdig the inner assembly to the base, 10, disconnect the water to tank hose and the fill level hose, 11, disconnect the motor cable at the motor, 12, free up the drain hose and pull it, 13, have a helper lift the inner assembly out and move it to a work area, 14, unbolt the drum from the base, motor, and counter weight 15, pry the drive hub off the transmission shaft, 16, remove the rubber seal from the drum, 17 flip the drum and remove the 3 bolts holding the bearing in place. Reverse to put it back. These steps are from memory so they may not be exact. The exploded views on PartsSelect.com web help, as to the instructions that come with the parts.
Read less
Parts Used:


-
Gary from Dousman, WI
-
Difficulty Level:A Bit Difficult
-
Total Repair Time:More than 2 hours
-
Tools:Nutdriver, Pliers, Screw drivers, Socket set, Wrench (Adjustable), Wrench set
101 of 114 people
found this instruction helpful.
Was this instruction helpful to you?
Thank you for voting!
The spin belt failed due to overloading the washing machine.
Unplugged the washing machine and turned off the water to the machine. Removed the two front covers; unhooked the two front springs; removed the (4) motor mounting bolts; unhooked the two hoses for the water pump; unhooked the wiring harness; removed the belt from the driven pulley; pulled the motor assembly out; removed the (3) screws t
... Read more
o separate the water pump from the motor; removed the belt from the motor pulley; installed new belt and repeated above in reverse to put everything back together; started washing machine and it worked great.
Read less
Parts Used:
-
Mark from Cheektowaga, NY
-
Difficulty Level:Easy
-
Total Repair Time:30 - 60 mins
-
Tools:Screw drivers, Socket set
47 of 51 people
found this instruction helpful.
Was this instruction helpful to you?
Thank you for voting!
The Seal On The Bottom Of The Tub Was Leaking
Removed the front of the washer, then lifted the top up and held it up with a prop. Pulled the agitator straight up and started the disasembly. Using the photos in the hub and seal kit was a big help. The large nut on the output shaft had to be cut off with my dremel tool and the hub removed with a wheeler puller. Assembly was pretty
... Read more
much straight forward. Primed the pump and started the machine for the stated time and was a sucess.
Read less
Parts Used:
-
HOWARD from CORTLAND, OH
-
Difficulty Level:Easy
-
Total Repair Time:1- 2 hours
-
Tools:Nutdriver, Screw drivers, Socket set, Wrench (Adjustable)
33 of 42 people
found this instruction helpful.
Was this instruction helpful to you?
Thank you for voting!