Enter the code DIYDAD10 at checkout to apply your discount. Discount will be applied at checkout when the code is entered & applies to all parts. Cannot be combined with any other coupon or special offer & cannot be applied to a previously placed order. Not valid toward tax or shipping & handling. Discount has no cash value. Discount expires on June 17 at 11:59pm EST.
You've Got 10% Off Your First Order!Save 10% with code at checkout *click to copy coupon code
This touch-up paint can be used on a wide variety of household appliances. It is most often used on washers, dryer, refrigerators, dishwashers, ranges, freezers, trash compactors, or microwaves. It is...
$8.02
In Stock
Order within the next 6 hrs and your part ships today!
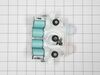
This is an inlet valve for your washing machine. The inlet valve is an electrically controlled valve with a solenoid that opens and closes as needed, during the water filling cycle of the washing mach...
$88.26
In Stock
Order within the next 6 hrs and your part ships today!
The hose clamp is used to hold the water hose in place which will prevent the hose from leaking water. Sometimes the clamp may lose its ability to latch on, causing a leaking washer. For the installat...
$11.12
In Stock
Order within the next 6 hrs and your part ships today!
This lid lock assembly is supplied by the original manufacturer for use in various models of top-load washing machines. The assembly includes the lid lock mechanism and the wiring harness. You can fin...
$144.02
In Stock
Order within the next 6 hrs and your part ships today!
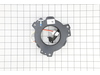
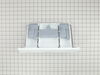
This is a dispenser drawer assembly direct from the manufacturer and used in washing machines. This drawer is made of plastic and features the compartments for bleach, detergent, and softener, for you...
$66.49
In Stock
Order within the next 6 hrs and your part ships today!
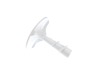
This agitator assembly is an authentic OEM part that is compatible with various models of washing machines. It consists of a central shaft with a series of fins attached to it. When the washer is oper...
$89.77
In Stock
Order within the next 6 hrs and your part ships today!
Appliance spray paint is a great way to cover up any chips and scratches that have appeared on your appliances. Instead of replacing the part entirely, this is an easy fix. This is also a great way to...
$22.68
In Stock
Order within the next 6 hrs and your part ships today!
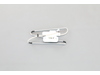
This lid hinge is a genuine OEM replacement part for your washing machine. This hinge is for the left side of your lid, although it is a good idea to replace btoh hinges at once. The hinge holds up th...
$25.37
In Stock
Order within the next 6 hrs and your part ships today!
Questions And Answers for MVWB765FW2
We're sorry, but our Q&A experts are temporarily unavailable.
Please check back later if you still haven't found the answer you need.
6 questions answered by our experts.
Sort by:
< Prev
1
2
Next >
Search filter:
Clear Filter
Your search term must have 3 or more characters.
Keep searches simple. Use keywords, e.g. "leaking", "pump", "broken" or "fit".
Sorry, we couldn't find any existing answers that matched.Try using some different or simpler keywords, or submit your new question by using the "Ask a Question" button above!
Ethel
November 22, 2022
I washed cloth shower liner and a small section is stuck in the gap at the bottom of machine around the center piece.
For model number MVWB765FW2
Hi Ethel,
Thank you for your question. If a piece of the cloth shower liner is stuck under the agitator, then you will need to remove it. We have included a link to one of our YouTube videos that you may reference on how to remove and install the agitator assembly. The washer and agitator assembly in the video may appear different from yours, but it will give you a general idea on how to remove and install the part. If you have any questions, please let us know. We are open 7 days a week. We look forward to hearing from you!
Was this helpful?
Thank you for voting!
Tom
March 29, 2023
I purchased a home and the previous owner left this 4 y/o washing machine.
On maximum fill the tub does not fill more than 1/4 or 1/3 of the tub. Is this usual?
For model number MVWB765FW2
Hi Tom, thank you for the question. We would recommend checking the water pressure hose for any blockage or damage. If there is any, replace it with part number PS11741846. This is the hose that tells your appliance if your tub is at the desired water level. If that does not help, we would recommend replacing the water inlet valve, part number PS12348013. We hope this information helps!
Our washer has developed a high-pitched squeal during it's second cycle. What is the common cause? Is it a bearing, motor, ???
For model number MVWB765FW2
Hi Jess, thank you for contacting us. We have researched the model and would suggest checking the slider assembly, part number PS10060062. We hope this helps!
Hello Jim, Thank you for reaching out. The filter is located under the basket in the bottom of the outer tub assembly. You will need to remove the basket and agitator to get to the filter. The filter is held in place by screws. Thank you for your inquiry!
Was this helpful?
Thank you for voting!
Greg
January 7, 2024
Bottom of washer drum swallows a shirt that we cannot remove. Tried to undo screw inside agitator. It won’t budge… help
For model number MVWB765FW2
Hi Greg, thank you for reaching out. Make sure that you are using the correct socket for the bolt. Use 7/16th socket wrench to unscrew the screw. If this does not help, the best tool to remove this bolt is an impact drill to break the bolt loose. You should use an impact drill to make this easier. Impact drill creates the hammering effect that loosens the bolt. We hope this solves your problem!
This product comes in a bottle with a brush like Liquid Paper. It goes on incredibly easy. A second coat might be needed. I wanted to prevent rust from setting in so I covered the scratches and dings. The paint is a little brighter since my washer is 10 years old but it still looks great.
1.) disconnect power to your washer. Turn off water supply and disconnect from the washer.
open the washer top and remove plastic cap from the wash plate
2.) using 7/16 socket, remove bolt from the wash plate. If you can't remove it with a socket , I recommend using impact wrench.
3.) remove wash plate
... Read more( you might need to spray penetrating oil or wd40 inside the bolt hole to loosen it. Check to make sure the wash plate gear grooves are not worn down, if they are, replace it.
4.) using your Maytag specific spaner nut wrench, remove the spaner nut from the shaft of the gear case. This should be right underneath where the wash plate was. If you can't turn it by hand , use a rubber mallet or hammer to encourage it.
5.) some people remove the wash basket at this point. I don't think it is necessary.
6.) close your washing machine. Tape the top closed to keep it from flying open. Tilt your washer back and prop it up where you have access to the underside of the washing machine.
7) remove motor rotor bolt and pull rotor off of the motor.
8.) disconnect the two wire connectors that supply power to motor. using a socket, remove bolts that are keeping motor attached to the gear case.
9.) Now that the gear case is all the is remaining on the underside, you can remove the 4 bolts that are holding the gear case to the washer. Now try to pull gear case out.
10.) if gearcase will not pull out, lower washer back to upright position. Spray penetrating oil or wd40 around the shaft of the gearcase and allow it to sit for 5-10 minutes. Using a hammer, lightly tap on the shaft of the gearcase and it should now fall out. ( you might have to apply penetrating oil again, or apply more force with the hammer.
11.) reinstall motor to new gearcase. Insert new gear case to the washer. Reinstall bolts and reconnect power supply wires.
12. ReInstall spaner nut inside the washer, reinstall wash plate.
Raised lid to remove two Torx head screws from each hinge. Lid will then lift off of hinges. Installation of new lid was the reverse of the removal procedure. It is best to install one hinge to the lid by removing that hinge from the washer. The lid can then be installed by inserting that hinge into it's spot and then over the other hinge
... Read more. Install the hinge screws into the second hinge and the job is complete. The lid now closes properly allowing the automatic lid lock to function properly.


 Diagram and Parts List for Whirlpool")