


Models
>
MC12J8035CT
MC12J8035CT ((AA-00)) Samsung Microwave Oven Combo - Overview
Sections of the MC12J8035CT
[Viewing 4 of 4] Samsung Microwave Oven Combo")
 Samsung Microwave Oven Combo")
 Samsung Microwave Oven Combo")
 Samsung Microwave Oven Combo")
Keep searches simple, eg. "belt" or "pump".

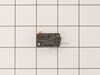
Micro Door Switch
PartSelect #: PS4131192
Manufacturer #: 3405-001034
This door switch, also known as a safety switch, is a genuine OEM replacement part for microwaves. It is a safety mechanism that sends signals to the microwaves control system, telling it when the doo...
$37.08
In Stock

Assembly GUIDE ROLLER;JES831
PartSelect #: PS4236203
Manufacturer #: DE92-90189S
The turntable tray support holds the turntable tray while allowing the tray to rotate.
$49.53
On Order


NUT-FLANGE;-,-,MSWR10,-,
PartSelect #: PS4226726
Manufacturer #: DE60-30016A
This flange nut is designed for use within various cooking appliances like ranges, microwaves and wall ovens. Flange nuts are typically used to evenly distribute pressure across its application surfac...
$5.40
In Stock


Assembly WIRE RACK;CK95,-,-,
PartSelect #: PS4240012
Manufacturer #: DE97-00136B
$84.96
Special Order

Questions And Answers for MC12J8035CT
We're sorry, but our Q&A experts are temporarily unavailable.
Please check back later if you still haven't found the answer you need.
Sort by:
- < Prev
- 1
- Next >
Search filter:
Clear Filter
Your search term must have 3 or more characters.
Keep searches simple. Use keywords, e.g. "leaking", "pump", "broken" or "fit".
Sorry, we couldn't find any existing answers that matched.Try using some different or simpler keywords, or submit your new question by using the "Ask a Question" button above!
RW
15 days ago
Unit lost high oven heat, expect heating element failure
For model number MC12J8035CT
Hi RW, thank you for the question. Before replacing the magnetron, we would suggest checking the thermostat, part number PS4226408. You may need to replace it to fix the issue. We hope this solves your problem!
Was this helpful?
Thank you for voting!
Related Parts:
THERMOSTAT;-,NT-101,250V


$24.88
In Stock
- < Prev
- 1
- Next >
Common Symptoms of the MC12J8035CT
[Viewing 3 of 3]Doesn’t shut off
Fixed by
these parts
these parts
Show All
No heat
Fixed by
these parts
these parts
Show All
Won’t turn on
Fixed by
these parts
these parts
Show All
Keep searches simple. Use keywords, e.g. "leaking", "pump", "broken" or "fit".
The microwave would not turn on or would run with the door open
Other tools that are usefull long needle nose pliers, long thin blade screw driver and small magnetic flashlight. Place the microwave on a work bench and remove the case it cover 3 sides. Place the microwave on a chair so it can stand with the controls up. You are replacing the lower door microswitch. The switch is located behind the
... Read more
control panel in the lower part of the area. The switch is several inches inside this area and your hands will not fit. Take care when moving wires and a couple of sensors. Use the thin blade screwdriver to release a tab holding the switch in place. Do not break this tab. Take the needle nose pliers and remove the switch. Put the wires on the new switch, open the door a short distance so a door lever moves enough to put the microswitch back into the bracket.
Read less
Parts Used:
-
Raymond from TROY, OH
-
Difficulty Level:Easy
-
Total Repair Time:1- 2 hours
-
Tools:Screw drivers
5 of 10 people
found this instruction helpful.
Was this instruction helpful to you?
Thank you for voting!
Part broke
Got the part and replaced it. Simple. Pleasure to work with
Parts Used:
-
Edward from MYRTLE BEACH, SC
-
Difficulty Level:Very Easy
-
Total Repair Time:Less than 15 mins
2 of 2 people
found this instruction helpful.
Was this instruction helpful to you?
Thank you for voting!
Missing roller guide under glass plate
I used my pocket knife to open the package. I opened the door and removed the plate and set the guide down and put the glass plate back.
Parts Used:
-
Jason from WASHINGTON, IN
-
Difficulty Level:Very Easy
-
Total Repair Time:Less than 15 mins
1 of 2 people
found this instruction helpful.
Was this instruction helpful to you?
Thank you for voting!