Enter the code DIYDAD10 at checkout to apply your discount. Discount will be applied at checkout when the code is entered & applies to all parts. Cannot be combined with any other coupon or special offer & cannot be applied to a previously placed order. Not valid toward tax or shipping & handling. Discount has no cash value. Discount expires on June 17 at 11:59pm EST.
You've Got 10% Off Your First Order!Save 10% with code at checkout *click to copy coupon code
The interior light in your refrigerator is controlled by a switch that is activated when the door is opened and closed. If your refrigerator light will not turn on, or stays on when the door is closed...
This lower holder cover is also known as a toe grille clip, or a kickplate clip. It is designed for use with refrigerators. The main purpose of this part is to hold the molding at the base of your ref...
This plastic cover is a genuine OEM replacement part for your refrigerator. This part serves as the frame the glass shelf above your refrigerator crisper. To replace this part, remove the glass shelf...
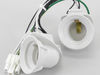
This part is a replacement light socket for your refrigerator. This model is white in color, and it has two sockets that will fit two separate light bulbs. The light socket connects to the power sourc...
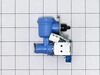
This water tubing clip holds the water fill tube in place in your refrigerator. The water fill tube attaches and supplies water to the ice maker/water dispenser in your fridge-freezer. If the tubing i...
$16.78
In Stock
Questions And Answers for LBC22518ST
We're sorry, but our Q&A experts are temporarily unavailable.
Please check back later if you still haven't found the answer you need.
1 question answered by our experts.
Sort by:
< Prev
1
Next >
Search filter:
Clear Filter
Your search term must have 3 or more characters.
Keep searches simple. Use keywords, e.g. "leaking", "pump", "broken" or "fit".
Sorry, we couldn't find any existing answers that matched.Try using some different or simpler keywords, or submit your new question by using the "Ask a Question" button above!
Mike
March 10, 2020
My fridge/freezer got warm. Lights and fan still running, any thoughts?
For model number LBC22518ST
Hello Mike, Thank you for the question. We suggest testing the Defrost Thermostat, PartSelect Number PS3529338. The best way to do this is to remove the thermostat from the refrigerator so you can control the temperature of the sensor. You can let the sensor warm up to room temperature. With the sensor warmed up to room temperature the sensor should read approximately 6.2K Ohms at 68°F. With the thermistor submerged is a glass full of ice water, the sensor should be very close to 32°F which should read approximately 16.3K Ohms. If the values that you are getting are far off from these readings, then the sensor is bad and should be replaced. We hope this helps.
This refrigerator/freezer problem had been escalating for almost a year, requiring me to frequently knock the ice buildup free with a rubber mallet. I finally decided to try to identify the problem by removing the freezer door and all of the shelves and shelf tracks (easily removed with only a phillips screwdriver). Then I removed the bac
... Read morek plastic panel to expose the cooling coils, which were partially encased in ice. I deduced that the evaporator fan motor was failing, which blows air over the freezer cooling coils and forces the cool air up into the upper refrigerator section (which was not staying cold). I then found and ordered the fan motor from part select. Their search function and exploded drawing schematics made it easy to identify the part and part number. It seems the original part number had been superceded with a new number, which I ordered. Once it arrived after about a week, I transferred the fan blades from the old motor to the new fan motor, and after completely drying out the freezer compartment, I reinstalled all of the parts and plugged in the unit and waited. By the next day, the refrigerator was operating at peak efficiency, and the ice buildup in the freezer has not returned. I was very close to scrapping the entire refrigerator as junk, but with a little diagnostic effort and about $110 for the new motor, I have a fully functioning refrigerator again. Thanks to Part Select for a great experience.
Video makes it look easy. Kenmore refrigerator does not have "groove" along the right hand side of switch that allows for pushing down on release. Used a thin screwdriver to get under to push while holding switch edge with pliers. Kept slipping. Tape sides to avoid scratching inside of refrigerator.
removed the upper freezer door to access screws to remove lower door. laid bottom door on its side, removed bad bushing, put new bushing in, put bottom door back on refridge, put upper door back on fridge. Door worked easy as when new. good closure of door and story..Happy customer, and wife even happier.....thank you....