Enter the code DIYDAD10 at checkout to apply your discount. Discount will be applied at checkout when the code is entered & applies to all parts. Cannot be combined with any other coupon or special offer & cannot be applied to a previously placed order. Not valid toward tax or shipping & handling. Discount has no cash value. Discount expires on June 17 at 11:59pm EST.
You've Got 10% Off Your First Order!Save 10% with code at checkout *click to copy coupon code
This condenser fan motor kit includes a motor, fan blade, wire harness, and screws. Used in a refrigerator, the condenser fan motor moves the condenser fan blade to direct and move air across the cond...
This genuine OEM replacement part is a water filter for your fridge or freestanding ice maker. The filter is used to remove contaminants and particles from the water, to ensure a clean and fresh taste...
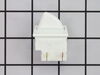
This is a light switch for your refrigerator. It activates when the door of your appliance is opened, and it will turn the light inside on and off. You will need to replace this part is if your light ...
This touch-up paint can be used on a wide variety of household appliances. It is most often used on washers, dryer, refrigerators, dishwashers, ranges, freezers, trash compactors, or microwaves. It is...
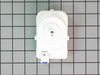
This bin temperature sensor is for ice makers.
The bin temperature sensor monitors the temperature in the ice maker bin and sends the temperature reading to the electronic control board.
Disconn...
Appliance spray paint is a great way to cover up any chips and scratches that have appeared on your appliances. Instead of replacing the part entirely, this is an easy fix. This is also a great way to...
This authentic OEM black touch-up paint is specifically designed for repairing minor scratches, chips, or blemishes on your kitchen appliances. The bottle contains 16ml or 0.6oz of black paint and has...
The process to repair was very simple, I removed the back of the refrigerator to expose the motor area. I then removed three screws that held the condenser motor in place. once it was loose I detactched the electrical harness and removed the old motor. I then placed the new motor in place and secured it with the screws and reattached the
... Read morenew electrical harness that came with the new part. Once completed I reviewed it to make sure I didn't miss anything. I then replaced the cover over the motor area and enjoyed my success in repairing my own appliance with no added cost for labor, which would have been expensive I'm sure. The part purchased came with clear and consice instructions very easy to follow.
We have a side-by-side fridge/freezer and we experienced a hot center post (where doors come together) and the fridge made loud noise. Also, the (old) fan motor would start, but then quit, so our issue was the motor.
For me the repair was very easy, but for an unexperienced person it may prove to be difficult. If you must o
... Read morerder a motor/fan, do NOT order the metal fan as a plastic fan comes with the motor. What's strange is the new motor is different than the old one, but it still mounted without any required modifications. I did NOT use the wire harness that came with the motor either as it was different too, but my old one was still good.
Check all of your parts as my fan had a cracked blade, but I used "superglue" and it's fine now.
Fridge stays cold and my wife had to lower the temperature in the fridge as she was blasted by the cold!
The procedure was straightforward. I removed the cardboard backing on the lower back of the refrigerator to expose the fan unit. I then undid the electrical harness at the fan. I then removed the three screws securing the fan motor to the metal bracket. This is the hardest part in that I had to reach through and get to the screws with my
... Read moresmall tools. I then removed the old motor and blades and placed the new motor and blades. Again, a bit tricky trying to get the three screws mounted into the bracket...small tools and hands helps. After that I used the electrical harness supplied with the kit to plug into the new motor and I was done.


 Diagram and Parts List for KitchenAid Ice Maker")