Enter the code DIYDAD10 at checkout to apply your discount. Discount will be applied at checkout when the code is entered & applies to all parts. Cannot be combined with any other coupon or special offer & cannot be applied to a previously placed order. Not valid toward tax or shipping & handling. Discount has no cash value. Discount expires on June 17 at 11:59pm EST.
You've Got 10% Off Your First Order!Save 10% with code at checkout *click to copy coupon code
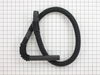
The tub dampening straps support the wash tub and reduce vibration by keeping the tub at the center of the cabinet. If your washer shakes and moves, or is making a loud banging noise during the wash c...
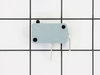
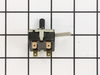
This clip ensures that the knob is securely fastened to the control shaft, allowing you to properly select the correct time and setting for your dryer. If your dryer will not start or shut off, the ti...
The drain hose is black in color and made of flexible material. This is a part for your top-load washer. The hose measures 57 inches long. This part moves the water out of the washer and into the drai...
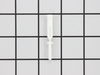
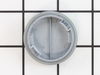
The timer knob clip on your washing machine connects the timer knob to the control panel. If your timer knob is damaged or will not stay in place, you may need to replace the clip. If the timer does n...
This is a dual-action agitator for a washer. It is an OEM replacement part that is sourced from the manufacturer. The agitator tosses your clothes to clean them efficiently. This plastic dual-action a...
The main tub seal is located between the transmission and the outer tub. Its the primary water seal in the outer tub for the transmission-shaft. If your washer is leaking during the fill cycle, or at ...
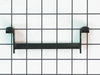
This drain hose support clip is a piece for your washer. The purpose of the drain hose support clip is to hold the drain hose in place by attaching to a cabinet. This piece is off-white and is roughly...
This detergent dispenser assembly is attached to the inner door panel of a dishwasher. This part holds detergent and dishwasher rinse products in a covered container. If your dispenser will not open, ...
This is a tub bearing and it is meant to work in conjunction with your washing machine. The purpose of this part is to aid in keeping the inner tub of your washing machine spinning smoothly during a w...
This split ring is supplied by the original equipment manufacturer, and it is designed to secure the tub bearing in washing machines. It is a circular metal ring, with an outer diameter of 2 inches. T...
This part is the hub nut, or lock down nut for your washing machine. It is designed to hold the inner tub on to the transmission. If your hub nut is stripped or damaged, it may need to be replaced. T...
$22.01
In Stock
Questions And Answers for GMR05BLHWWC
We're sorry, but our Q&A experts are temporarily unavailable.
Please check back later if you still haven't found the answer you need.
After removing frt panel which prys off I checked for anything obvious like a loose belt. Then I jiggled the magnet switch located on the inside of the loading cover. I saw the machine start agitating the it stopped again when I stopped touching it. I ordered the new part and spliced it in with the wire crip tool. Now the machine is A ok.
Remove the front coverfrom the machine. This is done by removing the 3 screws at the bottom of the panel. The panel then drops down and pulls straight off. The pump is located on the front right wall of the of the machine. You will notice a 2-3 inch diamete threaded cap on the right side of the front wall of the machine. This is the f
... Read moreront of the pump and access to the filter. Place a large bucket under this cap and slowly loosen the cap. All of the water remaining in the machine will begin to drain (this could be a lot of water. Do not remove the cap completely so that you can quickly stop the flow of water if needed). Once all water is drained from the appliance, Disconnect the two hoses from the pump using a pair of pliers to looses the presure clamps, sliding the clamps back an then pulling off the hoses (be careful of any remaining water in the hoses). Then remove the two screws from the rear base of the pump that secure it to the bottom floor panel of the washer. Slide the pump slightly to the rear to free it from the fittings on the front wall of the machine and the lift the pump up. At this point, firmly pull out the wiring harness plugged into the top right side of the pump. Install the new pump by plugging in the wiring harness and resecuring the pump. Plug in the machine and run on the rinse and spin cycle to test.
First I removed the screws that held the hose drain hose clip in place. Removed the damaged hose. Placed the new drain hose clip at the end of the new drain hose. Re-inserted back in hole, pushed in hose to necessary depth then tighted screws, Very easy and painless.