Enter the code DIYDAD10 at checkout to apply your discount. Discount will be applied at checkout when the code is entered & applies to all parts. Cannot be combined with any other coupon or special offer & cannot be applied to a previously placed order. Not valid toward tax or shipping & handling. Discount has no cash value. Discount expires on June 17 at 11:59pm EST.
You've Got 10% Off Your First Order!Save 10% with code at checkout *click to copy coupon code
This touch-up paint can be used on a wide variety of household appliances. It is most often used on washers, dryer, refrigerators, dishwashers, ranges, freezers, trash compactors, or microwaves. It is...
$8.02
In Stock
Order within the next 3 hrs and your part ships today!
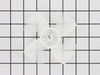
If you notice an unusual noise coming from your freezer, the evaporator fan blade might be the problem. Frost-free freezer models use evaporator fans to move air through the evaporator for more effici...
$16.18
In Stock
Order within the next 3 hrs and your part ships today!
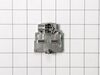
This part is both the start relay and the overload. The start relay boosts the compressor, and then shuts off as soon as the motor gets up to speed and the overload provides extra protection against e...
$105.56
In Stock
Order within the next 3 hrs and your part ships today!
Appliance spray paint is a great way to cover up any chips and scratches that have appeared on your appliances. Instead of replacing the part entirely, this is an easy fix. This is also a great way to...
$22.68
In Stock
Order within the next 3 hrs and your part ships today!
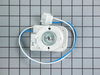
This evaporator fan motor is located in the back of the freezer, and circulates air over the refrigerator coils. These coils will convert the heat into cool air, which is then circulated.
$246.76
In Stock
Order within the next 3 hrs and your part ships today!
I used a flat-head screwdriver to pop out the old light rocker switch. Then, I unplugged the wires, plugged them into the new light rocker switch, and then popped the new switch into the hole. That's it! Lights began working again.
Removed shelves from inside freezer then removed 4 screws holding cover panel. Pulled panel up and slightly pulled forward to remove. Removed wiring connections then removed two screws that held the motor & fan assembly. Removed the support bracket from the old motor and installed same on the support bracket. Reversed removal procedur
... Read morees for installation. Cover panel is a little bit of a problem when trying to reinstall. Put in panel as high as you can and then slide down. You must then exert a little pressure on the bottom portion to get it to seat correctly. Install four remaing screws and you are done. I had this repaired previously by a professional repairman and noticed from the pictures you folks provided that he had installed the screws on the support bracket incorrectly. That was the reason for the fan blade to rip apart.
I had read on a fix it site that the start device for the compressor on this particular model was known to fail after 3-5 years. When we received the part it looked like something that just plugged into the compressor. My husband unscrewed the panel in the back of the fridge and saw the part on the compressor. He first removed the thre
... Read moree wires that it was connected to, and the wires were inside a plug so all he had to do was remove the plug from the start device. He then removed the old start device from the compressor. Plugged in the wire plug into the new start device, and pushed in the new start device into the compressor. There was also another black part plugged into the old start device that he plugged inot the new start device that connected to the compressor. Our freezer and refrigerator starting working. Within a couple of hours our freezer had made ice.


 Diagram and Parts List for Whirlpool Freezer")