Enter the code DIYDAD10 at checkout to apply your discount. Discount will be applied at checkout when the code is entered & applies to all parts. Cannot be combined with any other coupon or special offer & cannot be applied to a previously placed order. Not valid toward tax or shipping & handling. Discount has no cash value. Discount expires on June 17 at 11:59pm EST.
Parts That Fix Electrolux Dryer EFMG617STT0 Not Heating
Not Heating is a commonly reported symptom for the EFMG617STT0 Electrolux Dryer, and we have put together a full guide on how to fix this. This advice is based on feedback from people who own this exact appliance. We have listed the most common parts for your EFMG617STT0 Electrolux Dryer that will fix Not Heating. We have included repair instructions, and helpful step-by-step video tutorials. If you are experiencing this issue, not to worry, DIYers just like you have fixed this, and shared their experience to help you!
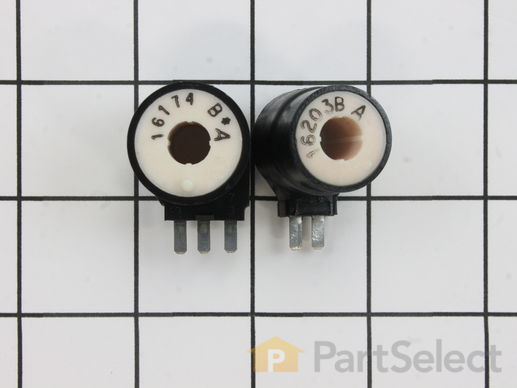
This kit contains two coils, one is a two-wire secondary coil and the other is a three-wire booster coil. Both coils in the ignition coil kit should be used together in the clothes dryer. Some of the symptoms that this kit could be a solution for are: If there is no heat, not enough heat, or clothes takes too long to dry. In this case, the gas valve coils can be defective and replacing this part will help. Customers rate this project as easy. Refer to the installation diagram for further instructions. For safety, unplug your dryer before repair.
Customer Repair Stories
Dryer would heat only on the initial start. Burner would not light again until completely cooled down. The ignitor would energize, but no gas would flow for ignition.
2. Remove 2 phillips screws on the inside of front panel.
3. Lift front panel up and set off to the side
4. Removed 2 phillips screws with short handled phillips driver that hold the gas valve coil bracket in place.
5. Unplugged and removed both coils, install ... Read more ed new coils and bracket. Re installed front panel, screws and top.
-
Bruce from Burnsville, MN
-
Difficulty Level:Easy
-
Total Repair Time:15 - 30 mins
-
Tools:Screw drivers
Dryer would heat initially then cool down
-
Brett from Monticello, MN
-
Difficulty Level:Easy
-
Total Repair Time:15 - 30 mins
-
Tools:Screw drivers
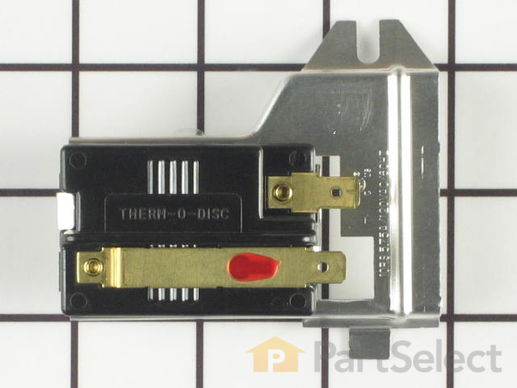
This part senses the flame for heat allowing the gas valve to open. The most common issue that might arise that would indicate the flame sensor needs to be replaced is your dryer is not giving off enough heat. If your clothes are not drying at a reasonable time, this might be your first indication of an issue. You will need to remove the two screws underneath the lint cover to remove the top of the appliance. Release the door switch wiring, remove the front panel, and remove the belt off the pully. You should now be able to completely remove the drum from the dryer. This will give you access to the sensor for the repair.
Customer Repair Stories
Dryer would not ignite
1) Popped-off top lid with flat-blade screw driver (Insert screw driver in joint between top and front of dryer above door) Spring clips are all that's holding top on in front
2) Unplugged plastic electrical connector loc ... Read more ated just along the top-right side of dryer
3) Removed one sheet metal screw located about 8" down from top on either side of dryer - total of two screws
4) Pull front of dryer back and pull up at bottom of dryer (Remember that when you replace front you will have to make sure plastic bearing surfaces on dryer tub are centered back in cut-out on front panel. Plastic tabs fit inside the cut-out or else you'll ge a swishing noise when tub rotates)
5) Set front panel to side
6) Flame sensor is located on the left side of the burn chamber sheet metal cover. It has a red and white wire with flat connectors that must be pulled off. Note which color goes to what terminal
7) Unscrew fastener. Note: this screw/fastener needs a non-standard driver to get it out. I have a variety of other drivers beyond phillips/flat types and non of them worked.
8) I ended up using a pair of pliers to just work it out from under the screw. I bent it, as it has a tab that slips in along left bottom edge of burn chamber cover.
9) Finish taking screw out by hand
10) Put new flame sensor in by inserting tab on bottom first. Then, screw in fastener to top of sensor bracket and reconnect wires. White on top and red on bottom terminal.
11) Replace front panel with door by placing in tabs on bottom front of dryer. Again, make sure plastic bearing surfaces are inside of circular flange on front panel
12) Make sure to reconnect plastic cable connector. Note: I added a tie-wrap because it looked like the connector might rub against drum. There are some holes through which you can run the tie-wrap
13) Replace the two sheet-metal screws
14) Push top down so spring clips re-engage with dryer body
-
David from Murrieta, CA
-
Difficulty Level:A Bit Difficult
-
Total Repair Time:30 - 60 mins
-
Tools:Screw drivers, Socket set
Gas flame turns off after a while. No more heat.
The flame sensor did not fix it but read on for info on how to replace this part. Before replacing this part, I should have read another posting in a different web site about the ignition coils: if you see a red glow inside the burner uni ... Read more t but the flame does not come on, then the problem is likely to be with the coils, not the flame sensor. However since some users here had solved the problem by replacing the flame sensors, I figured I'd try it. The setting for "More dry, less dry" never worked either so maybe this would fix two problems at once.
This dryer is a stacked front loader sitting on top of our washing machine. Opening the little front door (lower left side) is easy once you figure out that a little screw below needs to be removed. I almost broke the door trying to pull it open. The sensor is attached to the side of the flame area cylinder. It was hard to remove both the screw and the part itself from the slots as it's very springy. In fact when I finally removed it, it dropped to the base of the unit and sparks went flying as one of the electrical clips touched the metal (ground). Tip: first disconnect the electrical lead coming from the back of the unit to the ingnition block and later I used rubber gloves just in case. (I could not access the plug/outlet in the back). I installed the new part easily, though I was confused by the electrical leads: the white wire connects to the lead that has a red plastic dot on the side, but I think that must be a mechanical part and not a (wrong) marking, while the red connects to the other lead. Anyway, I connected it the same way I found it and put it back. Reconnected the other electrical wires and closed the door.
This did not fix the problem which turned out to be with the gas valve coils: as they get old, they turn off the flame when they get hot, even though the dryer keeps on turning. To read how to replace that part, search for comments under part number PS470049 ('M' Series Ignition Coil Kit). I don't know whether replacing the flame sensor is going to fix the "more dry-less dry" function, will have to see. Still, this website is great. Our dryer is a Westinghouse bought in 1991 (almost 20 years old!) and with this fixes it's just like new.
-
Giuseppe from San Francisco, CA
-
Difficulty Level:Difficult
-
Total Repair Time:15 - 30 mins
-
Tools:Screw drivers


