Enter the code DIYDAD10 at checkout to apply your discount. Discount will be applied at checkout when the code is entered & applies to all parts. Cannot be combined with any other coupon or special offer & cannot be applied to a previously placed order. Not valid toward tax or shipping & handling. Discount has no cash value. Discount expires on June 17 at 11:59pm EST.
You've Got 10% Off Your First Order!Save 10% with code at checkout *click to copy coupon code
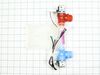
This drive hub kit (part number W10528947VP) is for washers.
Drive hub kit W10528947VP connects the spin basket to the spin shaft that spins the basket. The kit may include multiple parts; refer to...
$34.00
In Stock
Order within the next 8 hrs and your part ships today!
This is lid lock designed for use within various washing machines. This lid lock, also known as a latch assembly, is used to secure the lid of your washing machine during the washing cycle. If your wa...
$139.49
In Stock
Order within the next 8 hrs and your part ships today!
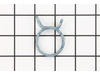
This is a lid strike for various models of top-load washing machines. Lid strikes are designed to engage with the lid switch and communicate to the control board that the washer can start. If your was...
$20.67
In Stock
Order within the next 8 hrs and your part ships today!
This is an inlet valve for various washing machines. Inlet valves are responsible for opening and closing as needed, to allow water to enter the washer during the washing cycle. This inlet valve featu...
$77.50
In Stock
Order within the next 8 hrs and your part ships today!
ordered hub and it shipped quickly. I was able to put the hub in place and screw the screws in. you want to tighten them down slowly and go around to each screw tightening a little at a time so you don't break the hub. as you tighten the screws down the hub slides down flush. its impossible to just push the hub on with your hand. Buttoned
... Read more it back up and got caught up on laundry. good day when the washer is fixed.
unfasten top from back, slide top forward and lift up, remove switch and cable (one piece), in stall new switch and cable, put top down and slide back, reinstall screws.
THE NEW LATCH COMES WITH A NEW BEZEL ATTACHED, WHICH MOUNTS TO THE TOP OF THE WASHER, JUST UNDERNEATH THE LID. BECAUSE THE ORIGINAL BEZEL WAS IN PERFECT CONDITION AND DIFFICULT TO REMOVE, I DECIDED TO REMOVE THE BEZEL ON THE NEW LATCH, AND USE THE ORIGINAL ONE. THIS WOULD HAVE TO BE DONE REGARDLESS IN ORDER TO INSTALL THE NEW LATCH. REMO
... Read moreVING THE BEZEL WAS DIFFICULT DUE TO ALL THE LOCKING TABS THAT KEEP IT IN PLACE. I HAD TO RESTRAIN THE SLIDING SWITCH PARTS WHILE I REMOVED TO BEZEL TO AVOID THE ASSEMBLY FROM COMING APART. ONCE I SNAPPED THE NEW LATCH TO THE EXISTING BEZEL, THE ASSEMBLY WORKED FINE. TAKE TIME TO STUDY HOW THE LATCH ASSEMBLY IS ATTACHED TO THE BEZEL SO THAT YOU DON'T BREAK SOMETHING. USE A VERY SMALL SCREWDRIVER TO PRY BACK THE PLASTIC TABS IN ORDER TO RELEASE THE BEZEL FROM THE LATCH ASSEMBLY.


 Diagram and Parts List for Whirlpool Washer")