Enter the code DIYDAD10 at checkout to apply your discount. Discount will be applied at checkout when the code is entered & applies to all parts. Cannot be combined with any other coupon or special offer & cannot be applied to a previously placed order. Not valid toward tax or shipping & handling. Discount has no cash value. Discount expires on June 17 at 11:59pm EST.
You've Got 10% Off Your First Order!Save 10% with code at checkout *click to copy coupon code
This freezer door key is designed for use with most upright and chest freezers. It is an authentic OEM replacement part. Your appliance has a lid or door that locks and unlocks, this key controls that...
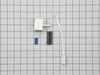
This refrigerator defrost thermostat is a genuine OEM part and is sourced directly from the manufacturer. Located on the back wall of the freezer section in the refrigerator, the defrost thermostat is...
This gasket is used to seal the freezer door when closed to keep the cool air inside and the warm temperature surrounding the freezer from getting in. It is white in color. If you notice that your fre...
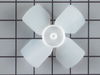
This evaporator fan blade is a genuine OEM part that is sourced directly from the manufacturer. The evaporator fan blade circulates air through the refrigerator to control the amount of cold air goes ...
This gasket retainer clip kit is for freezers. There are 24 pieces in this kit. The clips are what secure the gasket and liner to the freezer lid. The clips are white in color and made of plastic. If ...
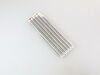
This part could be found underneath a fridge, dryer, or freezer. The original foot may be cracked, broken, or perhaps missing altogether. If you notice the appliance is uneven to the floor or wobbling...
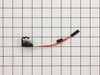
This part is both the start relay and the overload. The start relay boosts the compressor, and then shuts off as soon as the motor gets up to speed and the overload provides extra protection against e...
$80.42
In Stock
Questions And Answers for 25321041105
We're sorry, but our Q&A experts are temporarily unavailable.
Please check back later if you still haven't found the answer you need.
This freezer has many screws that hold the cover on the back of the door and assist clamping the edge of the gasket in place. Be sure to just loosen the screws 3/4 the way out, use a flat head screw driver to pry the cover from the door in case over time it is stuck to the door. The new gasket will come in a creative box trying not to kin
... Read morek the gasket itself, but there will be some distortion of the gasket when you get it. Put it in the sun or in hot water. I put it in my dryer for 10 minutes. Remove the old gasket, and start at the top of the door to replace the gasket. TIPS: If the screws are backed out enough, there should not be any problem sliding the back part of the gasket under the cover. When on the sides, do not pull the gasket down to make it easier to slide the gasket underneath the cover. This will distort and lengthen the gasket so it will not fit and thin it out so it will not function well. Once the gasket is in place, tighten the screws being sure to feel along the outside edge of the gasket for any bulging that would indicate that portion of the gasket is NOT under the cover properly.
I accidently threw away both freezer keys to our upright Gibson and G.E. Freezers!!!! I had no luck finding replacements locally, so I got on the internet and came across PartSelect.com. I called them on the telephone; and after giving the model numbers of my freezers, the keys were on their way!! I received the keys very quickly and bot
... Read moreh worked perfectly. I would highly recommend Partselect.com. Charlotte M. Bishop
After building a test box and determining the Controller was bad simply ordered parts and installed. Installation was a little difficult due to locking spades on electrical connections.
Unplug all power from freezer. Remove Bail wire from controller capacitor unit and remove from compressor by pulling STRAIGHT from compre
... Read moressor body to avoid bending contacts.
Use a very small instrumentation screwdriver to release locking spade on yellow and white wires. To unlock slide screwdriver in slot along wire entry to controller body while gently pulling on wire. Note position of wires and replace on new unit in same position/order. Plug new run capacitor into new controller being careful to orient capacitor to proper position (hole matches guide on controller unit). Plug newly installed controller and capacitor into condensor and replace bail wire.
Make sure timer is not in defrost mode - manually advance timer if necessary to ensure timer is in run mode. Turn temperature control to coldest setting. Plug in and hopefully enjoy the humming noise of your newly repaired and operational compressor and freezer.