


Models
>
18H
18H - Overview
Models starting with 18H
Click on the best match to narrow your results.
- 18H (18 H 1996-03) Husqvarna Hedge Trimmer (Hedge Trimmer)
- 18H (18 H 1995-08) Husqvarna Hedge Trimmer (Hedge Trimmer)
- 18H (18 H 1994-04) Husqvarna Hedge Trimmer (Hedge Trimmer)
- 18H (18 H 1992-03) Husqvarna Hedge Trimmer (Hedge Trimmer)
- 18H ( 19953200001-19960900000 ) Husqvarna Hedge Trimmer (18h (19953200001-19960900000))
- 18H ( 19920900001-19941400000 ) Husqvarna Hedge Trimmer (18h (19920900001-19941400000))
- 18H ( 19960900001-Current ) Husqvarna Hedge Trimmer (18h (19960900001-Current))
- 18HA181 Frigidaire Air Conditioner
- 18HA181A Frigidaire Air Conditioner
- 18HT42 Emerson Air Conditioner (Air Conditioner)
Exact Part matches for your search term
[Viewing 1 of 1]
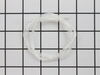
Screen
This part number matches the current model number 18H
PartSelect #: PS12427801
Manufacturer #: 18H
No Longer Available
Keep searches simple, eg. "belt" or "pump".

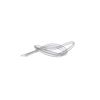
Fuel Line
PartSelect #: PS9472280
Manufacturer #: 530069247
This is the replacement fuel line 25 Inch for several OPE products that use small engines. The fuel line carries fuel from the tank to the carburetor. Over time, the fuel line can become badly clogged...
$6.62
In Stock

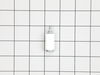
Engine Fuel Filter
PartSelect #: PS9285148
Manufacturer #: 530095646
This fuel filter is for lawn and garden equipment engines.
Fuel filter cleans the fuel before it reaches the carburetor.
Work in a well-ventilated area when installing this part. Drain the fuel...
$4.99
In Stock

Tank Purge Line
PartSelect #: PS9472264
Manufacturer #: 530069216
This part is the replacement tank/purge line for your outdoor power equipment. It is made of clear plastic and is sold individually. The tank/purge line returns excess fuel from the carburetor to the ...
$6.21
In Stock
 – Part Number: 530069599")
Fuel Line (25" Length)
PartSelect #: PS9472350
Manufacturer #: 530069599
This Fuel Line is a 25-inch, clear, plastic line used to deliver fuel. It requires a screwdriver, pliers, socket set, and nut driver and is rated as "Easy" to install by customers. If the fuel line we...
$7.46
In Stock

Fuel Line Fitting
PartSelect #: PS9469715
Manufacturer #: 530023877
The Fuel Line Fitting is a plastic part which attaches two pieces of fuel line together. If broken due to damage/fatigue, there may be a leak and the part must be replaced. Installation is rated as "E...
$4.99
In Stock

 – Part Number: 530069232")
Rope (3 ft.)
PartSelect #: PS9472269
Manufacturer #: 530069232
The chainsaw starter rope is a three-foot-long white rope that is approved by the original equipment manufacturer, and which wraps around the recoil pulley and is pulled to start the engine. Installat...
$7.46
In Stock


Fuel Cap Assembly
PartSelect #: PS9981768
Manufacturer #: 577858601
The Fuel Cap Asssembly attaches on top off the fuel tank in order to prevent fuel from exiting, or debris from entering. Installation is rated as "Easy" by customers. If broken due to fatigue/wear/dam...
$7.46
In Stock
Common Symptoms of models starting with 18H
[Viewing 2 of 2]Will Not Start
Fixed by
these parts
these parts
Show All
Engine stops after a few seconds or minutes
Fixed by
these parts
these parts
Show All
Keep searches simple. Use keywords, e.g. "leaking", "pump", "broken" or "fit".
Both the Fuel line and the Engine fuel line, where dry rotted.
1) While still attached to the fuel tank, I first sized up the old fuel lines with the newer fuel lines.
2) With a pair of needle nose players, I then removed the old dry rotted fuel ?? lines, from the fuel tank.
3) I cleaned the fuel tank and around the carburetor area, to insure that there was no debris, that could possibly fa ... Read more ll into the path of the new fuel lines installation.
4) I then installed the smaller one of the fuel lines, so that it would be out of the way, of the larger fuel line. I Pulled the fuel line through the smaller hole in the fuel tank, with needle nose players. I pulled the smaller fuel line out through the fuel tank filler hole, attached the fuel filter to the smaller fuel line. I Made sure that the fuel filter was extended to the furthest end of the fuel tank bottom. Six inches in all. I then attached the smaller fuel line to the carburetor.
5) I Installed the larger fuel line, followed the same procedures as the smaller fuel line.
6) Both fuel lines where cut on an angle for easy installation. No lubricant was necessary.
7) I filled up the fuel tank with fresh fuel and oil, new air filter and spark plug. It started on the first pull. Amazing.
Read less
Parts Used:


-
Victor from SCOTTSVILLE, KY
-
Difficulty Level:Very Easy
-
Total Repair Time:15 - 30 mins
-
Tools:Pliers, Socket set
32 of 41 people
found this instruction helpful.
Was this instruction helpful to you?
Thank you for voting!
Fuel and Purge lines had disintegrated
Disassembled it and cleaned fuel tank. Cut and ran new fuel lines, installed filter and reassembled. Parts fit perfectly and got running after not running for over 20 years.
Parts Used:
-
Casper from ERATH, LA
-
Difficulty Level:Really Easy
-
Total Repair Time:30 - 60 mins
-
Tools:Nutdriver, Pliers, Screw drivers
18 of 25 people
found this instruction helpful.
Was this instruction helpful to you?
Thank you for voting!
My A/C unit quit working on the hottest day of the year! I had this A/C unit for 13 years and I just knew I'd never find a fan blade for the same make and model, so I tried to go purchase a new one but couldn't find one big enough since it was so late in the season.
After receiving the fan blade, I popped off the old one and put on the new one! The A/C unit worked like new once again!! It even blew colder air than before! The hardest part about the entire process was getting the13 year old fan blade off! I'd recommend your website to anyone looking for a part!
Thank you for all your help!!
Thank you for all your help!!
Parts Used:
-
Tracy from Morgantown, WV
-
Difficulty Level:Really Easy
-
Total Repair Time:15 - 30 mins
-
Tools:Screw drivers
14 of 19 people
found this instruction helpful.
Was this instruction helpful to you?
Thank you for voting!