This dryer drum belt (Whirlpool Dryer Belt, Drive Belt) has four ridges, three grooves and is 1/4" wide, and 92 1/4 inches in length. It comes in black and is made of rubber. The belt transfers the ro...
If your washer shakes or vibrates loudly when it reaches its max speed, check that the leveling legs are even. To ensure that the washer is firmly on the ground using all four legs, adjust the legs so...
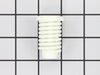
This manufacturer-certified dryer lint filter is used to collect lint during the dryer cycle, to prevent damage to the machine and to prevent lint from sticking to clothes. This model comes in white a...
This touch-up paint can be used on a wide variety of household appliances. It is most often used on washers, dryer, refrigerators, dishwashers, ranges, freezers, trash compactors, or microwaves. It is...
This part is the replacement single front panel clip for your dryer. It is made of metal and is approximately 2 inches long and ¾ inch wide. The front panel retainer clip is what holds the front panel...
This part is an electrical connector where you can attach wires. This part does NOT included the wires, screws, and nuts. Must be order separately
$18.91
In Stock
Questions And Answers for 11060222510
Ask our experts a question about this model and we'll get back to you as soon as possible!
1 question answered by our experts.
Sort by:
< Prev
1
Next >
Search filter:
Clear Filter
Your search term must have 3 or more characters.
Keep searches simple. Use keywords, e.g. "leaking", "pump", "broken" or "fit".
Sorry, we couldn't find any existing answers that matched.Try using some different or simpler keywords, or submit your new question by using the "Ask a Question" button above!
Randy
January 8, 2023
the heater element comes on but only stays hot for about 1 min then goes cold. What would cause this and what would be a good start for replacment part/parts. Im thinking thermal overload or heater element.
Thanks
Randy
For model number 11060222510
Hi Randy, thank you for reaching out. The following parts need to be checked to fix the issue: Thermal Fuse, part number PS11741460, Thermal Cut-Off Kit, part number PS334299, and Heating Element, part number PS334313. We hope this information helps! If you need help placing an order, customer service is open 7 days a week. Thanks again for your great question.
1. Removed the screws from the lint catcher 2. Removed the bolts from upper rear of dryer 3. Pried off the dryer top from the front (it rests on rear hinges) 4. Disconnected dryer door wiring 5. Removed bolt from inside upper front corners; removed front panel (be careful: the edges are sharp and the tumbler will fall
... Read morewhen it loses support) 6. Removed broken belt and lint from interior parts; removed tensioner (which had fallen out of place). Note: The newer models have a tensioner pulley; my older model had a smooth semicircle that was confusing at first glance 7. Flipped dryer onto its back (for easier reinsertion of new belt and tumbler) 8. Placed new belt on tumbler; reinserted tumbler 9. Inserted new belt through tensioner, inserted tensioner "legs" into grooves on floor. Note: The belt will pull the tensioner upright when it's inserted properly (which isn't obvious at first) 10. Made sure belt and tumbler seal were properly installed 11. Replaced parts in reverse order The process took over an hour because I couldn't figure out how to insert the belt through the tensioner. The trick is to insert the folded belt through the tensioner and onto the motor pulley. If I had to do it again, it would take about 30 minutes (including cleaning lint)
After looking on the website for advice I walked throught the simple steps of disassembling the front, removing the drum, removed the back, disconnected the wire harness. Then removed the blower housing in the back. The blower, mounted on the back side of the motor was very tight. I used a pipe wrench wedged in place and help by my 10
... Read moreyear old Grand-daughter while I used an adjustable wrench to turn the shaft on the front of the motor. Spun the blower off, removed the two clips holding the motor. Then reversed the process when I received the new motor. Care should be taken to avoid damaging the blower fan if a lot of pressure is required.
Started out taking the back off, then found online that access is from the front and much easier to get to. Simply pop the hinges in the back of the top panel and then the front of the top is popped off. From there, it is easy to remove the old belt, clean the innards (found 31 cents) and replace the new belt. It was a little disconcer
... Read moreting to see the idler pulley laying loose inside, but the diagram showed exactly how to put it back in place, with the new belt keeping it in place.