This part is a replacement screw for your oven. It is made of black metal and is sold individually. This screw is approximately 1/4 inch in diameter and about 1/2 inch in length. It is designed to con...
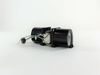
This blower motor, also known as the fan blower is supplied directly by the manufacturer for use in ovens. It is responsible for circulating hot air within the oven cavity. The blower motor helps dist...
This is an oven rack that is compatible with your range. Oven racks are designed to hold and support food items while they are cooking or baking within your oven and can also be used to cool or dry it...
We're sorry, but our Q&A experts are temporarily unavailable.
Please check back later if you still haven't found the answer you need.
2 questions answered by our experts.
Sort by:
< Prev
1
Next >
Search filter:
Clear Filter
Your search term must have 3 or more characters.
Keep searches simple. Use keywords, e.g. "leaking", "pump", "broken" or "fit".
Sorry, we couldn't find any existing answers that matched.Try using some different or simpler keywords, or submit your new question by using the "Ask a Question" button above!
Christopher
January 14, 2024
how do I start the self clean...i've misplaced the owners manual.
Thanks,
CD
For model number JTD3000SN1SS
Hi Christopher, thank you for getting in touch. Before operating the self clean cycle, wipe up the grease and soils from the oven. Remove all items from the oven other than enameled (dark color) racks. Shiny or silver racks and any cookware or other items should all be removed from the oven before initiating a self-clean cycle. Close the door. Press the Self Clean pad and a default self-clean time is displayed. The clean time can be changed to any time between 3:00 and 5:00 hours by using the number pads to enter a different time and pressing Start. For heavily soiled ovens, the maximum 5 hour clean time is recommended. If you wish to use the default time, press the Start pad immediately after pressing the Self Clean pad. The oven will turn off automatically when the self-clean cycle is complete. The door will stay locked until the oven has cooled down. After the oven has cooled down, wipe any ash out of the oven. Flat racks that are enameled, not shiny, can be left in the cavity during self clean, or can be washed with warm, soapy water. Racks may be more difficult to slide, especially after a self-clean. Put some vegetable oil on a soft cloth or paper towel and rub onto the left and right edges. We hope this information is useful!
Was this helpful?
Thank you for voting!
Patricia
March 20, 2024
We cancelled the self clean on the lower oven after 2 hours and let the oven cool while we ran errands.
Upon returning 5 hours later, the oven was making loud clicking noise. We turned off the electricity twice for a minute or so, but it continued. Turned it off completely. We will wait an hour to see if it still shows the msg. Any suggestions?
For model number JTD3000SN1SS
Hi Patricia, thank you for getting in touch. Based on the description that you have provided, we would recommend replacing the door latch assembly, part number PS12226850, to fix the issue. We hope this sorts out your problem!
It took a while to remove approx 30 screws to get to the blower. So my oven was sitting, torn apart while I waited on the new blower fan that I had ordered. It arrived shortly, about 5 days. When I opened the box I saw that PARTSELECT had sent me a drain pump instead of the blower fan that I had ordered. Since an oven does not require a d
... Read morerain pump and it wouldn't work to replace my broken blower fan I had to return it. I was told that I needed to send the part back in order to get a refund. After I sent their drain pump back at a cost of $13 they emailed me and said I didn't need to send the drain pump back. And they refunded me minus shipping So I had to pay shipping both ways for a part that was wrong. And I ordered it from someone else. I put the new blower fan that I had bought from another company in and replaced the 30 screws. And the oven has been working fine ever since. Thank you PARTSELECT for allowing me to tell people how you operate. They have a money back guarantee, but they don't give you back ALL your money. Thanks Again.
My less than 2 year double wall oven was showing a F97 on the right hand side of display screen on my oven, indicating to me it was a lower cooling fan issue. Purchased the parts after a lot of research (and a GE technician telling me over the phone it would be a 600 or more costly repair). I decided to bite the bullet and just do it mys
... Read moreelf to save money! I’m glad I did! I built a table for it to rest on after it got it out of the wall as it’s a heavy oven. I asked my dad to help me get it out and onto the stand. After that, it was a matter of getting to the lower fan through the back abs having to remove some panels. All went well and best part is this fixed it! I figure even if it goes out again in 2 years it’s still cheaper than paying a technician to do it! I’m a woman with zero background in repair but lots of determination and desire to save money! Just do it yourself!
I ordered the fan and the sensor. I had to pull the whole oven out anyway, why not replace both. Bought a piano dolly at Harbor Freight so I could set the oven on something while it was out of the hole. Make sure and remove the oven doors and racks prior to pulling it out. I was not able by myself. A neighbor had to assist. The fan and se
... Read morensor are located mid-way up the middle of the rear panel. I just take pictures with my phone as I disassemble so I have a roadmap for reassembly. Once I plugged the fan and sensor in I tested the oven while still out of the hole. I used the vegetable oil to provide a little lubrication to the runners while sliding the oven back in. Works like a charm.