This an authentic OEM 40-Watt replacement light bulb, used in a number of household appliances. It is specially designed to withstand extreme temperatures, which is why these replacement bulbs are mos...
This condenser fan motor kit is designed for use with refrigerators. This fan draws air through the condenser coils and over the compressor. It does this with the goal of cooling the warm refrigerant ...
In addition to the solenoid (115V), this kit also comes with a door strike and an ice door assembly. Please be advised the spring and roll pin are not included with this kit.
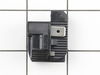
This light switch may also be known as a refrigerator door switch or a light switch kit, and is compatible with your refrigerator. The function of the refrigerator door switch is to turn on the light ...
This is a multi-use and multi-appliance screw. It can be used on a microwave, refrigerator, range/oven, air conditioner, dehumidifier, washer, or dryer. The measurements of this screw are 8 x 1/2 inch...
This valve is located behind the refrigerator. It has a 1/4" compression inlet fitting. This part is a solenoid-operated switch that, when activated, releases water from the supply line to the water ...
This is a push-on start relay for your refrigerator. It attaches to the compressor and starts it by briefly boosting it. It will then shut off as soon as the motor is up to the required speed. You may...
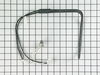
This is an evaporator fan motor for a refrigerator. The fan motor circulates air through the refrigerator to the fresh food compartment for efficient cooling. It is just over three inches long. It is ...
This is a lower hinge pin for your refrigerator door. This hinge helps your door open and close easily by allowing it to pivot. You will need to replace your lower hinge pin if your refrigerator door ...
Unplug the appliance. Removed the screws holding the back panel. Removed the fan blade. removed 3 screws holding the condenser fan. Remove the 3 metal brackets attached to the fan. (First note which studs the brackets are attached to. Attach the 3 metal brackets to the new fan. (New screws were supplied) Cut
... Read moreand strip the wire about two inches from the fan. Cut and strip the new wire. I cut the new wire in half (about 6 inches.) Connect the two wires, twist and used 2 wire nuts. Tie wrap the wire to the wire harness. Mount the new fan (three screws) Screw the back panel back on. Mount the new
I could see that a tab was broken from the round chute that opens for ice dispensing and closes to seal off freezer ice chute when not in use. With the tab broken, the round door would not shut to seal the freezer chute and dispensing water would spatter everywhere. I looked for just the round door part, but is only sold in the "Ice disp
... Read moreenser solenoid and door kit" I only had to use the round chute/flap from the kit. The instructions were easy to follow and I had the fridge back working in about 10 minutes. It took me longer to find the right star headed screwdriver that I needed to remove the Maytag star screws (5) total. Because I didn't have to replace the solenoid or the spring mechanism, this was especially easy, and now I have those parts on hand if one day I need them!!
I ordered the three parts from the diagram for my model. The new relay was not at all similar to the old one (3 connections instead of 2, new cover. Seareching for about an hour on the web I found some blogs that helped. In case anyone else asks, here is the answer. The old relay had two connections - white wire to one and 2 orange wires
... Read more to the other. The new relay had three connnection - they are numbered on the relay, attach as follows - White to #3, orange from capacitor to #2, orange from harness to #1. Blue stays with overload. I am surprised that the so-called experts had no idea what to do, but a simple homeowner was able to figure it out!! Fridge works perfectly now..